
- Introduction
- What is Multi-tenancy in VMware NSX-T?
- History of Multi-tenancy in NSX-T
- Multi-tenancy Policy Data Model to Multi-Tenancy Framework
- Dependency & Carried Services
- Multi-tenancy features & Functionality
- Conclusion
Introduction
This is my first blog 😎 and I must say, I was raised with an unwavering sense of faith and confidence. These two traits have played a vital role in shaping my outlook on life. Faith keeps me focused on my goals and keeps me believing in my ability to achieve them, while confidence fuels my drive and motivation to pursue my dreams with utmost passion. With these powerful forces propelling me forward, I feel invincible and ready to conquer any challenge that comes my way.
In this blog we will discuss about the multi-Tenancy.
What is Multi-tenancy in VMware NSX-T?
This configuration ensures that every tenant or object has its own distinct network and security settings. With this setup, a single NSX deployment can accommodate multiple tenants, which gives enterprise administrators the power to effortlessly configure and manage isolated security and networking settings for each tenant. This feature offers an indispensable level of security and control that is vital for any enterprise environment.
History of Multi-tenancy in NSX-T
NSX has long had the feature of multi-tenancy. This feature is integrated into the data plane level of NSX-T components like T0, T1, VRF, Distributed Security, and Cloud management platform. Thanks to the Multi-tenancy model introduced in NSX-T, it is now possible to configure multiple tenants on a single NSX deployment and achieve isolated security and networking configuration across tenants. This model was first introduced in NSX-T 4.0.1.1. In NSX-T 4.0.1.x, API configured functionality, and in NSX-T 4.0.1.1 UI, we can see configuration as read-only. However, in the NSX-T Version 4.1.x, the UI & API will support both functionalities, allowing multiple users in NSX to consume their objects, see their alarms and monitor their VMs with trace flow. The Enterprise Admin can segment the platform into Projects and give different spaces to different users while keeping visibility and control. With all these features, NSX provides a secure and flexible platform that can be tailored to the needs of any modern enterprise.
Multi-tenancy Policy Data Model to Multi-Tenancy Framework
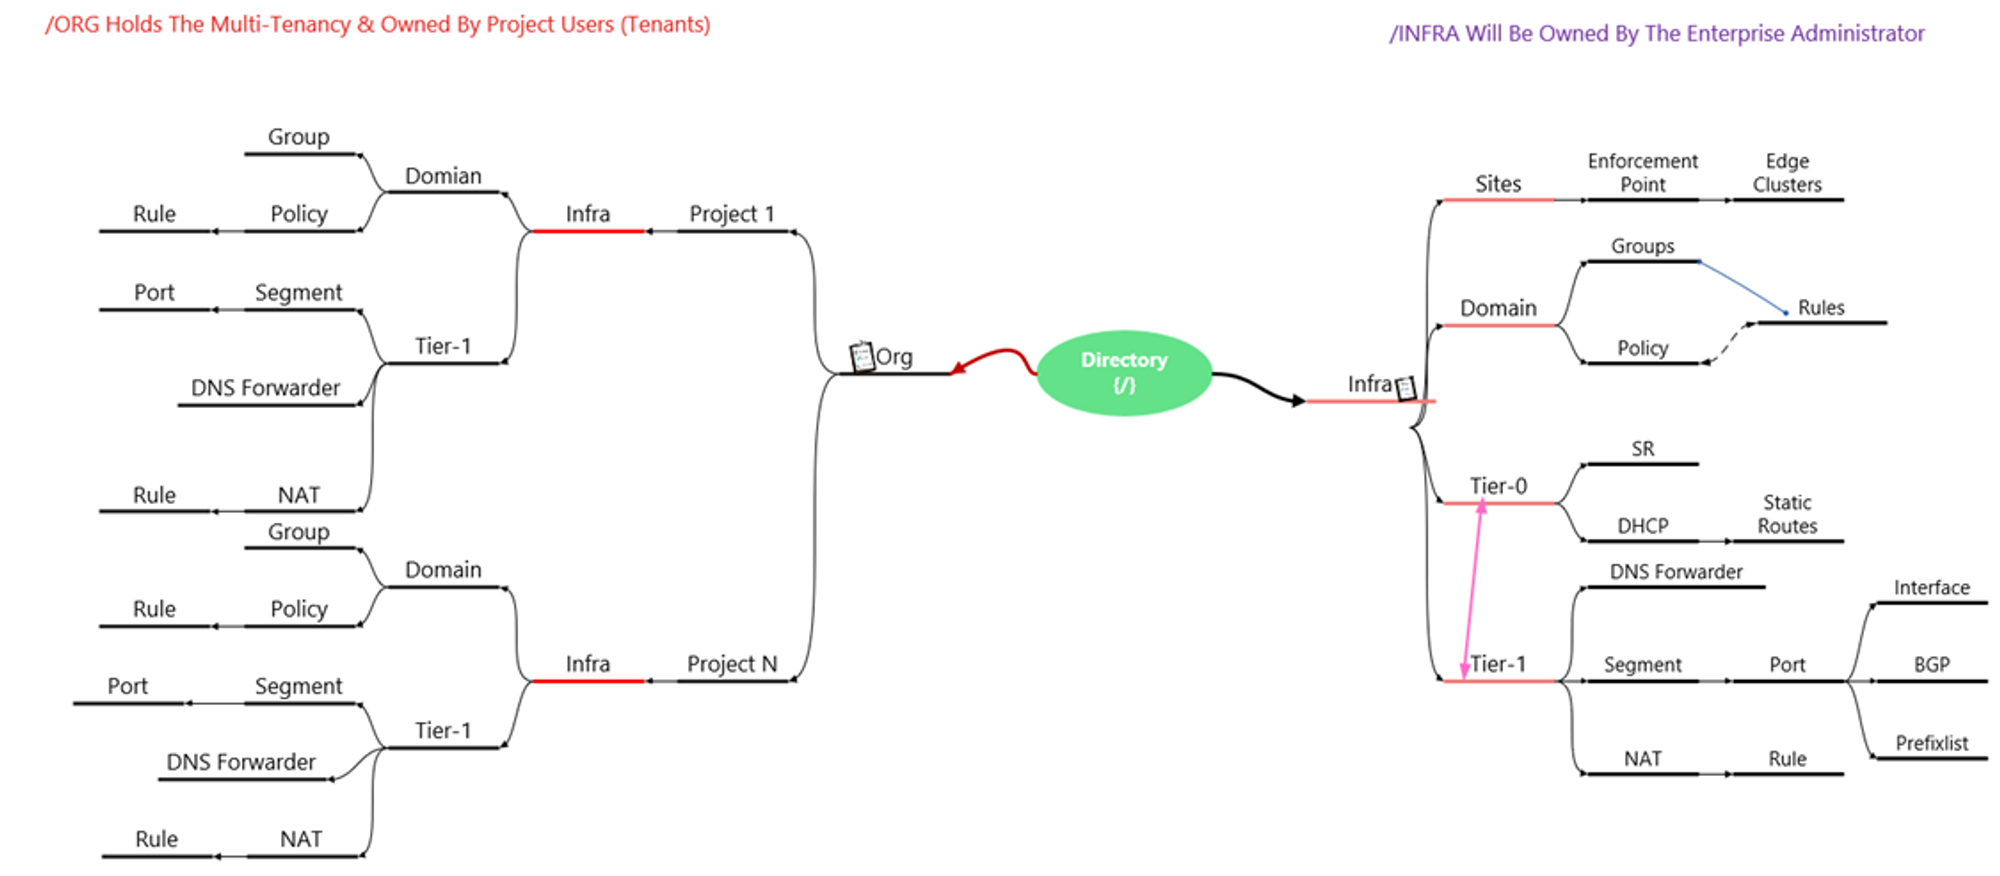
The NSX policy model follows a clear hierarchical structure that comprises two system-created branches: Infra and /org/default.
**Infra: -**is under the management of the enterprise administrator and all infra objects can be viewed under the default UI.
**On the other hand, /org/default: -**serves as a space for multi-tenancy objects. Org objects are isolated and identified by the system, but not visible in the UI.
Projects : – which are comparable to tenants, can be created to isolate security and networking objects across tenants in a single NSX deployment. The Large NSX Manager can create up to 500 projects, while the medium size can create up to 200 projects. Project A-Users, Project N-Users, and Enterprise admins can log into NSX and have their customized view. It is important to note that Project A-Users and Project N-Users cannot view each other’s configurations and are not allowed to view the configuration of the default Infra owned by the Enterprise Administrator. Configuration limits we can check here.
Capture 1:
Ideology for creating the diagram taken from the VMware Website.
This Diagram will provide the general view of flow & interactions between the Org, Infra, Objects & Projects.
Dependency & Carried Services
Dependency: – To configure the multi-tenancy via the UI, we need the VMware NSX-T 4.1.x. During creating this document am using the NSX-T version 4.1.0.2.
Carried Services: –
Note: – Project-A is the Project Name.
- Networking: –
Always ensure that when working on a project, the networking features are kept separate from other projects. This approach makes everything organized and easy to manage. I connect Tier-1 gateways and segments to the tier-0 gateways specifically assigned to each project. Proper connection maintenance is crucial to prevent any issues in the future. With the latest version 4.1.0, any segments created within a project automatically become part of the default transport zone assigned to that project, making the process smoother and more efficient.
Capture 2: –
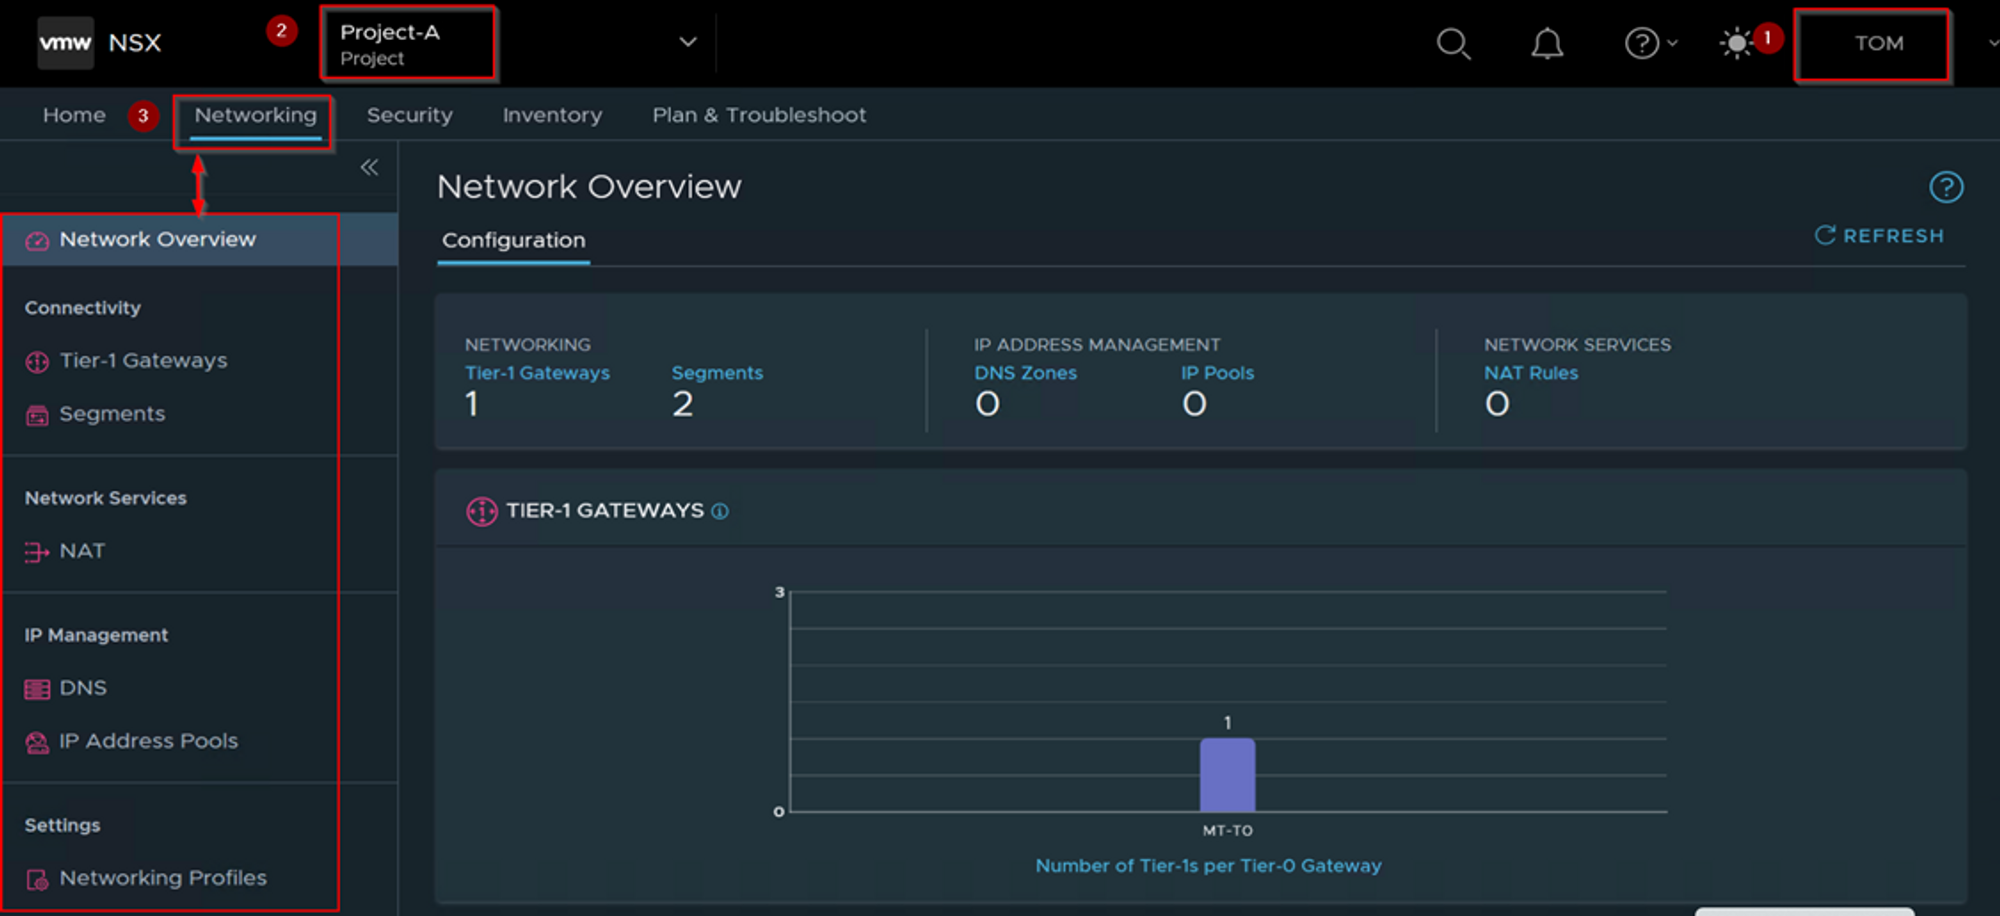
Step 1: – login as a Project Administer of the Associated Project. As per the capture 2 User “TOM” role assigned as a Project Administer.
Step 2: -Under the Projects we can see the project name. As per the Capture-2 we can see the Project-A.
Step 3: – Click on Networking TAB to configure the network services and components.
- Security: –
Users have the power to create their own distributed firewall policies, ensuring the seamless traffic flow between the east and west sides of the project. These policies and rules are solely applicable within the project, leaving no impact on any workloads outside of it. This feature promotes unparalleled flexibility and customization in managing network security within a project, all while maintaining the safety and security of other areas.
Capture 3: –
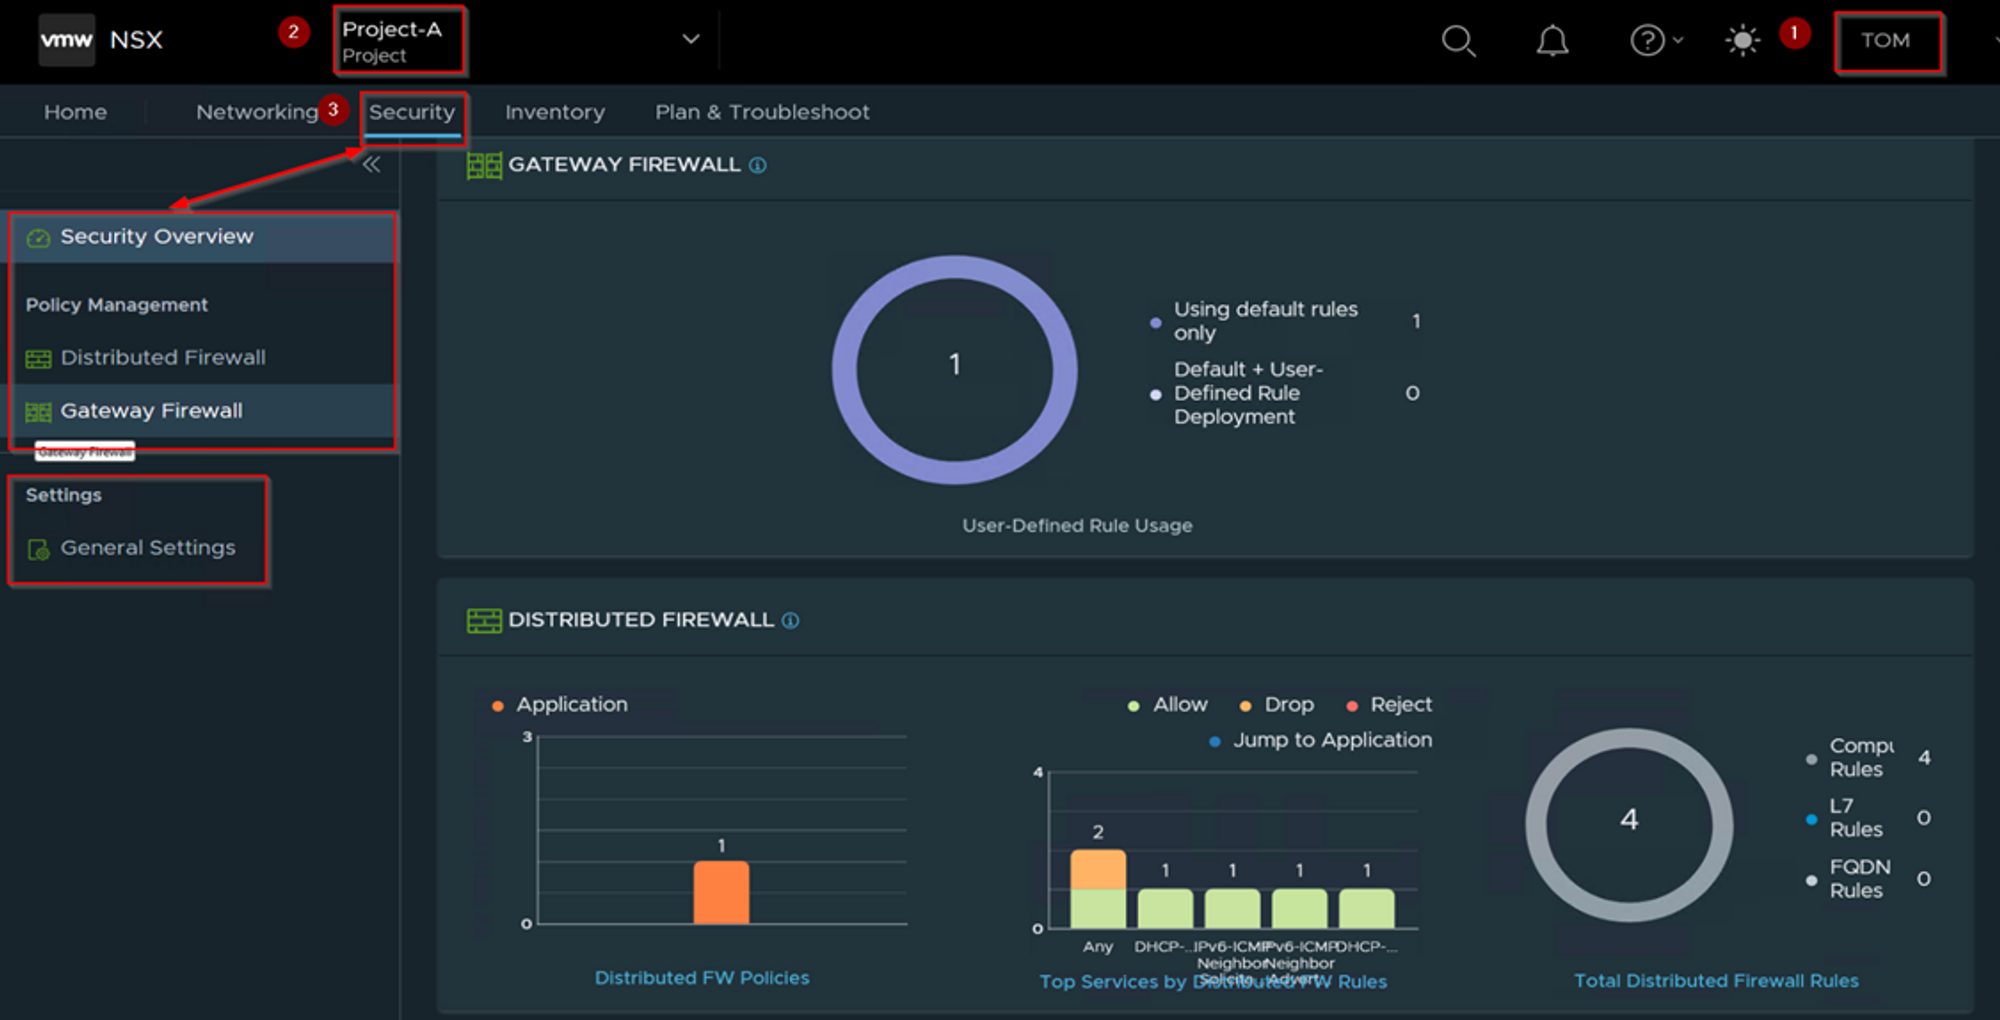
Step 1: – login as a Project Administer of the Associated Project. As per the capture 3 User “TOM” role assigned as a Project Administer.
Step 2: -Under the Projects we can see the project name. As per the Capture-3 we can see the Project-A.
Step 3: – Click on Security TAB to configure the Security Components. Under general Settings we can also see the Firewall options (Session Timer, Flood Protection, DNS Security).
- Inventory: –
As a skilled project administrator, you possess the expertise to configure various aspects of the NSX inventory flawlessly. You have the power to customize services, groups, context profiles, virtual machines, and tags to suit your specific requirements. By utilizing this exceptional feature, you can optimize the inventory’s organization and enhance your productivity. So why wait? Take charge today and make the most of this exceptional tool to streamline your workflow like a pro!
Capture 4: –
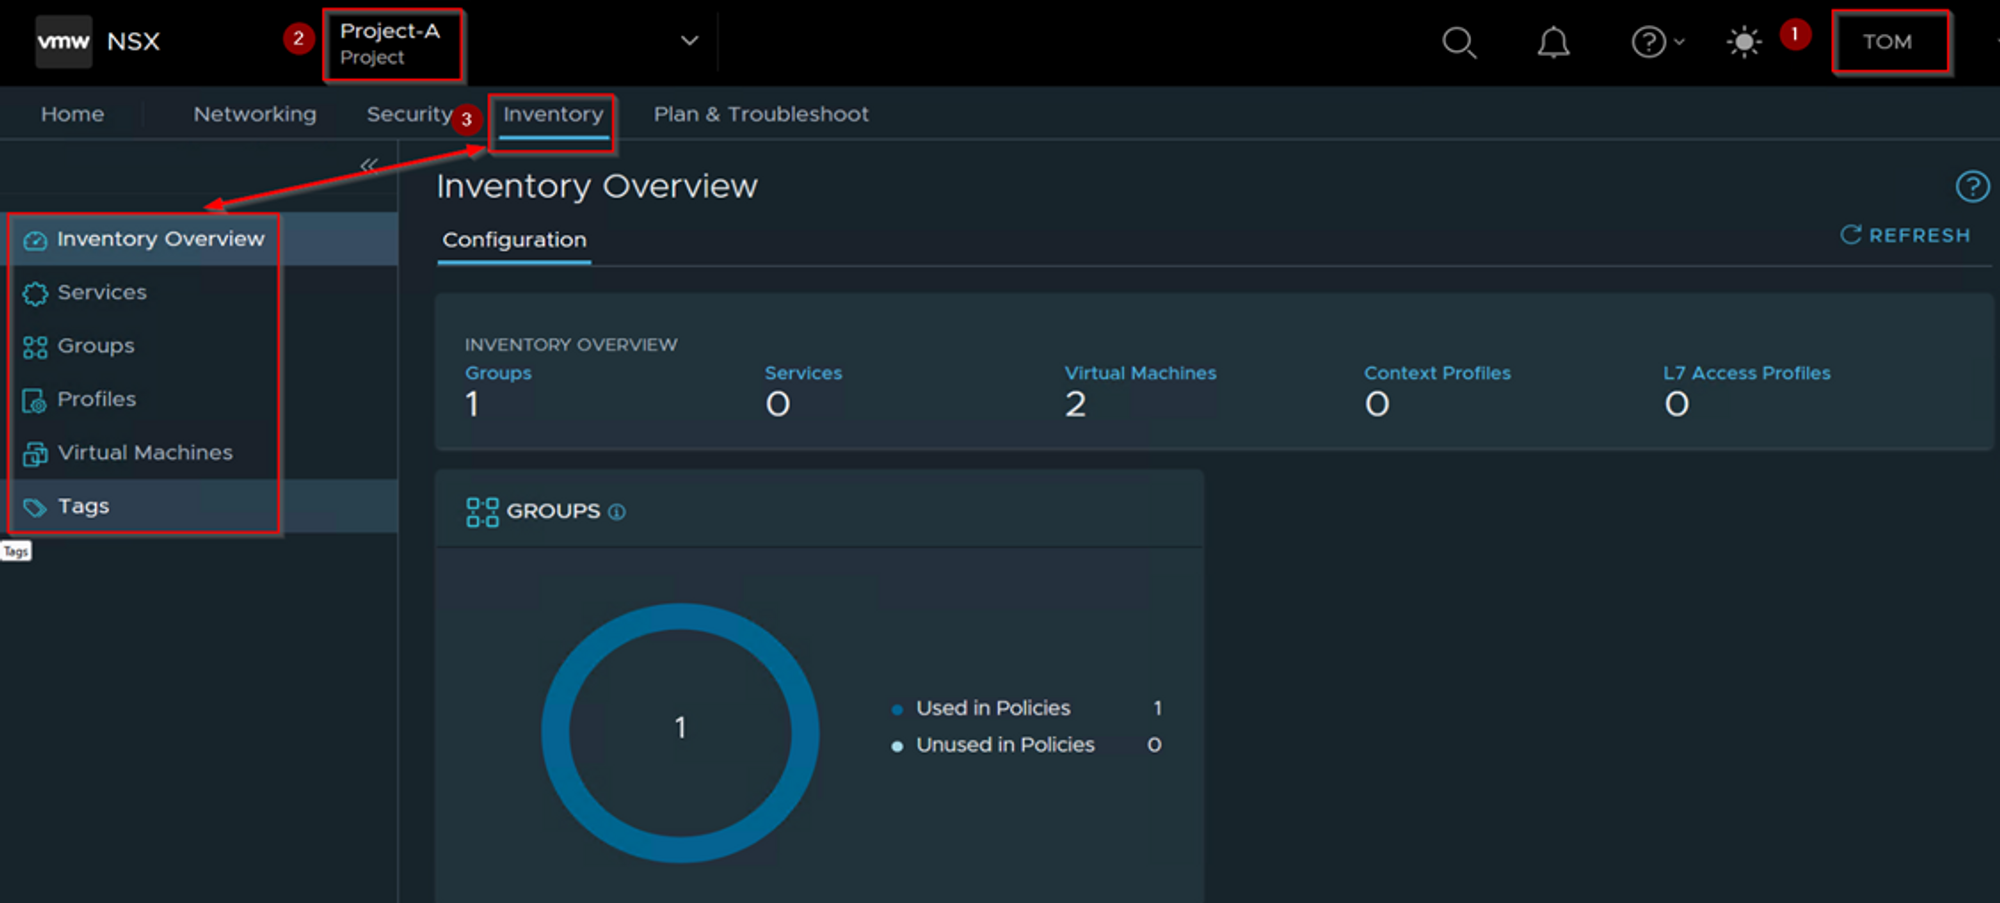
Step 1: – login as a Project Administer of the Associated Project. As per the capture 4 User “TOM” role assigned as a Project Administer.
Step 2: -Under the Projects we can see the project name. As per the Capture 4 we can see the Project-A.
Step 3: – Click on Inventory TAB to configure the inventory Components.
- Plan & Troubleshoot: –
As the project administrator, you’ll have complete visibility to closely monitor, effectively debug, and efficiently troubleshoot the network traffic of your project. Additionally, you’ll be able to access and view alarms that have been raised specifically for your project. It’s important to keep in mind that while the enterprise administrator can view alarms within the default space and across all projects, as a project administrator, you’ll only be able to view alarms that are specific to your project.
Capture 5: –
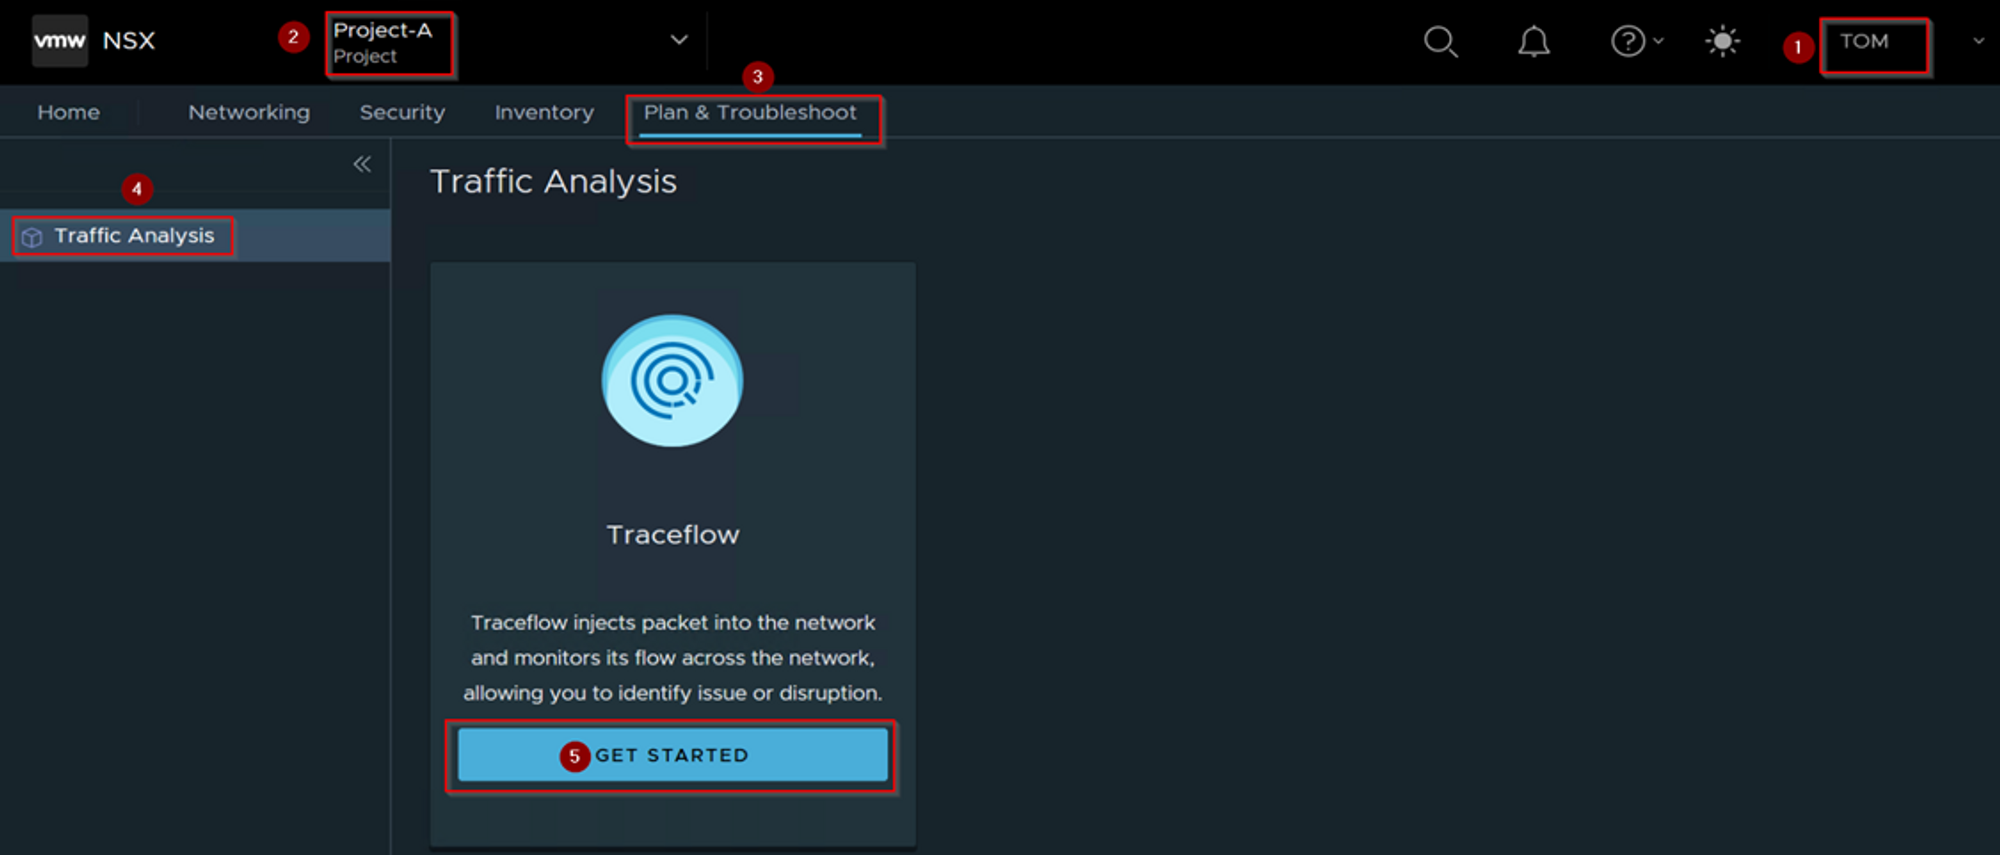
Step 1: – login as a Project Administer of the Associated Project. As per the capture 5 User “TOM” role assigned as a Project Administer.
Step 2: -Under the Projects we can see the project name. As per the Capture-5 we can see the Project-A.
Step 3: – Click on Plan & Troubleshoot TAB
Step 4: – Click on Traffic Analysis
Step 5: – Click on “get started” to monitor & troubleshoot the objects & services.
Multi-tenancy features & Functionality
NSX 4.1.0 enables multi-tenancy consumption from the UI for the Enterprise Admin (Provider) and the Project users (Tenants).
Capture 6: –
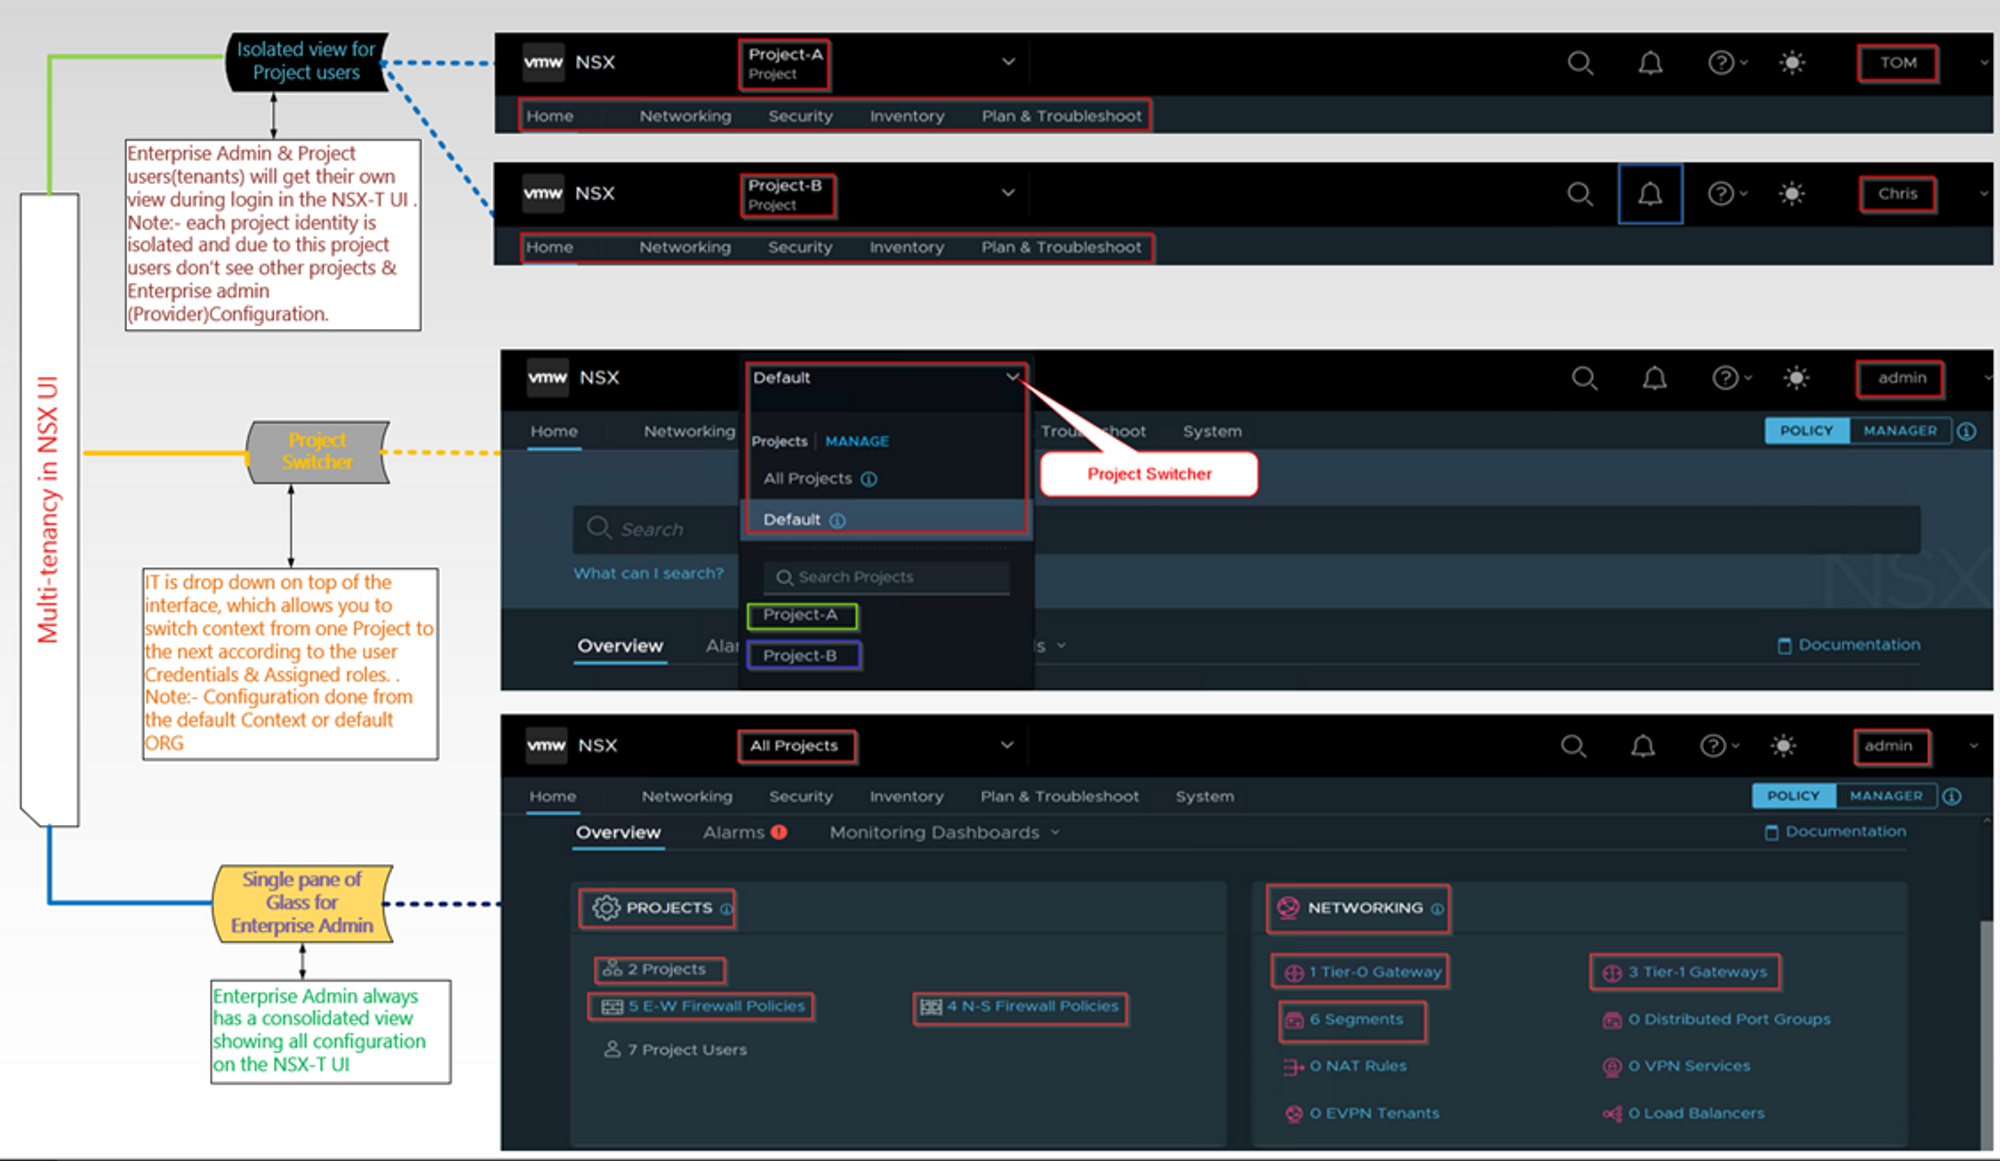
There are lot of features are available under the projects. Feature of projects seen here.
Conclusion
Thank you for taking the time to read this!
I am eagerly anticipating the release of part 2, where I will gain more insight into creating projects and users with topology diagrams, configuring resource sharing, and setting up quotas. With this guide, I am confident that I will be able to optimize efficiency and organization in project management.

Leave a comment