
- Securing vSphere
- How Permission works in vSphere
- The best practices for vCenter access control
- Conclusion
Securing vSphere
Securing vSphere is critical and involves protecting the vCenter system, ESXi hosts, VMs, and the vSphere network. The environment comes with built-in security features like authentication, authorization, and firewalls, but you can customize them to suit your requirements. You can secure different vSphere objects and use vCenter Single Sign-On and the vCenter Server permission model to protect your vSphere environment.
It is crucial to keep in mind that all services associated with vCenter Server instances must be protected when securing a vSphere environment. This means in some environments, several vCenter Server instances must be protected.
Roles in vSphere define permissions that can be assigned to users or groups at different levels in the vSphere hierarchy. Assigning permissions carefully can ensure that users have the necessary access to perform their duties while minimizing the risk of security breaches or accidental changes.
How Permission works in vSphere
Capture1: –

Global permissions confer a user or group with the privilege to view or manage all objects in each of the inventory hierarchies of the solutions deployed. In other words, global permissions are applied to a global root object that spans solution inventory hierarchies. These permissions are replicated across the vCenter Single Sign-On domain (vsphere.local by default). It is important to note that global permissions do not provide authorization for services managed through vCenter Single Sign-On domain groups.
1.You assign a global permission at the root object level with “Propagate to children” selected.
2. vCenter Server propagates the permissions to the vCenter Server 1 and vCenter Server 2 object hierarchies in the environment.
3. A local permission on the root folder on vCenter Server 2 overrides the global permission.
4.Select the object to which you want to apply the permission in the vCenter Server object hierarchy.
5. Select the group or user that should have privileges on the object.
6. Select individual privileges or a role, that is a set of privileges, that the group or user should have on the object.
- Let’s see how we create a role and assign to an object.
Capture 2: –
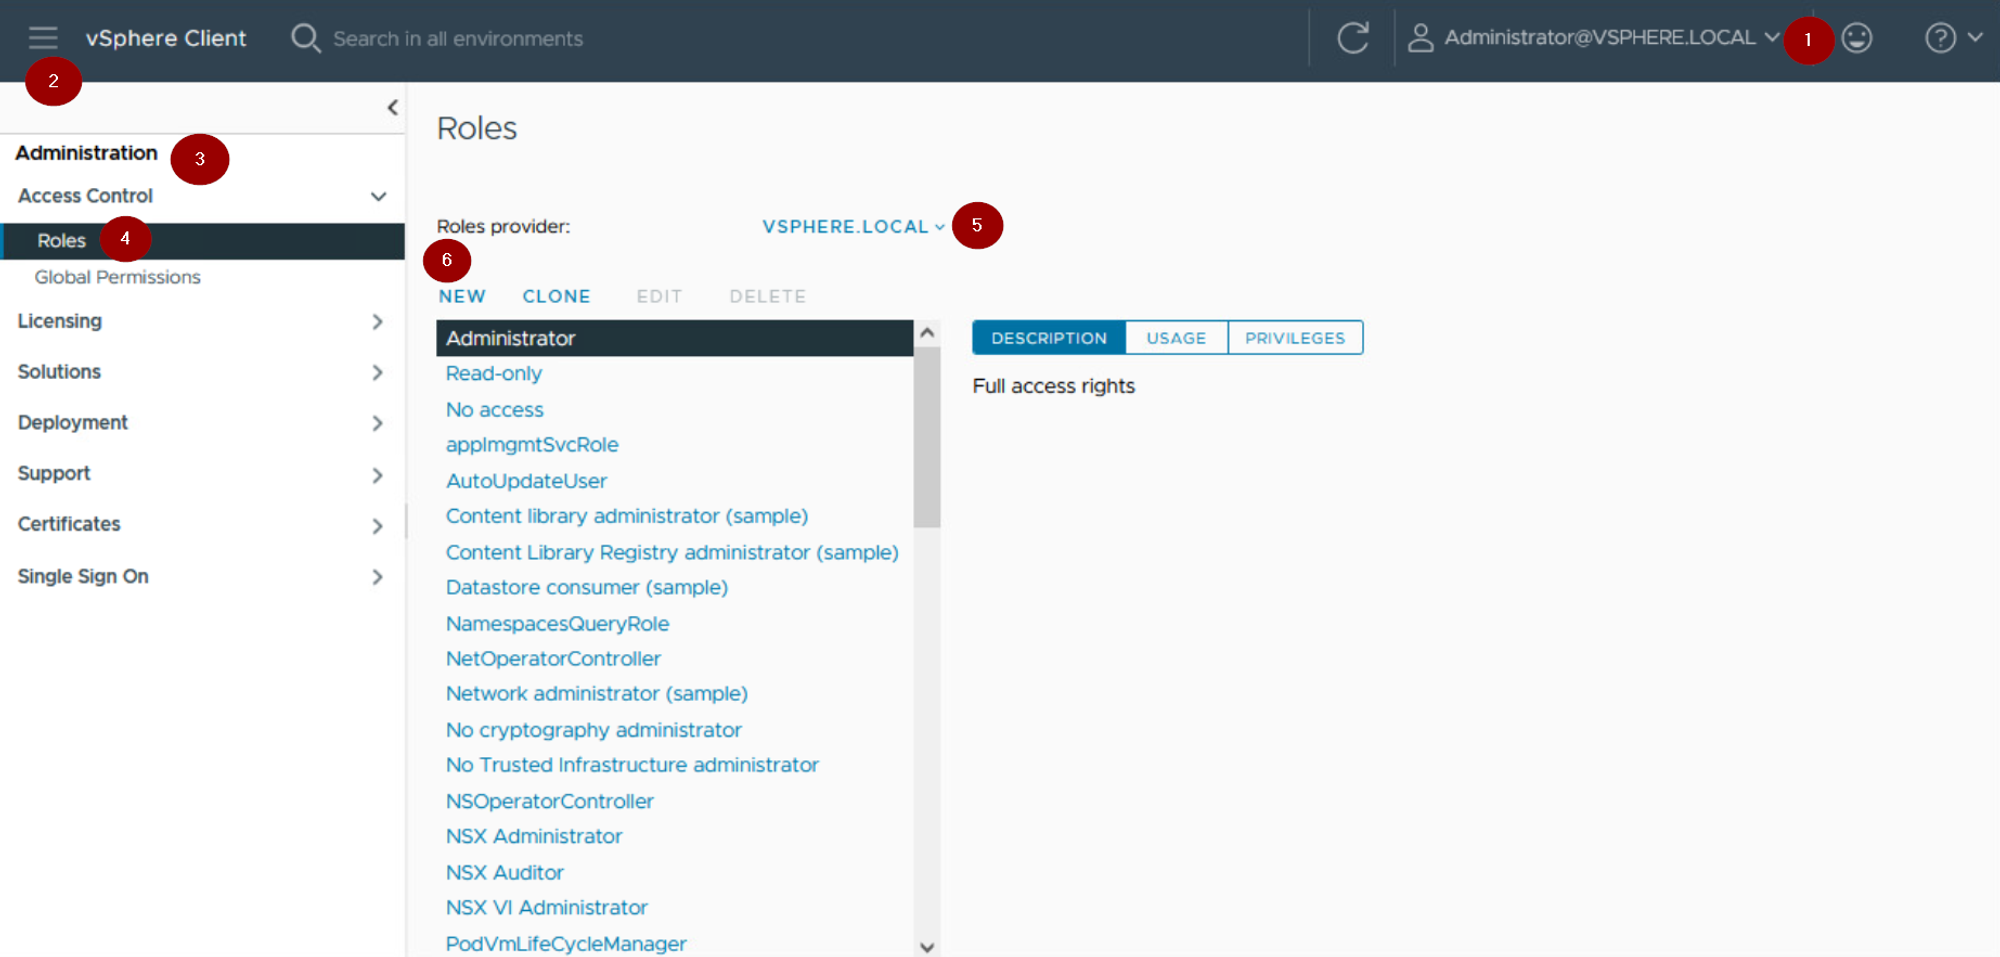
Step1 :- Login to vSphere client as an administrator privileges.
Step 2:- Click on Menu.
Step 3: – Click on Administration.
Step 4: – Click on Roles under access control.
Step 5: – Click on Role Provider. In this example we are using the default —vsphere.local.
Step 6: – Click on New
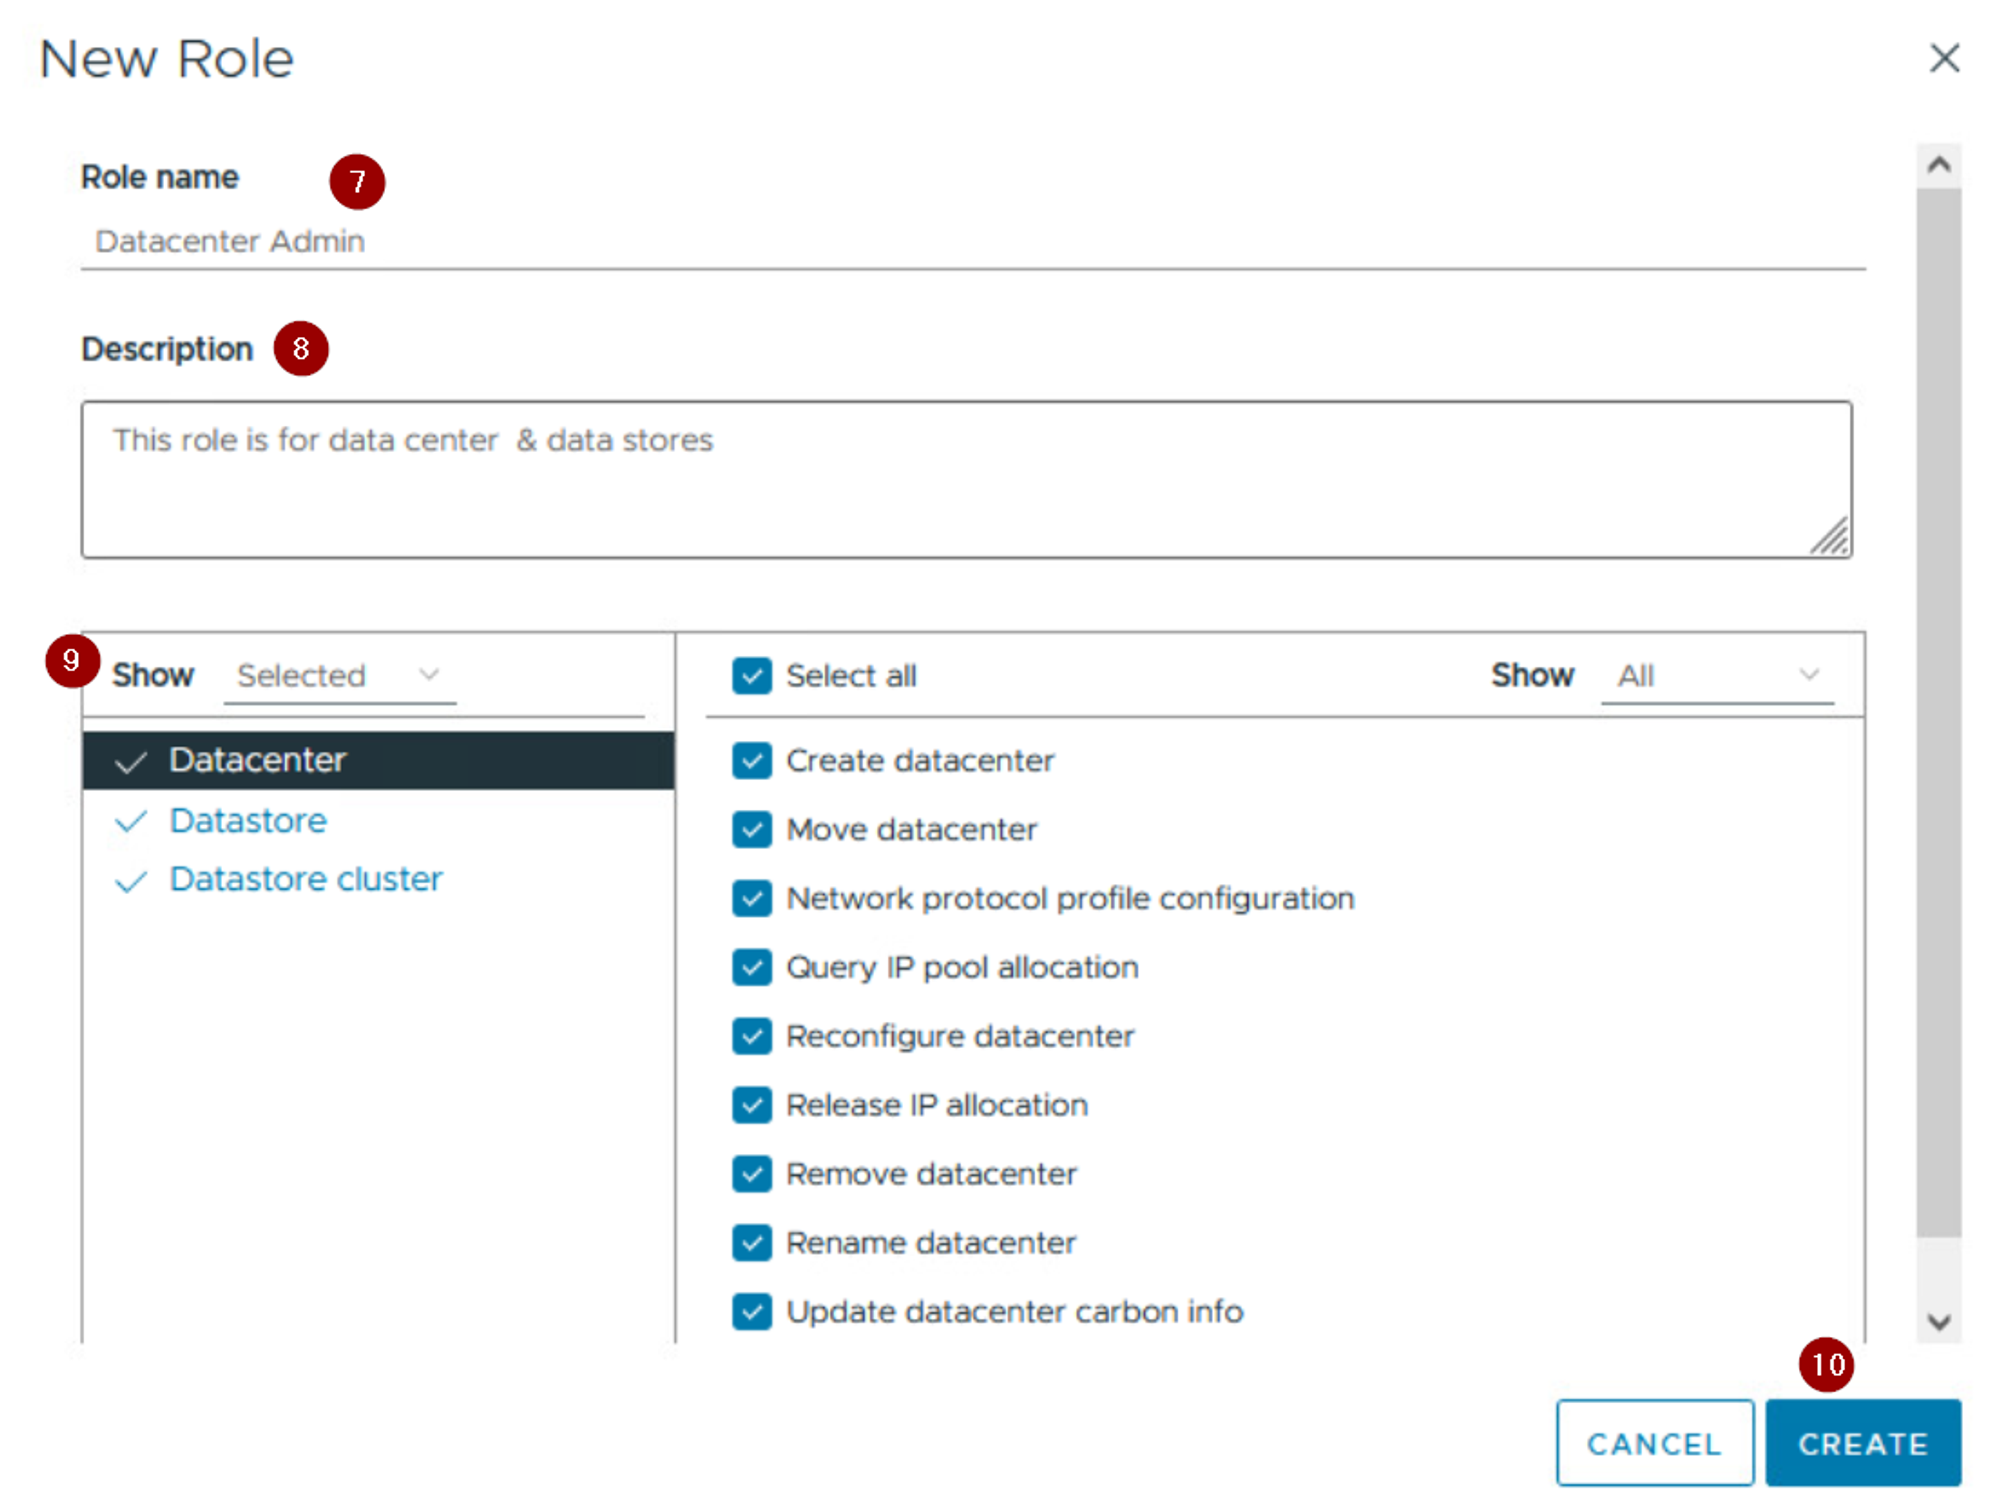
Step7: – Give the name of the role. In this example we are using Datacenter Admin
Step 8: – Give the Description of the Role
Step 9:- Select the Roles
Step 10: – Click on Create.
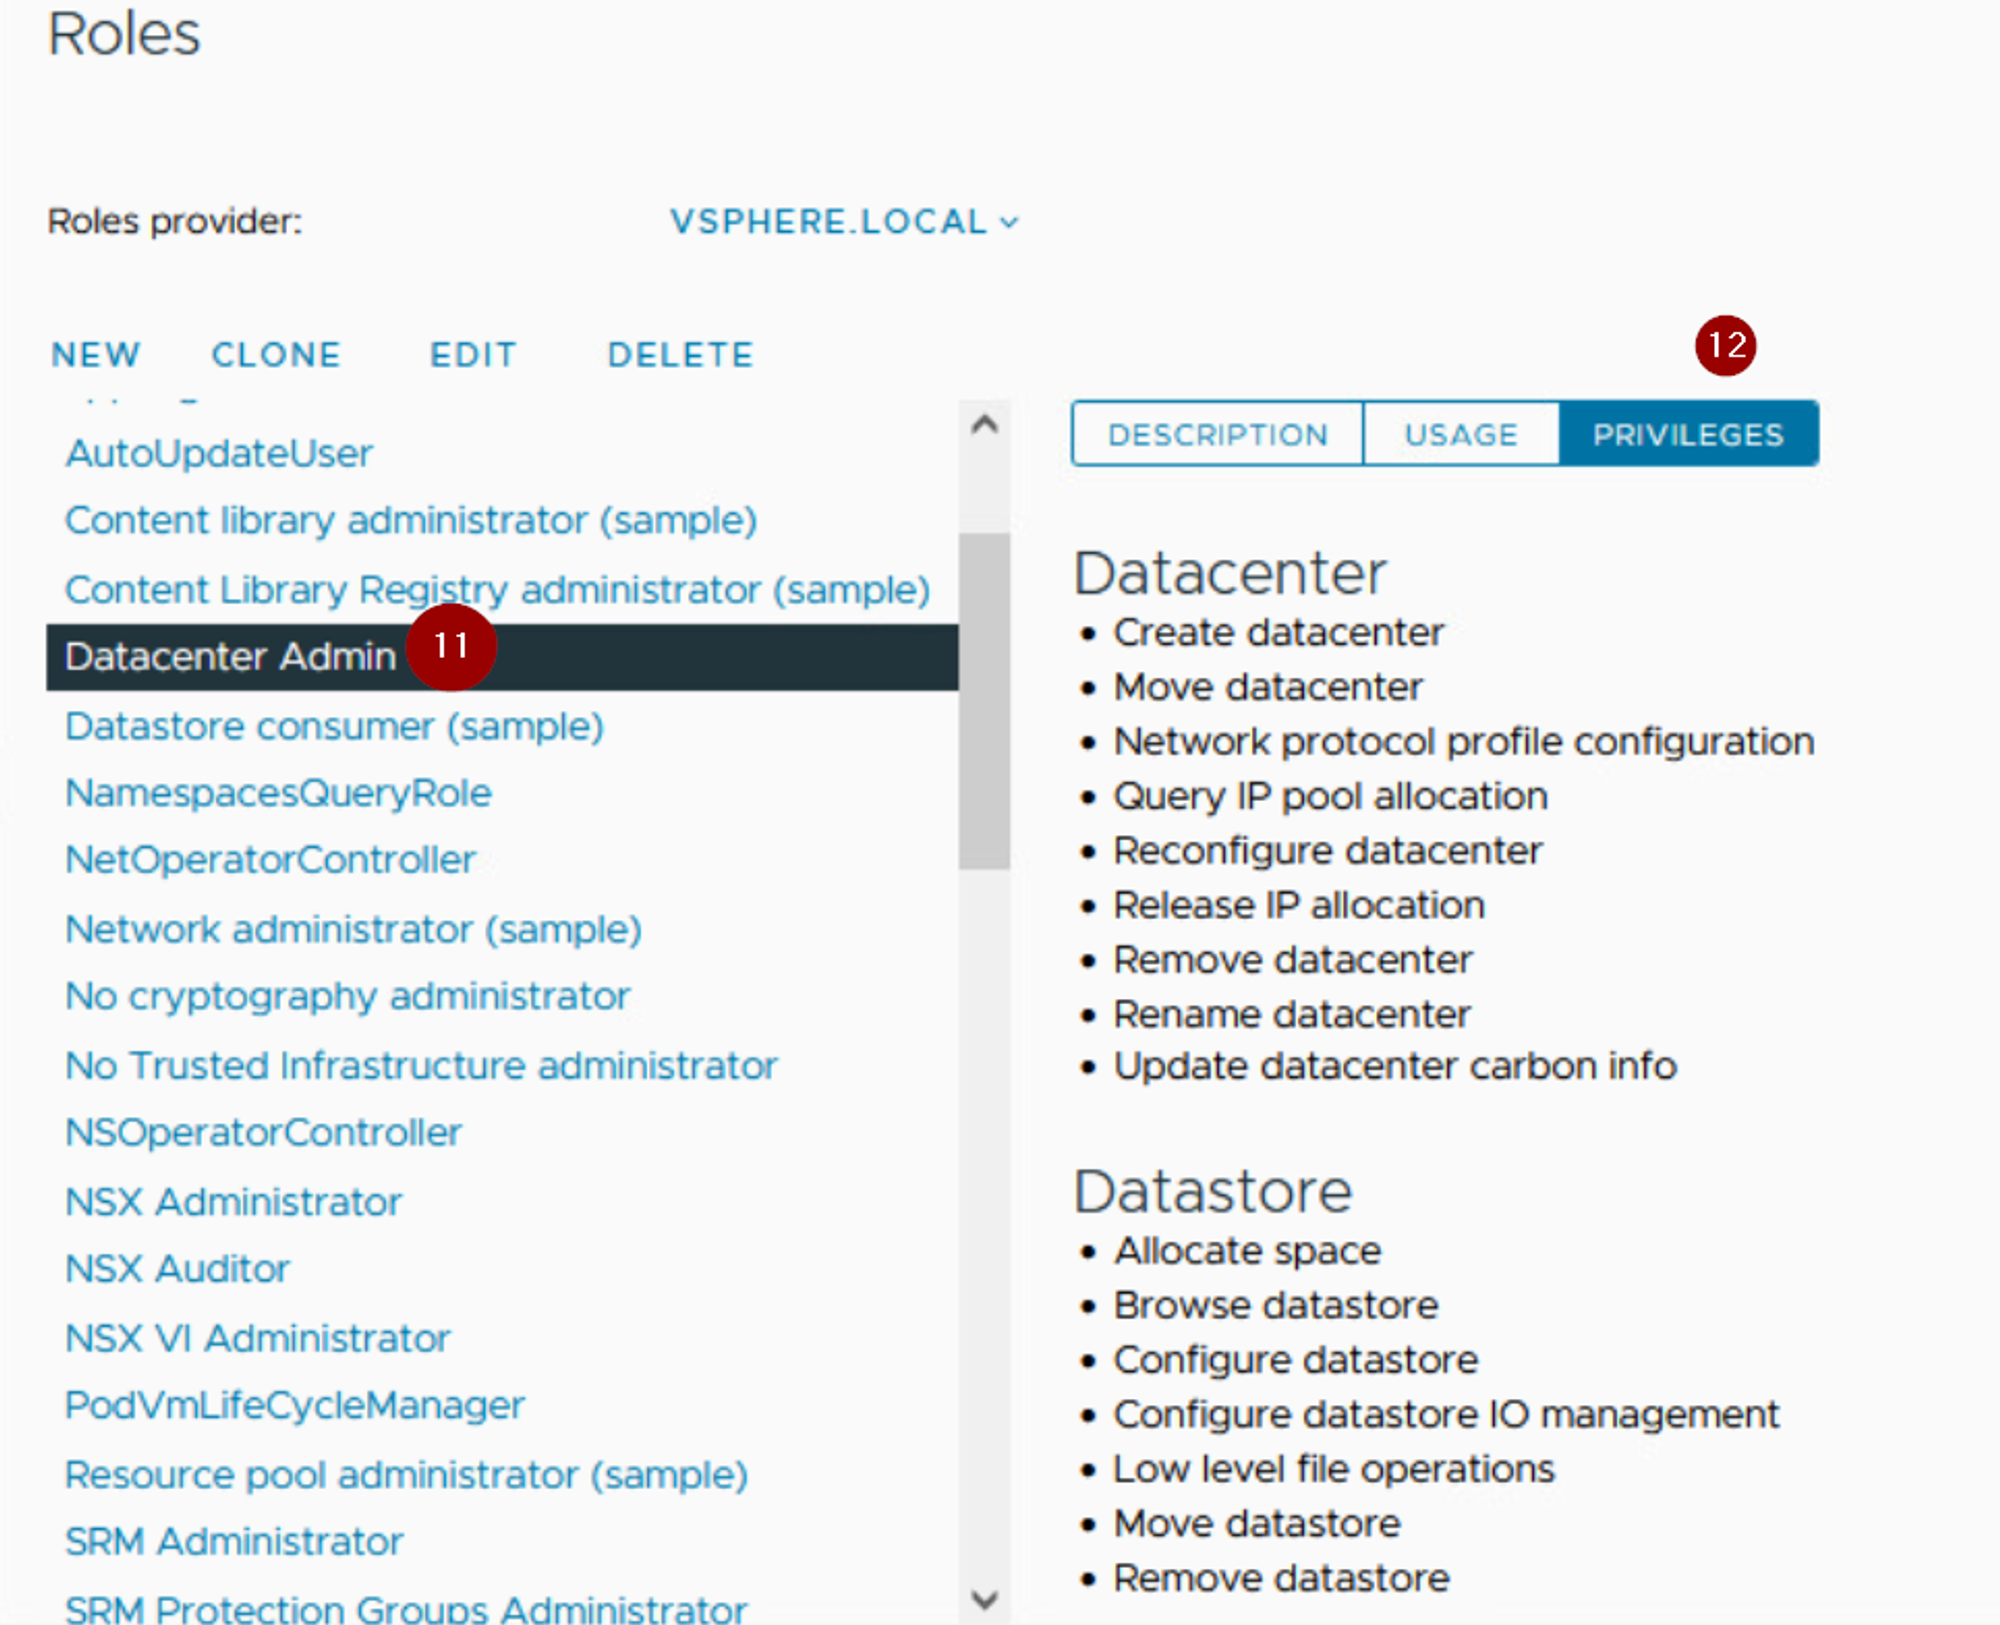
Step 11: – We can see the newly created role —Datacenter Admin
Step12: – We can also see the privileges under the created role.
2. Let’s see how we assign a permission & also assign a role to user group for that object.
Capture 3: –
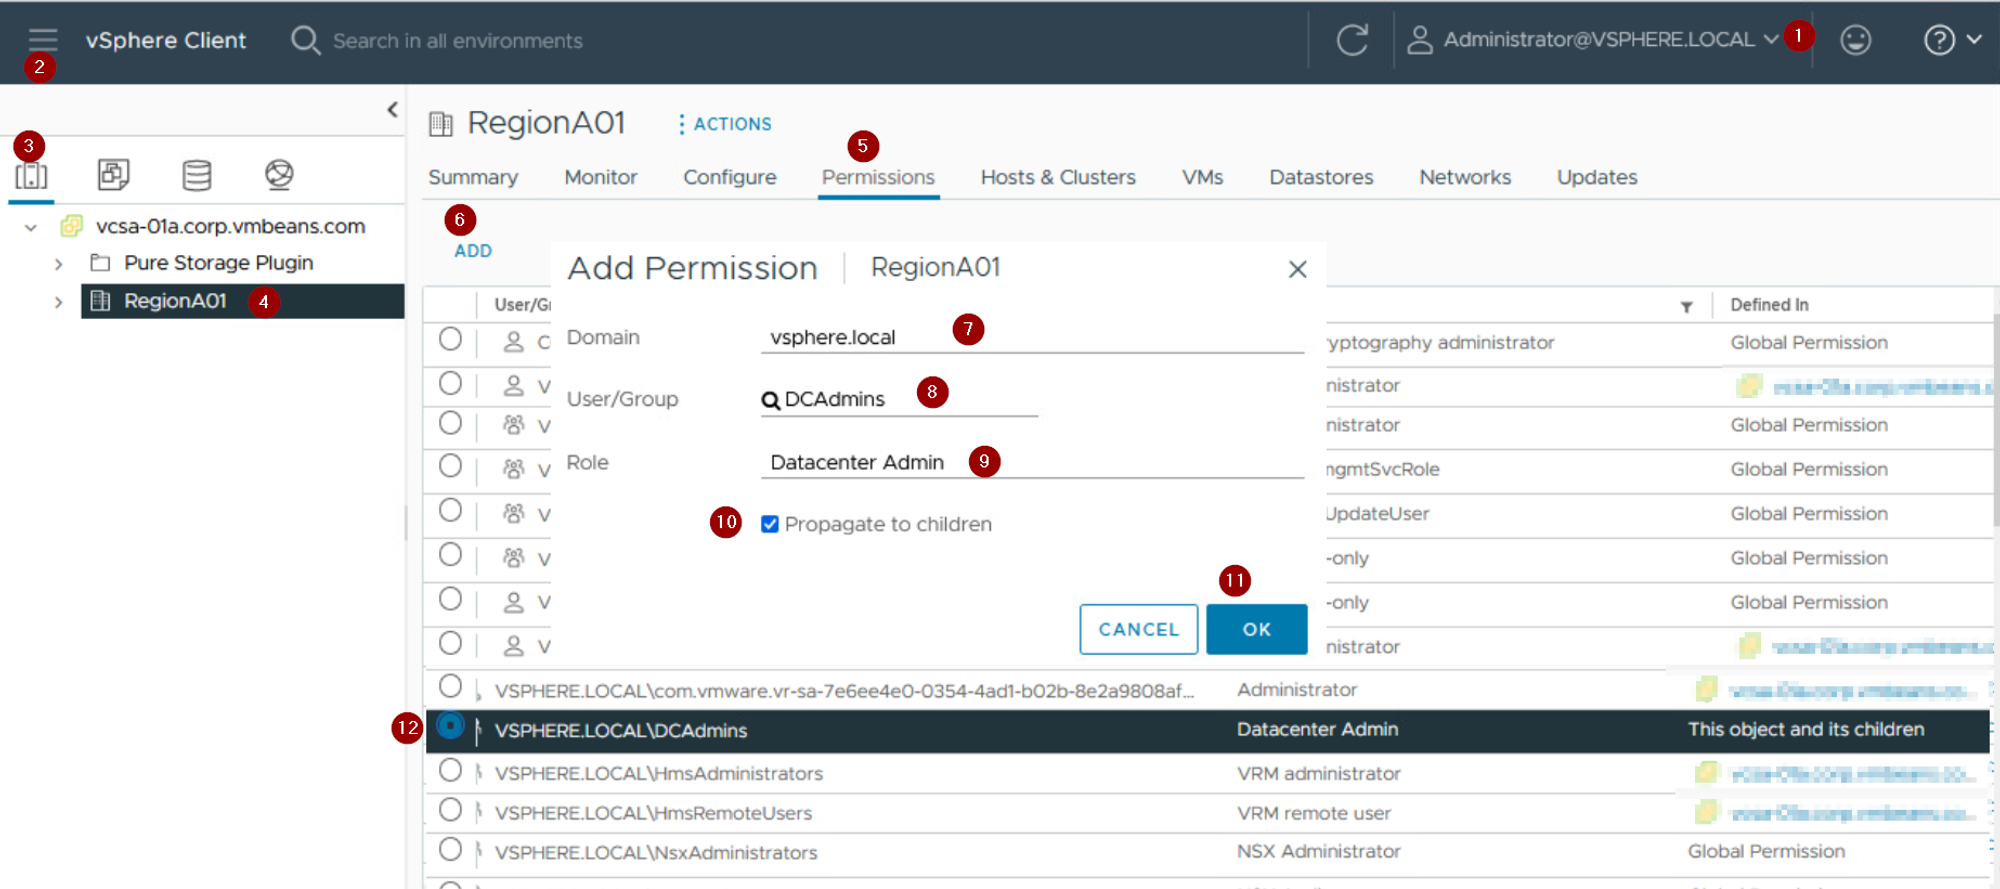
Step1 :- Login to vSphere client as an administrator privileges.
Step 2:- Click on Menu
Step 3: – Click on host & clusters
Step 4:- Click on Datacenter. As per capture we are given RegionA01.
Step 5: -Click on Permissions
Step 6: – Click on ADD.
Step 7: – Select the Domain from the drop down.
Step 8: – Select the User/Groups. As per capture we have selected DCAdmins
Step 9: – Select the role. As per capture we have selected Datacenter Admin
Step 10: – Check the box in front of Propagate to children. (Roles are not inherited to the users or groups in the hierarchy if we are not selecting this option ).
Step 11: – Click on OK.
Step 12:- We can see the Permissions added to display under the Permissions tab.
3. Let’s see how we assign a global permission.
Capture 4: –
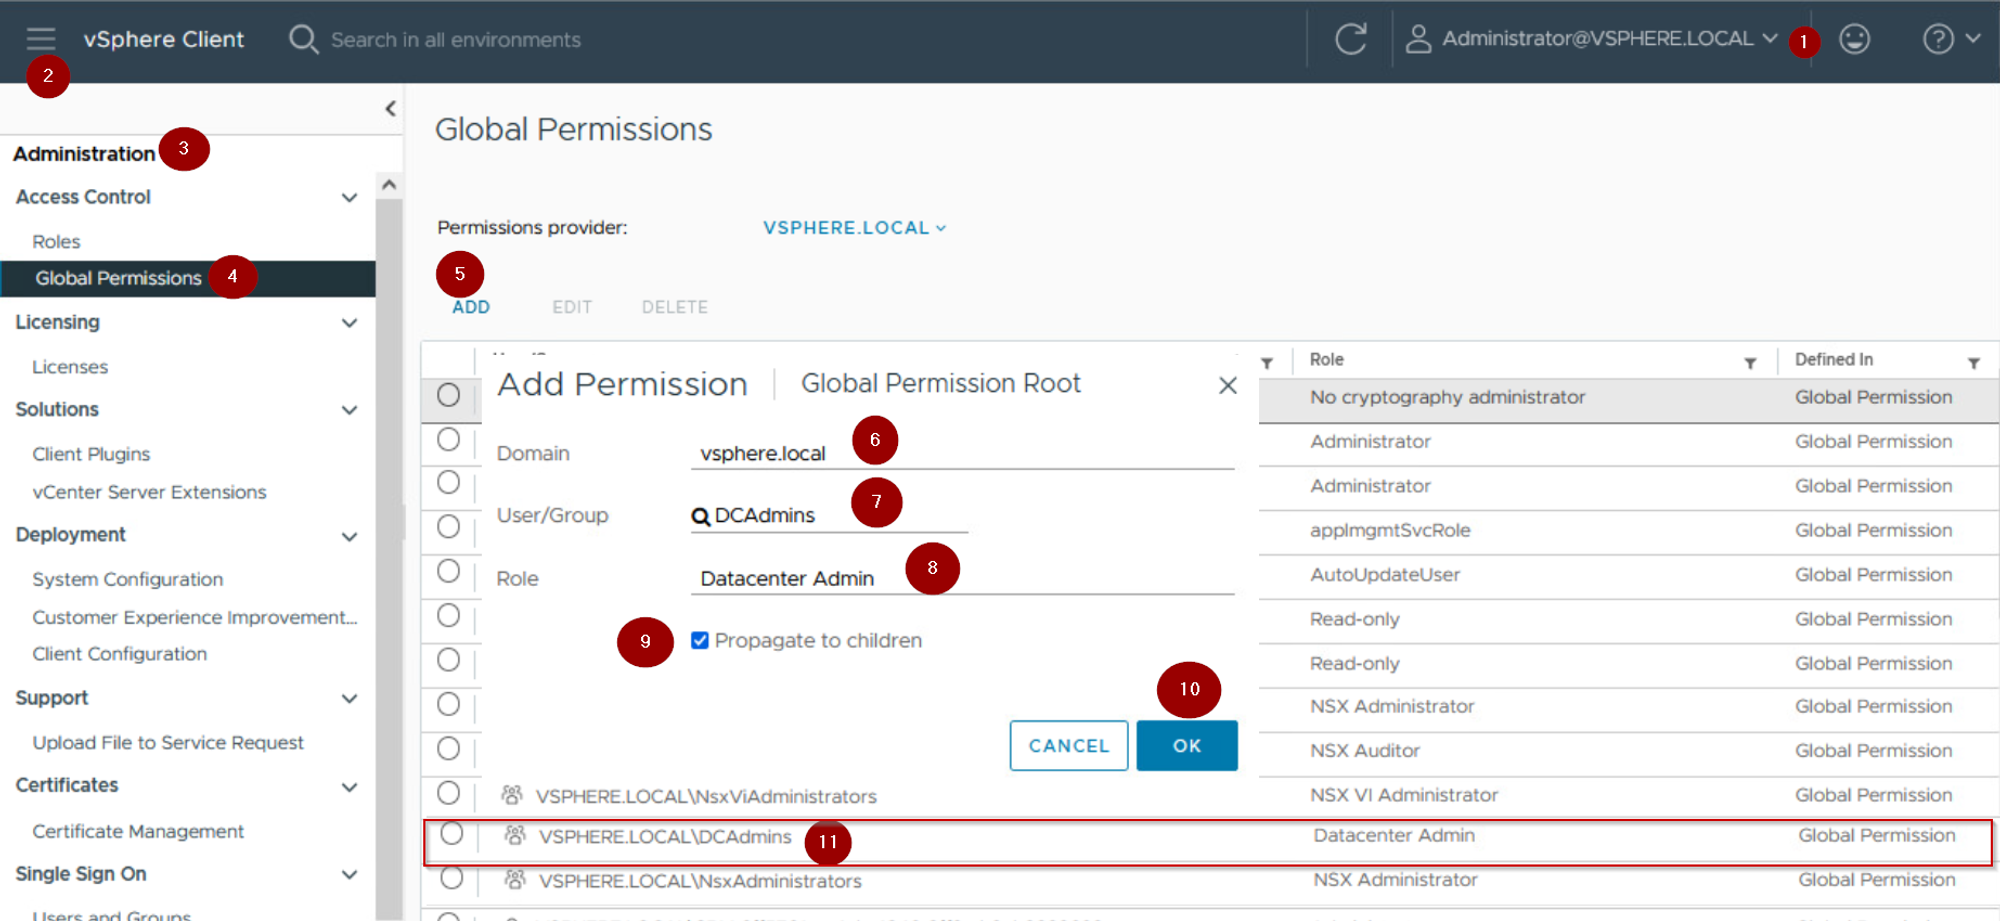
Step1 :- Login to vSphere client as an administrator privileges.
Step 2:- Click on Menu
Step 3: – Click on Administration
Step 4:- Click on Global Permission under the Access Control.
Step 5: -Click on ADD
Step 6: – Select the Domain from the from drop down.
Step 7: – Select the User/Groups. As per capture we have selected DCAdmins.
Step 8: – Select the role. As per capture we have selected Datacenter Admin
Step 9: – Check the box in front of Propagate to children. (Global Permissions are not inherited to the users or groups in the hierarchy if we not selecting this option ).
Step 10: – Click on OK.
Step 11: – We can see the Global Permissions added to display under the Permissions tab.
The best practices for vCenter access control
- Best Practices for vCenter Access Control
- Use named accounts and grant the Administrator role only to accounts that are required to have it.
- Monitor the privileges of vCenter users.
- Restrict datastore browser access to users who genuinely require that privilege.
- Instruct users of the vSphere Client to never ignore certificate verification warnings.
- Configure custom roles to ensure that users only have the privileges that they require.
- Set the strict vCenter password policy.
- Limit vCenter network connectivity by putting the vCenter system only on the management network.
- Restrict Internet access for vCenter.
- Assigning vCenter Administrator Role and Datastore Privileges
- Keep in mind the role of vCenter root user and always remember it does not have administration rights.
- The vCenter Administrator role is assigned to a select number of named vCenter administrator accounts.
- Emphasize the importance of assigning the Browse Datastore privilege only to users or groups who genuinely require the privilege.
- The users with the privilege can view, upload, or download files on datastores associated with the vSphere deployment through the vSphere Client.
- Certificate Verification and Password Policy
- Remember the importance of verifying vSphere Client certificates.
- Emphasize how without certificate verification, the user might be subject to man-in-the-middle attacks.
- The vCenter automatically changes the vpxuser password every 30 days by default.
- Emphasize how this frequency can be changed in the vSphere Client.
- Setting a strict vCenter password policy can further increase security.
- Restricting Network Connectivity
- Limiting vCenter network connectivity by putting the vCenter system only on the management network can increase security.
- Emphasize the importance of ensuring that vSphere management traffic is on a restricted network.
5. Similarities between securing physical and vSphere networks
- Securing physical switches to prevent unauthorized access
6. Unique characteristics of securing vSphere management networks
- Securing standard switch ports and vSphere distributed switches
1. Rejecting promiscuous mode
2. Rejecting MAC address Changes
3. Rejecting forged transmits.
- Use of physically isolated
- Use of VLANs
7. Importance of creating and installing vCenter instance on management network
- Reasons to avoid putting vCenter system on production or storage networks
- Reasons to avoid putting vCenter system on network with access to the Internet.
8. TLS in vSphere
- TLS 1.2 cryptographic protocol in vSphere version 8.x
- Removal of support modules for TLS 1.0 and 1.1
- Importance of using TLS 1.2 for better communication.
9. Communication between ESXi and vCenter
- Communication takes place on TLS 2
- Need for other component services to use TLS 1.2 for better communication.
10. vSphere Compliance with FIPS-140-3
FIPS 140-3 is a standard for encrypted data by US and Canadian governments. vSphere 6.7 performs cryptographic operations in FIPS 140-3 mode by default. FIPS-validated cryptography can be activated on vSphere 7.0 Update 2 and later. When FIPS 140-3 mode is activated, vSphere uses only compliant cryptographic modules. However, it’s not compatible with third-party tools that don’t enable cryptographic modules.
Conclusion
Thanks for reading. Roles in vSphere define permissions assigned to users or groups at different levels in the hierarchy. Assigning permissions carefully can ensure necessary access while minimizing risks. Follow best practices to achieve this goal. The knowledge gained through this process is worth the dedication and effort invested. We would like to extend an invitation to stay informed about our upcoming topic, which we are positive will be equally enlightening.

Leave a comment