
- Overall Series Introduction
- What is Memory Tiering Over NVMe?
- How Does This Intelligent System Work?
- Who Should Care? Ideal Use Cases
- Key Conceptual Steps for Host Configuration
- Pre Validation of Host Configuration
- ESX host into Maintenance mode
- Delete the Partition of NVMe
- List the NVMe devices on the ESX host
- Verify the NVMe device has a tier Partition or not
- Create the tier partition on the NVMe device
- Reverify the NVMe device has a tier Partition created
- Verify the status of memory tiering on host
- Activate Memory Tiering at Host level
- Deactivate Memory Tiering for an ESX host
- Conclusion
Overall Series Introduction
- Problem/Solution Introduction: Briefly re-introduce Memory Tiering over NVMe as a solution to escalating memory demands, emphasizing its role in extending effective memory capacity beyond physical DRAM.
- Series Purpose: Explain that this multi-part series will delve into the practical aspects of activating and managing vSphere Memory Tiering in different deployment contexts: single host, clustered environments, and vSAN integrated setups.
- Disclaimer: This series provides conceptual deployment guidance. Specific implementation details (e.g., commands, UI) are version-dependent. Always consult official VMware documentation for your vSphere 9.x release.
Contemporary applications, including large-scale databases, AI/ML workloads, and Virtual Desktop Infrastructure (VDI), exhibit escalating memory consumption. While direct DRAM capacity expansion is a primary solution, it frequently entails significant capital expenditure and potential procurement limitations. vSphere Memory Tiering over NVMe addresses this by enabling cost-effective virtual machine memory augmentation, mitigating the performance degradation associated with traditional memory overcommit.
This blog will be structured in Three distinct sections:
Part 1: Deploying vSphere 9.0 Memory Tiering Over NVMe: Host-Level Activation.
Part 2: Deploying vSphere 9.0 Memory Tiering: Cluster Integration and Management.
Part 3: Deploying vSphere 9.0 Memory Tiering: Considerations with vSAN Environments
What is Memory Tiering Over NVMe?
At its core, memory tiering is about intelligently leveraging different types of memory with varying performance and cost characteristics. With vSphere Memory Tiering over NVMe, VMware by Broadcom introduces a brilliant concept: treating high-performance NVMe storage devices as a Tier 2 memory layer, working seamlessly alongside your traditional DRAM (which acts as Tier 1). Think of it like this:
- Tier 1 (DRAM): Your fastest, most expensive memory. Ideal for actively used data and critical operations that demand ultra-low latency.
- Tier 2 (NVMe): A slightly slower but significantly more cost-effective memory tier. Perfect for less frequently accessed data pages that still need better performance than traditional disk-based swap.
How Does This Intelligent System Work?
The magic happens behind the scenes, orchestrated by vSphere’s sophisticated memory management. Here is a simplified breakdown:
- Dedicated NVMe Resource: You designate a dedicated NVMe device on your ESXi host to create a special
vmemswap datastore. This isn’t just any regular storage; it’s optimized for memory operations. - Intelligent Page Placement: vSphere’s I/O engine continuously monitors the activity of memory pages within your VMs.
- Hot Pages Stay in DRAM: The most actively used or “hot” memory pages remain in the blazing fast Tier 1 (DRAM).
- Warm Pages Move to NVMe: Less active or “warm” memory pages are intelligently offloaded to the Tier 2
vmemdatastore on the NVMe device. This frees up precious DRAM for more critical data.
- Transparent to Applications: The beauty of this system is its transparency. Your virtual machines and applications continue to operate as usual, unaware that some of their memory might reside on an NVMe device. vSphere handles the seamless movement of pages between tiers as needed.
Who Should Care? Ideal Use Cases
Memory Tiering over NVMe is particularly beneficial for:
- Large-scale VDI (Virtual Desktop Infrastructure) deployments: Where many users might be logged in but not all are actively engaged simultaneously.
- Consolidating diverse workloads: Running a mix of memory-hungry and less active VMs on the same hosts.
- Environments with fluctuating memory demands: Where peak memory usage might exceed available DRAM, but average usage could be accommodated by tiered memory.
- Organizations seeking to maximize hardware ROI: Getting more performance and capacity out of existing servers.
Note: – Memory Tiering over NVMe is an augmentation, not a complete replacement for DRAM. For truly latency-sensitive applications where every nanosecond counts, having ample DRAM remains crucial. However, for a vast majority of workloads, this tiered approach offers a smart, cost-effective pathway to greater memory capacity and improved overall performance.
Key Conceptual Steps for Host Configuration
Pre Validation of Host Configuration
Capture 1: –
Here we are validating the current memory of each host.

Step 1:- Click on “Overview” under hardware of the host.
Step 2: – Under memory, we can see total memory is 96 GB.
Note :- Same configuration, I have configured on the esx-02d and esx-03d.
Capture 2: –
Here we are validating the current NVMe storage of each host.

Step 1: – Click on Storage devices under the Storage.
Step 2: – We have a 100 GB NVMe flash drive with PCIe transport, along with an NVMe device that vSAN does not utilize.
ESX host into Maintenance mode
Capture 1: –

Step 1: – Place the host in maintenance mode.
Note: – Place the ESX host into Maintenance Mode. Do not modify the partitions on NVMe devices used as tiered memory while the virtual machines are operational.
Delete the Partition of NVMe
Capture 1: –

Step 1: – Click on Configure.
Step 2: – Click on Storage Devices under storage.
Step 3: – Select the box In front of the NVMe flash drive.
Step 4: – Click on Erase Partitions.
Capture 2: –
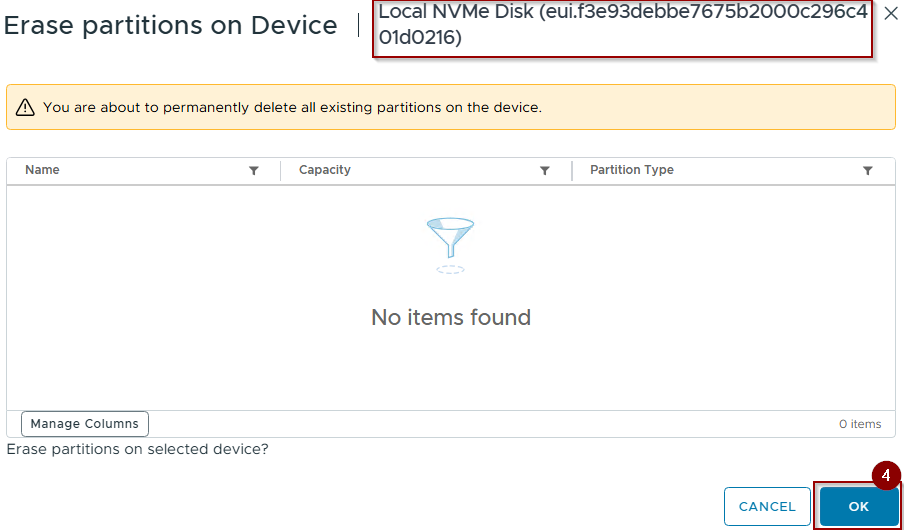
Step 4: – Click on Ok.
List the NVMe devices on the ESX host
Capture 3: –
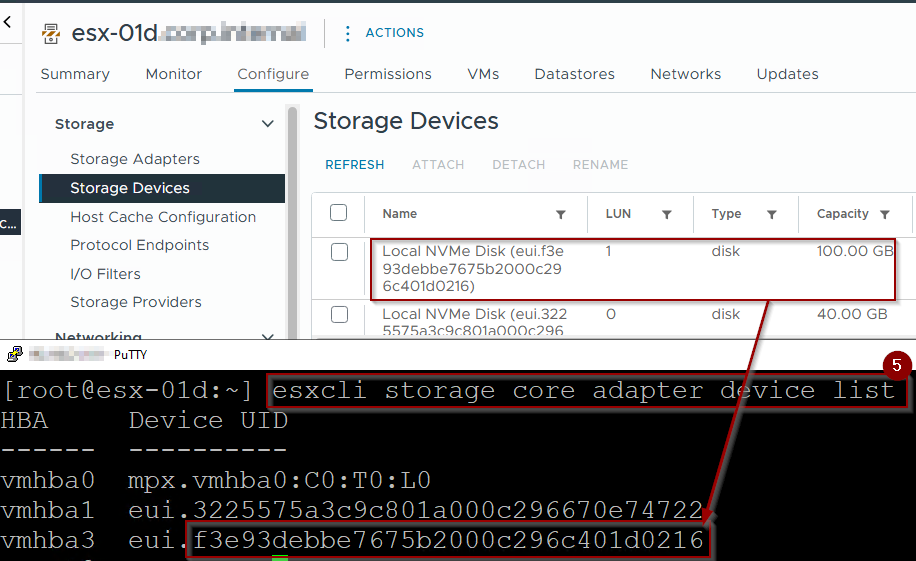
Step 5: – Run the command “esxcli storage core adapter device list” to validate the running NVMe devices on the ESXi host.
Verify the NVMe device has a tier Partition or not
Capture 4: –

Step 6: – Run the command “esxcli system tierdevice list” to validate the NVMe device has a tier Partition or not on the ESXi host
Create the tier partition on the NVMe device
Capture 5: –

Step 7: – Run the command “esxcli system tierdevice create -d /vmfs/devices/disks/<UUID of NVMe>“
Reverify the NVMe device has a tier Partition created
Capture 6: –
ESX-01d


Esx-02d


ESX-03d


Step 8: – Run the command “esxcli system tierdevice list” to validate the NVMe device has a tier Partition.
Step 9: – Once the verification is done, we can verify the NVMe Storage device assigned to a Datastore as Consumed for Memory Tiering.
Note: – Repeat the steps from the ESX host into Maintenance mode till Reverify the NVMe device has a tier Partition created for ESX-02d and ESX-03d.
Verify the status of memory tiering on host
Here we can check the memory tiering status at each host level.
ESX-01d:-
Capture 1: –

Step 10: – Run the cmd “esxcli system settings kernel list -o MemoryTiering” to verify the memory tiering status of Configured and Runtime on ESX-01d. We can see that configured and runtime are False.
ESX-02d: –
Capture 2:-

Step 11: – Run the cmd “esxcli system settings kernel list -o MemoryTiering” to verify the memory tiering status of Configured and Runtime on ESX-02d. We can see that configured and runtime are False.
ESX-03d: –
Capture 3: –

Step 12: – Run the cmd “esxcli system settings kernel list -o MemoryTiering” to verify the memory tiering status of Configured and Runtime on ESX-03d. We can see that configured and runtime are False.
Activate Memory Tiering at Host level
ESX-01d
Capture 1: –

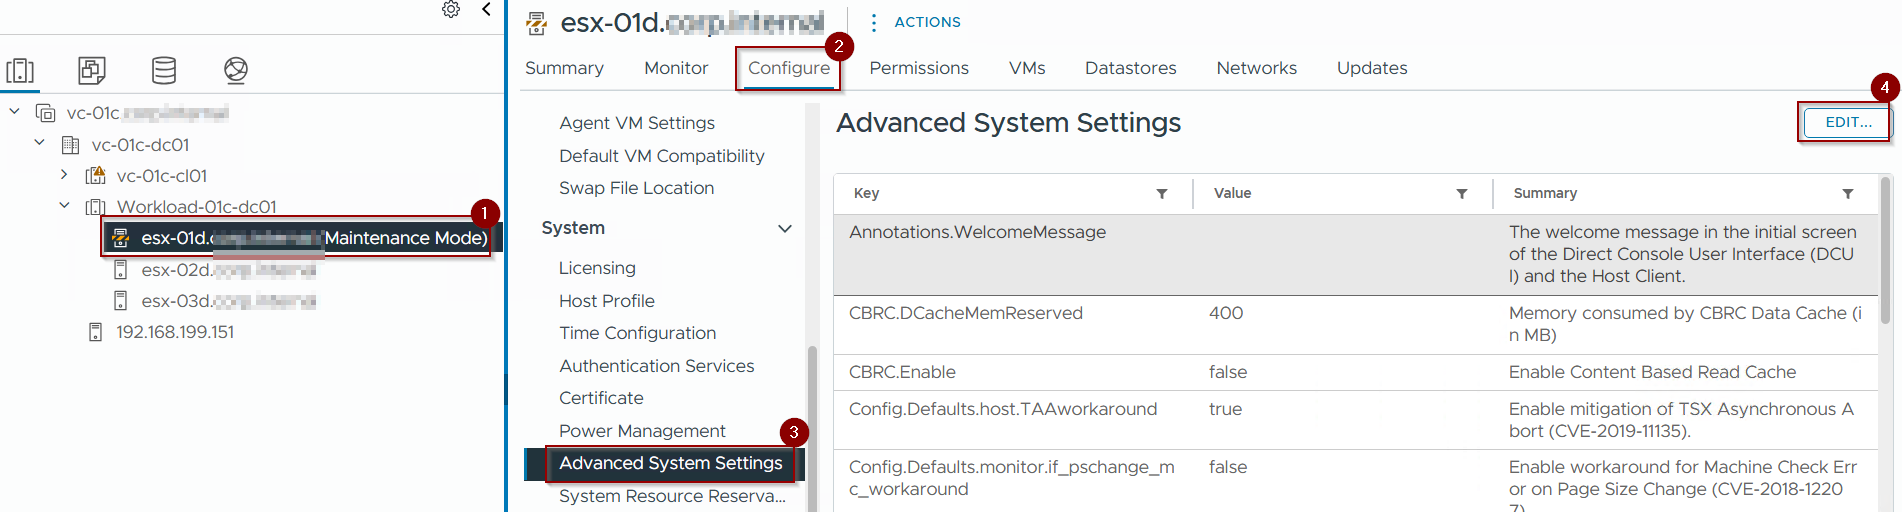
Step 1: – Select the Host.
Step 2: – Click on Configure.
Step 3: – Click on Advanced System Settings under System.
Step 4: – Click on Edit.
Capture 2: –

Step 5: – Click on the Filter under Key.
Step 6: – Write down the Memory tiering.
Capture 3: –
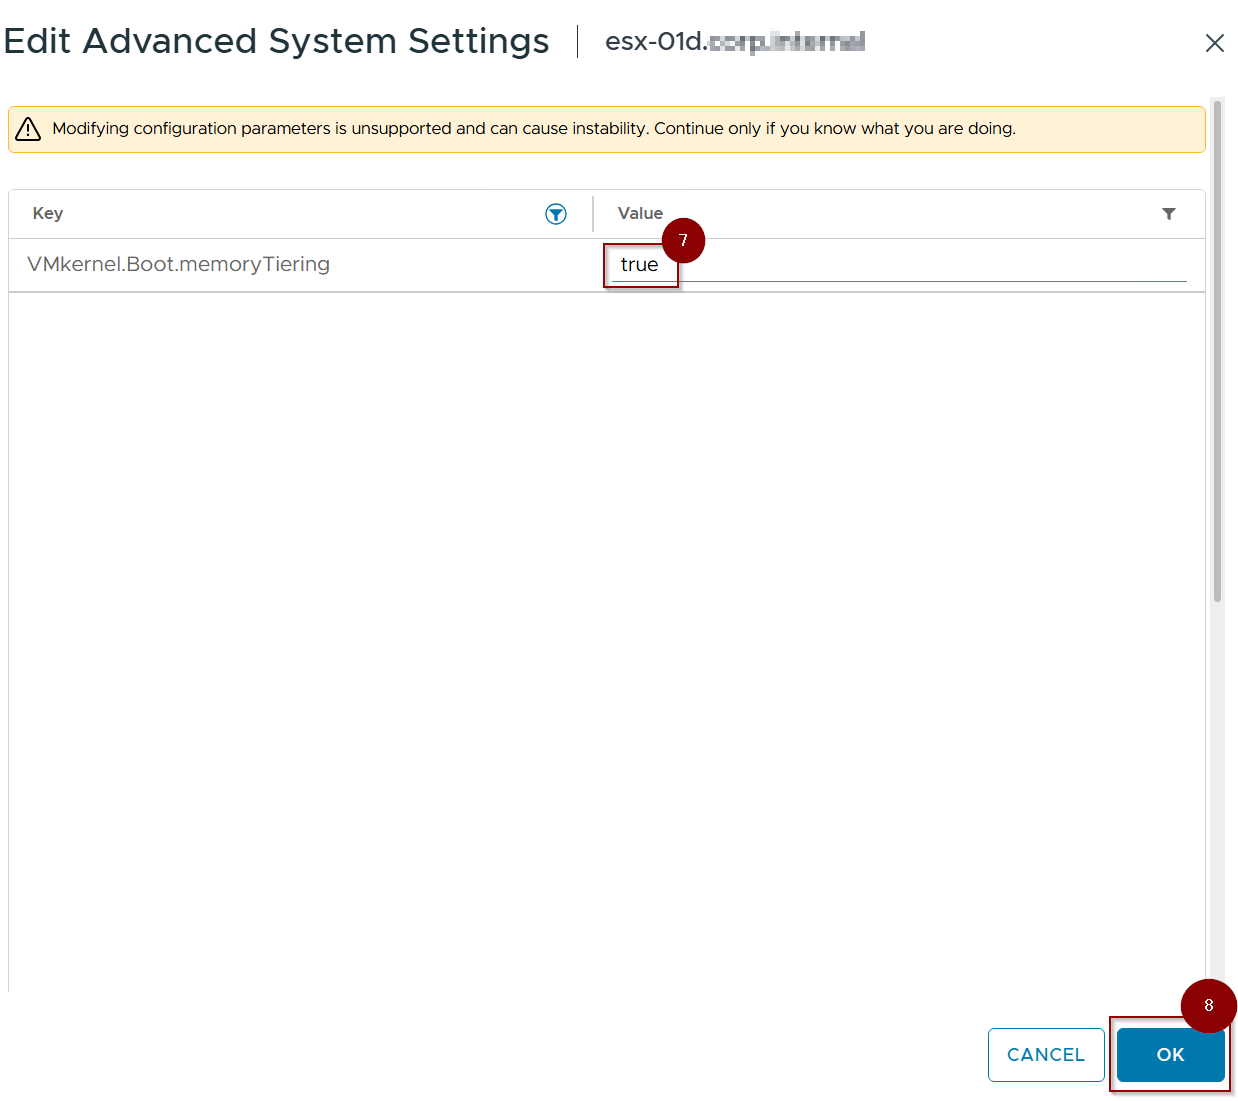
Step 7: – Change the value from false to true.
Step 8: – Click on OK.
Capture 4: –

As per capture 4, we can see the value is set as true.
Capture 5: –
Note:- Reboot the host so changes can be executed.
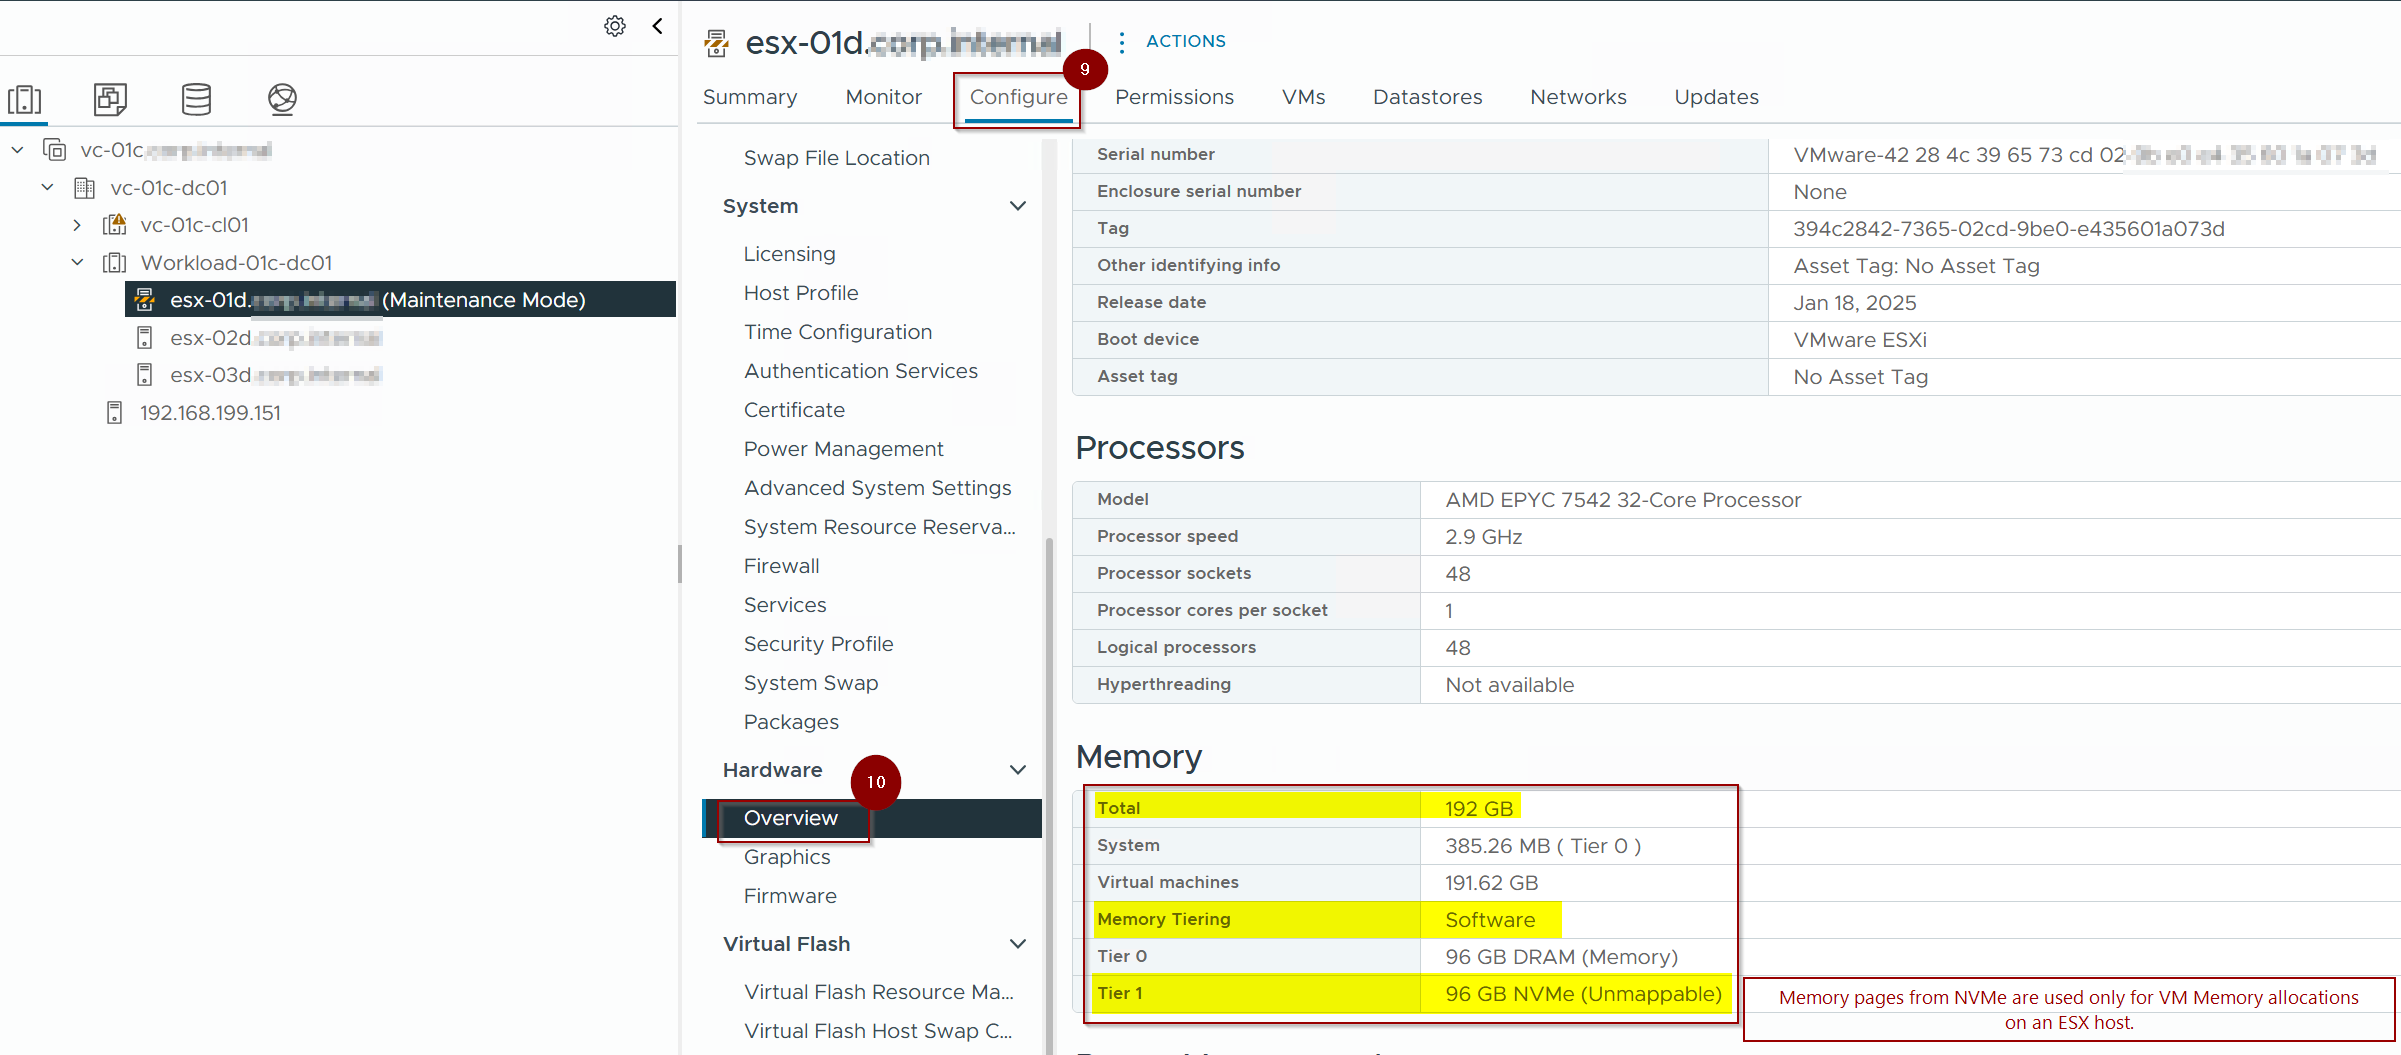
Step 9: – Click on Configure.
Step 10: -Click on Overview under Hardware.
As we can see the point below under Memory
1. Total memory is increased from 96GB to 192 GB.
2. Memory Tiering is software-based.
3. Memory is divided into 02 parts –
. Tier-0 – DRAM (96 GB Memory)
. Tier-1- NVMe (96 GB Memory). These Memory pages are used only for VM memory allocations on an ESX host.
Capture 6:-

Step 11: – Right-Click on Host and go to maintenance mode.
Step 12:- Select the Exit maintenance mode.
Capture 7: –

Step 13: – Click on summary and see the magic under memory. As you see, the cluster memory is also increased from (96*3=288 GB) to (96*2+196=384 GB, excluding system reserved).
Capture 8: –

I performed memory tiering on a single host, ESX-01d, while the other hosts, ESX-02d and ESX-03d, maintained the same memory configurations. It is not necessary to implement memory tiering for all hosts; based on my specific use case, I only applied it to one host.
If your use case requires memory tiering to be applied across all hosts, I recommend following best practices and configuring the cluster for memory tiering. Additional details will be provided in part two.
Deactivate Memory Tiering for an ESX host
In this section, I will guide you on how to deactivate the memory tiering on the configured host.
Capture 1: –
Step 1: – Put the host in maintenance mode.
Step 2: – Click on Configure.
Step 3: Click on Advanced System Settings.
Step 4: – Click on edit.
Capture 2: –

Step 5: – Click on Filter under Key.
Step 6: – Write down Memory tiering.
Capture 3: –

Step 7: – Change the value from true to false.
Step 8: – Click on OK.
Capture 4: –

Step 9: – Click on Configure
Step 10: – Click on advanced system settings under system
Step 11: – Under value we can the value is false.
Capture 5: –

Step 12: – Click on Configure.
Step 13: – Click on Overview under hardware,and we can see the total memory is back to 96 GB.
Capture 6: –

Step 14: – Exit the maintenance mode.
Step 15: – Click on Cluster.
Step 16: – As you can see the memory is back to 288 Gb from the 388 GB.
Conclusion
In this first installment of our series, we’ve established the fundamental framework for implementing vSphere Memory Tiering. We detailed the essential prerequisites, including the specific hardware (PCIe-based NVMe) and compatible vSphere software components required for activating this feature on a standalone ESXi host. The conceptual process involved identifying eligible NVMe devices, allocating a dedicated tier partition, and activating the hypervisor’s memory tiering service. We also touched upon initial verification and critical operational considerations pertinent to a host-centric deployment. This foundational understanding demonstrates how an individual ESXi host can leverage NVMe to augment its effective memory capacity, thereby expanding its consolidation potential.
Building upon this host-level activation, Part 2: Deploying vSphere Memory Tiering: Cluster Integration and Management will extend our focus to the cluster environment. In the next segment, we will examine the critical considerations for implementing and managing Memory Tiering across multiple ESXi hosts within a vSphere cluster. This will include discussions on achieving cluster-wide consistency, and more importantly, how Memory Tiering interacts with core vSphere cluster services such as vMotion, Distributed Resource Scheduler (DRS), and High Availability (HA) to ensure optimal VM performance and resource utilization in a consolidated, highly available infrastructure.

Leave a comment