
- Introduction
- Steps Overview
- Step 1: – Creating the Projects.
- Step 2: – Create the users and associated with the projects.
- Step 3: – Resource Sharing
- Step 4: – Quota
- Conclusion
Introduction
Greetings! Thank you for your expressed interest in learning about the process of creating projects and users with topology diagrams, configuring resource sharing, and configuring quotas. I am pleased to provide you with detailed explanations of these topics.
- How to create the Projects and Users with the topology diagrams.
- What & how to configure the resource sharing.
- What & how to configure the Quota.
Below is the high-level topology we are referring to simulate in this blog.
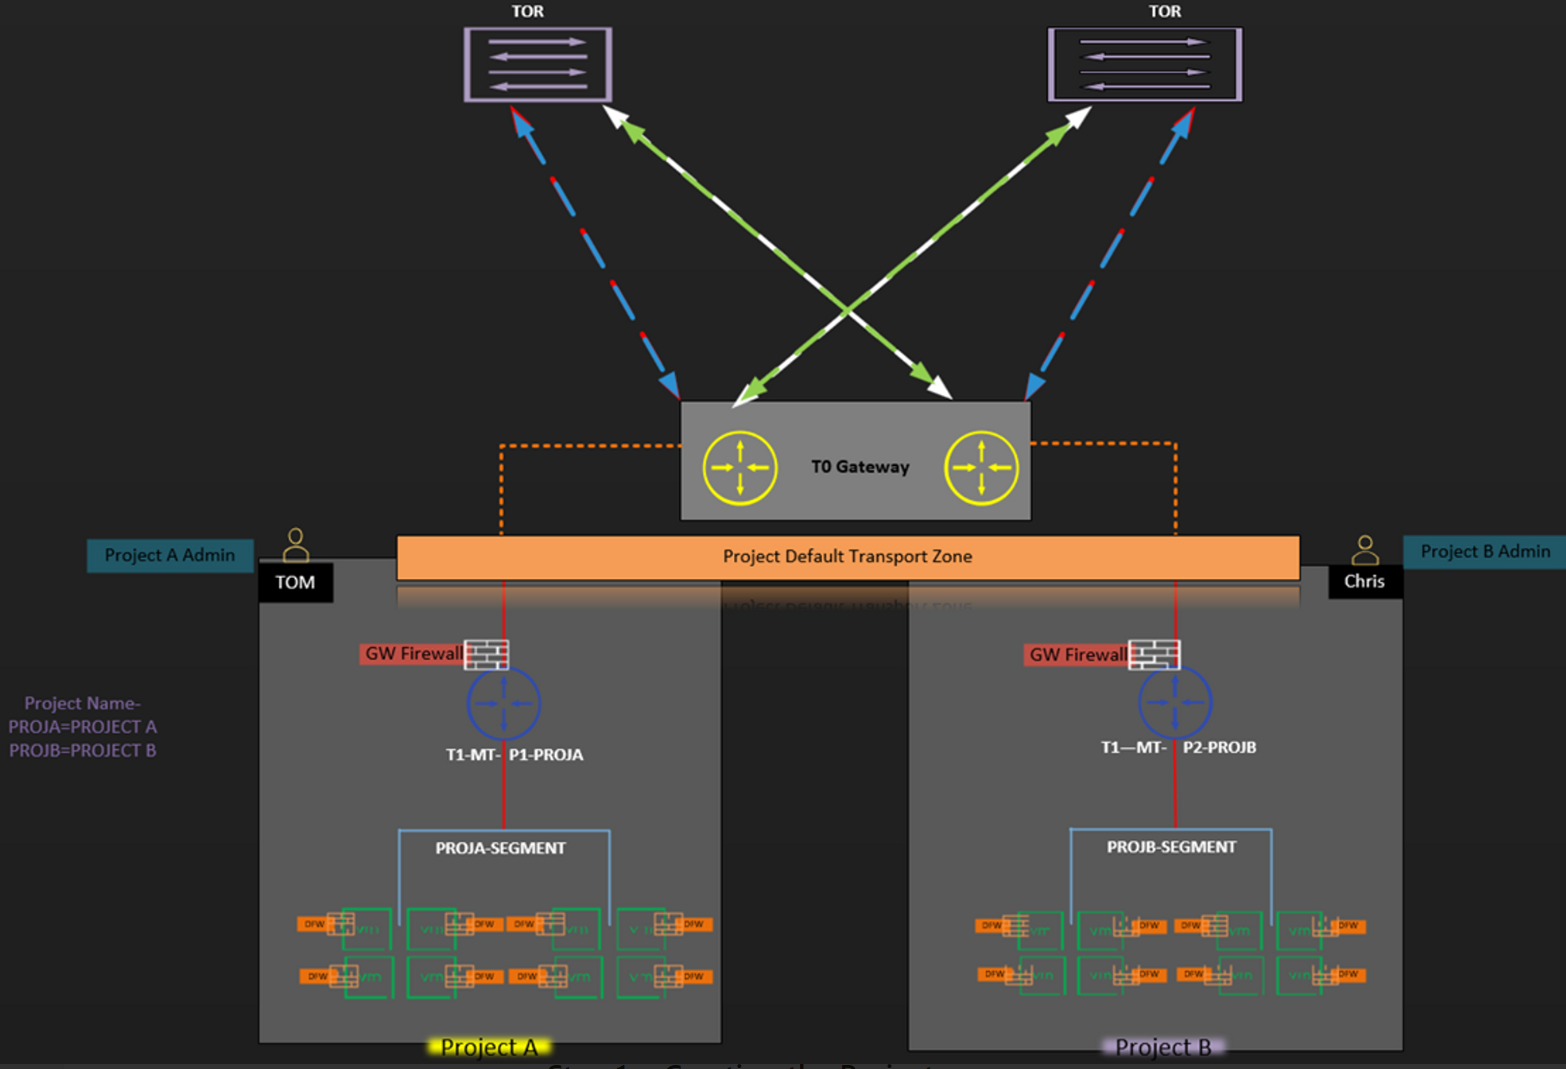
Brief information about the topology
- We will create a T0 under the /ORG or default Space.
- We will create 2 no’s of projects (Project A & Project B).
- Project A will be owned by the Project Administrator-TOM.
- Project B will be owned by the Project Administrator-CHRIS.
- Project A has its dedicated T1, distributed firewall rules, GW firewall, and segments.
- Project B has its dedicated T1, distributed firewall rules GW firewall, and segments.
- Both projects use the default /ORG transport zone.
Overview
- Step 1: – Creating the Projects.
- Step 2: – Create the Users and associated with the projects.
- Step 3: – Resource Sharing.
- Step 4: – Quota
Step 1: – Creating the Projects.
- Project: -In this Step, we will create 2 no’s of projects. Project A & Project B. Under these projects, we will create Tier-1(T1) which is connected to Tier-0 (/ORG). Intra-traffic between each project is allowed. Inter Traffic between projects is not allowed.
- Users: – We will create the new local user “TOM”. He is responsible as a project admin for project A. The Project-B user “CHRIS” is responsible as a project admin.
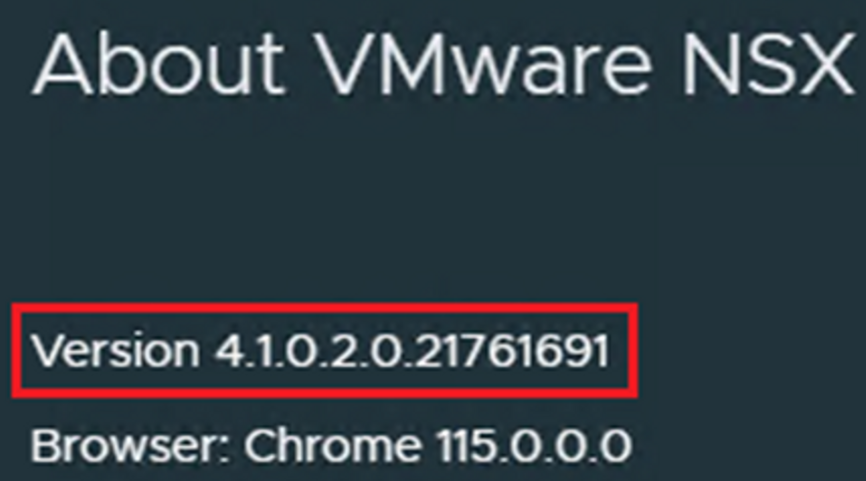
- NSX-T: – During creating this blog am using the NSX-T version 4.1.0.2.0 Build 21761691.
Capture 1: –
Now we will create the projects. (Project -A & Project -B)
Capture 2: –

Step 1:- login as the enterprise administrator rights”Admin”
Step 2: – Click on drop down next to default & click on manage under the Project switcher.
Now we will create the Project.
Capture 3: –
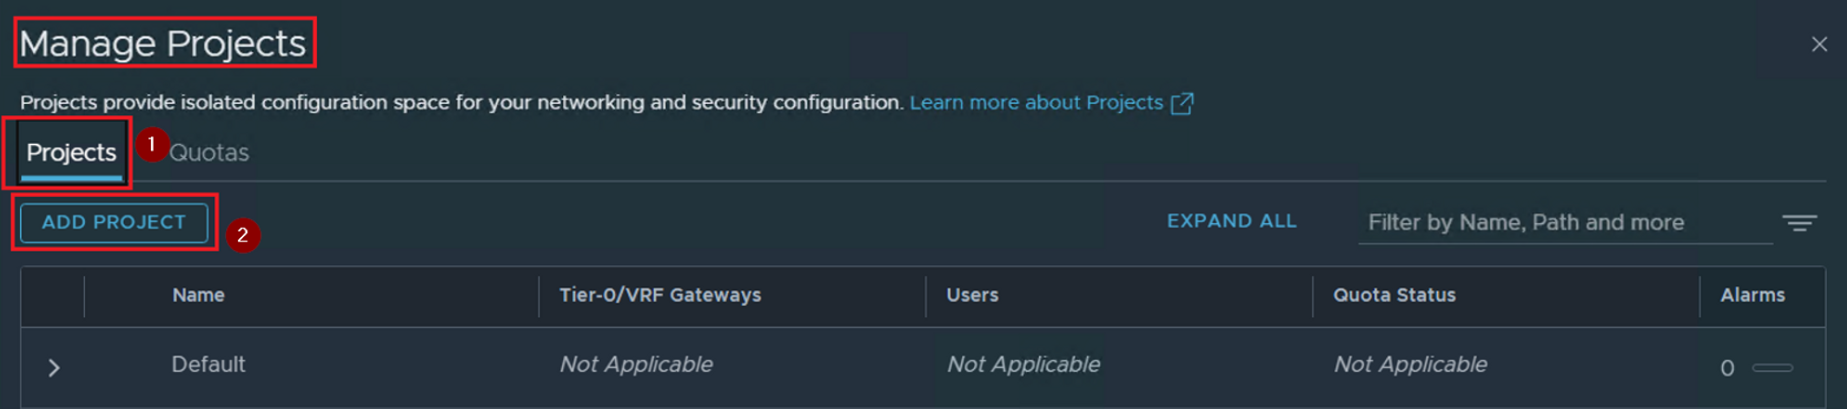
Step 1 :- Click on Projects
Step 2: – Click on “ADD Projects”
Now we will create the first project “Project-A”
Capture 4: –

Step 1:- click on Add Project
Step 2: – Give the name of the project. As per the capture 4 “Project-A” is the project name.
Step 3:- Select the T0/VRF gateway. As per the capture 4 “MT-T0” is the default space created T0 gateway.
Step 4: – Select the Edge Clusters. As per the capture 4 “Multi-tenancy” is the default space created Edge Cluster.
Step 5:- Select the Short log Identifier. As per the capture 4 short log identifier name is “ProA-log”.
Step 6: – Click on Save.
Now we will create the Second project “Project-B
Capture-5: –
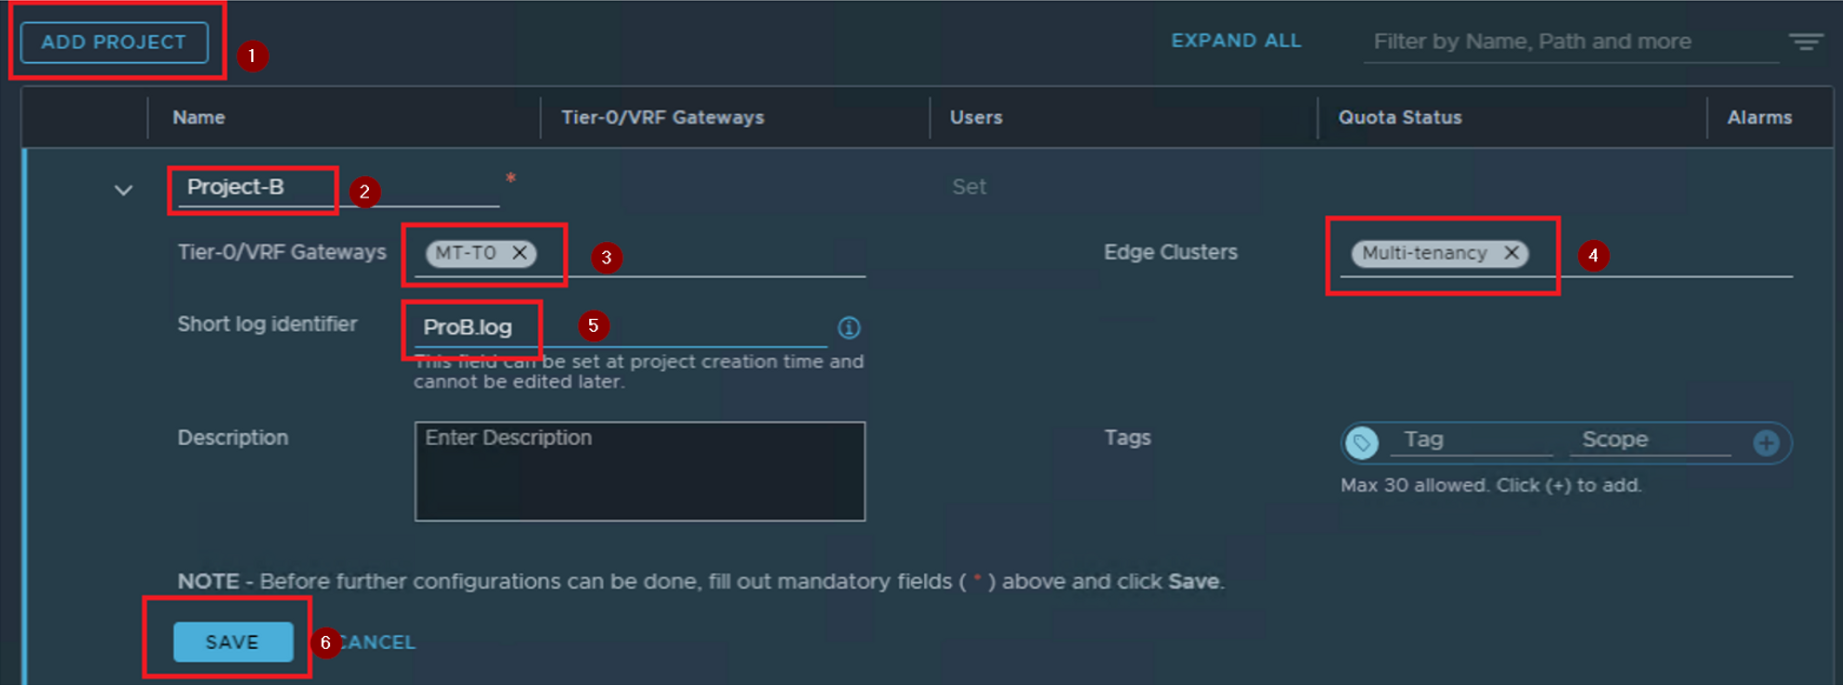
Step 1:- click on Add Project
Step 2: – Give the name of the project. As per the capture 5 “Project-B” is the project name.
Step 3:- Select the T0/VRF gateway. As per the capture 5 “MT-T0” is the default space created T0 gateway.
Step 4: – Select the Edge Clusters. As per the capture 5 “Multi-tenancy” is the default space created Edge Cluster.
Step 5:- Select the Short log Identifier. As per the capture 5 short log identifier name is “ProB-log”.
Step 6: – Click on Save.
Capture 6: –
Consolidated View of the Project dashboard
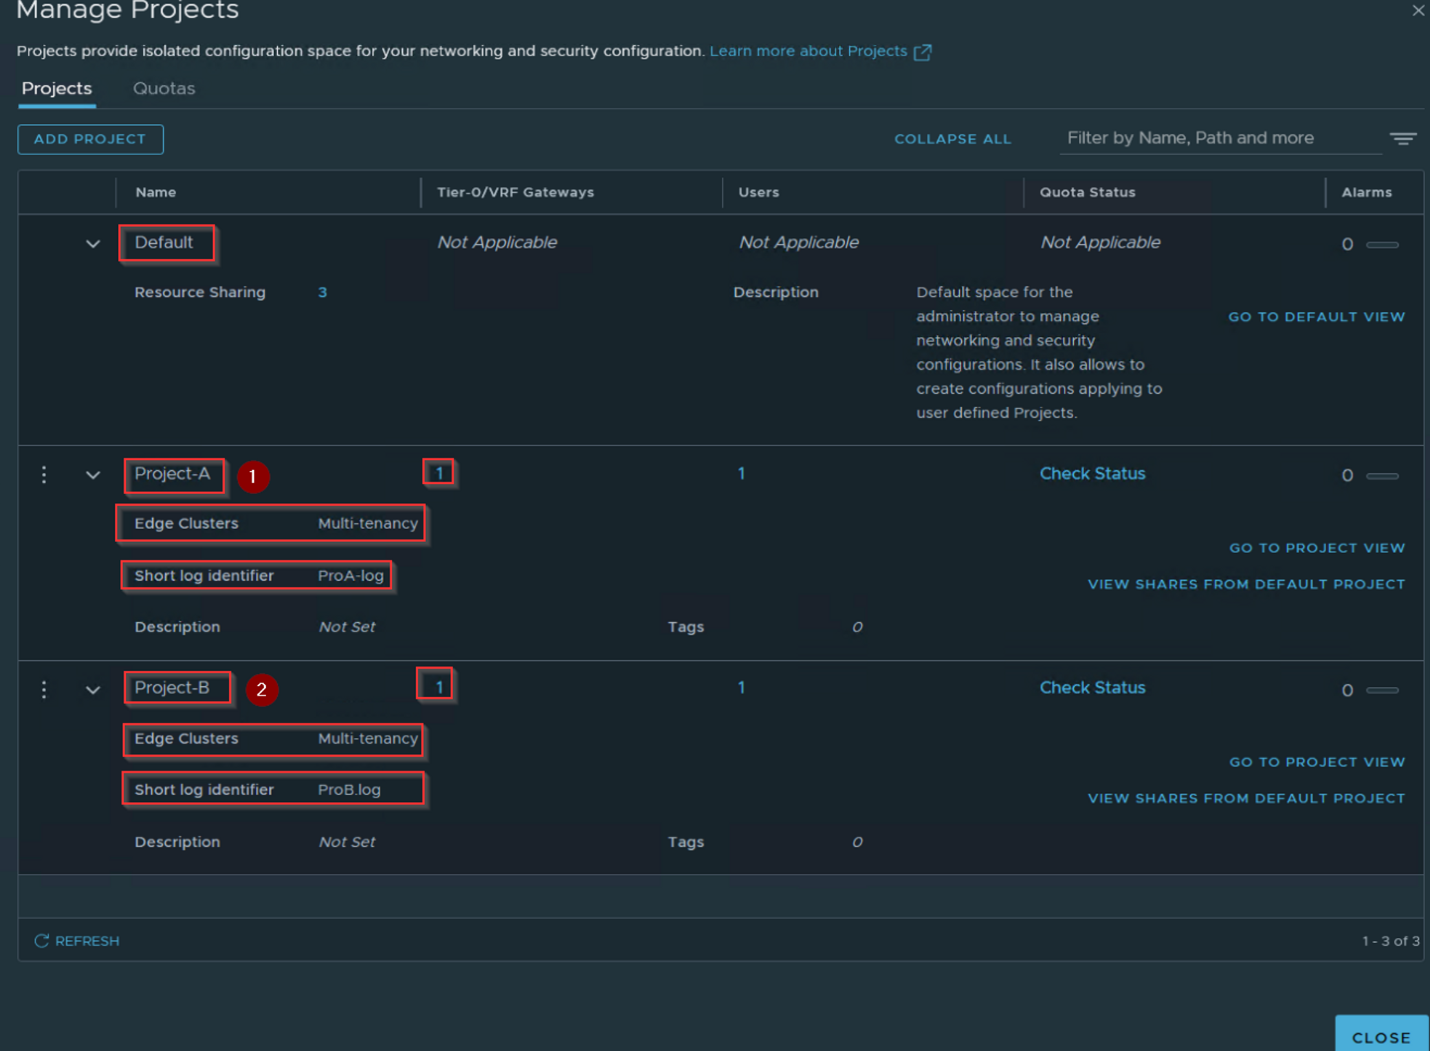
As per the capture 6 we can see the both projects.
Step 2: – Create the users and associated with the projects.
Capture 1: –

Step1 :- login as the enterprise administrator rights and click on default drop down.
Step 2: – Click on System.
Step 3: – click on User management under the setting.
Step 4: – Click on local Users.
Step 5: – Click on ADD
Step 6:- Click on Local User.
Capture 2:-

Step 1:- Give the name of the User. As per the capture 2 we are creating User “TOM”.
Step 2: – Click on save.
Capture 3:-

Step 1:- Click on 3 Dots in front of the user “TOM”.
Step 2: – Click on Activate User.
Capture 4:-
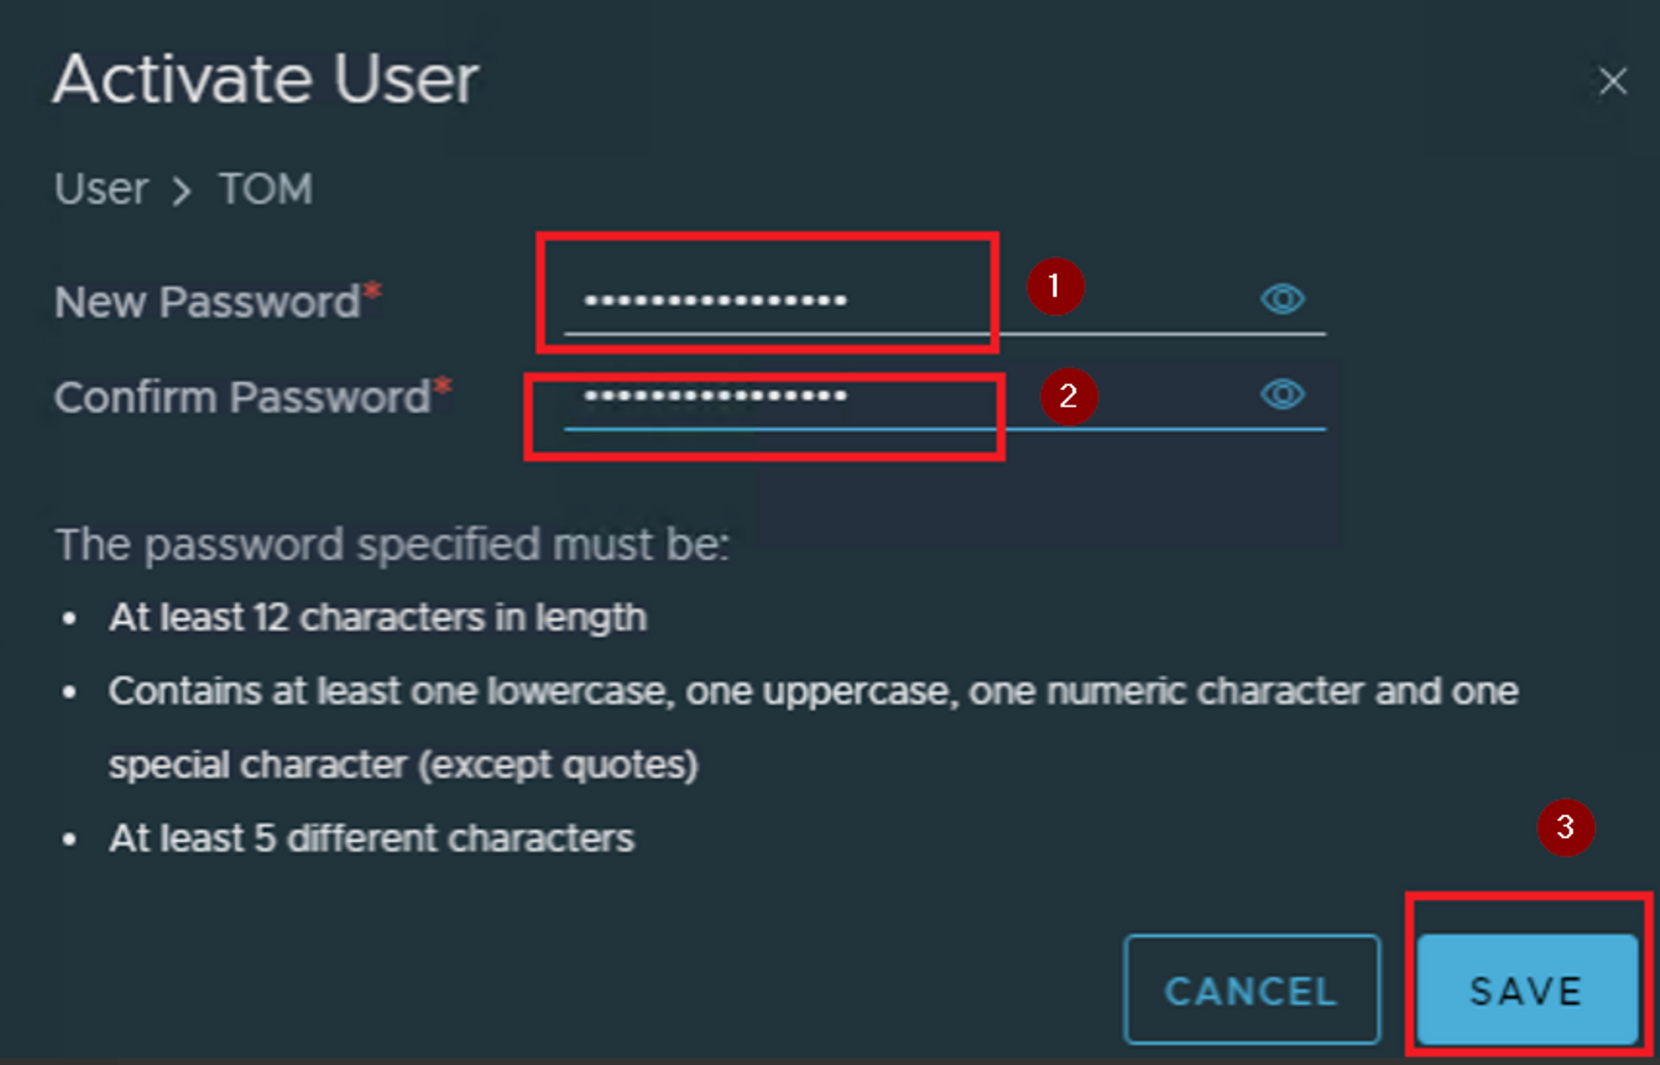
Step 1:- Gives the new password ********** for the user TOM.
Step 2:- Confirm the password ********.
Step 3:- Click on Save.
Capture 5:-

As per the capture 5 we can see the status of user TOM is “ACTIVE”
Capture 6: –
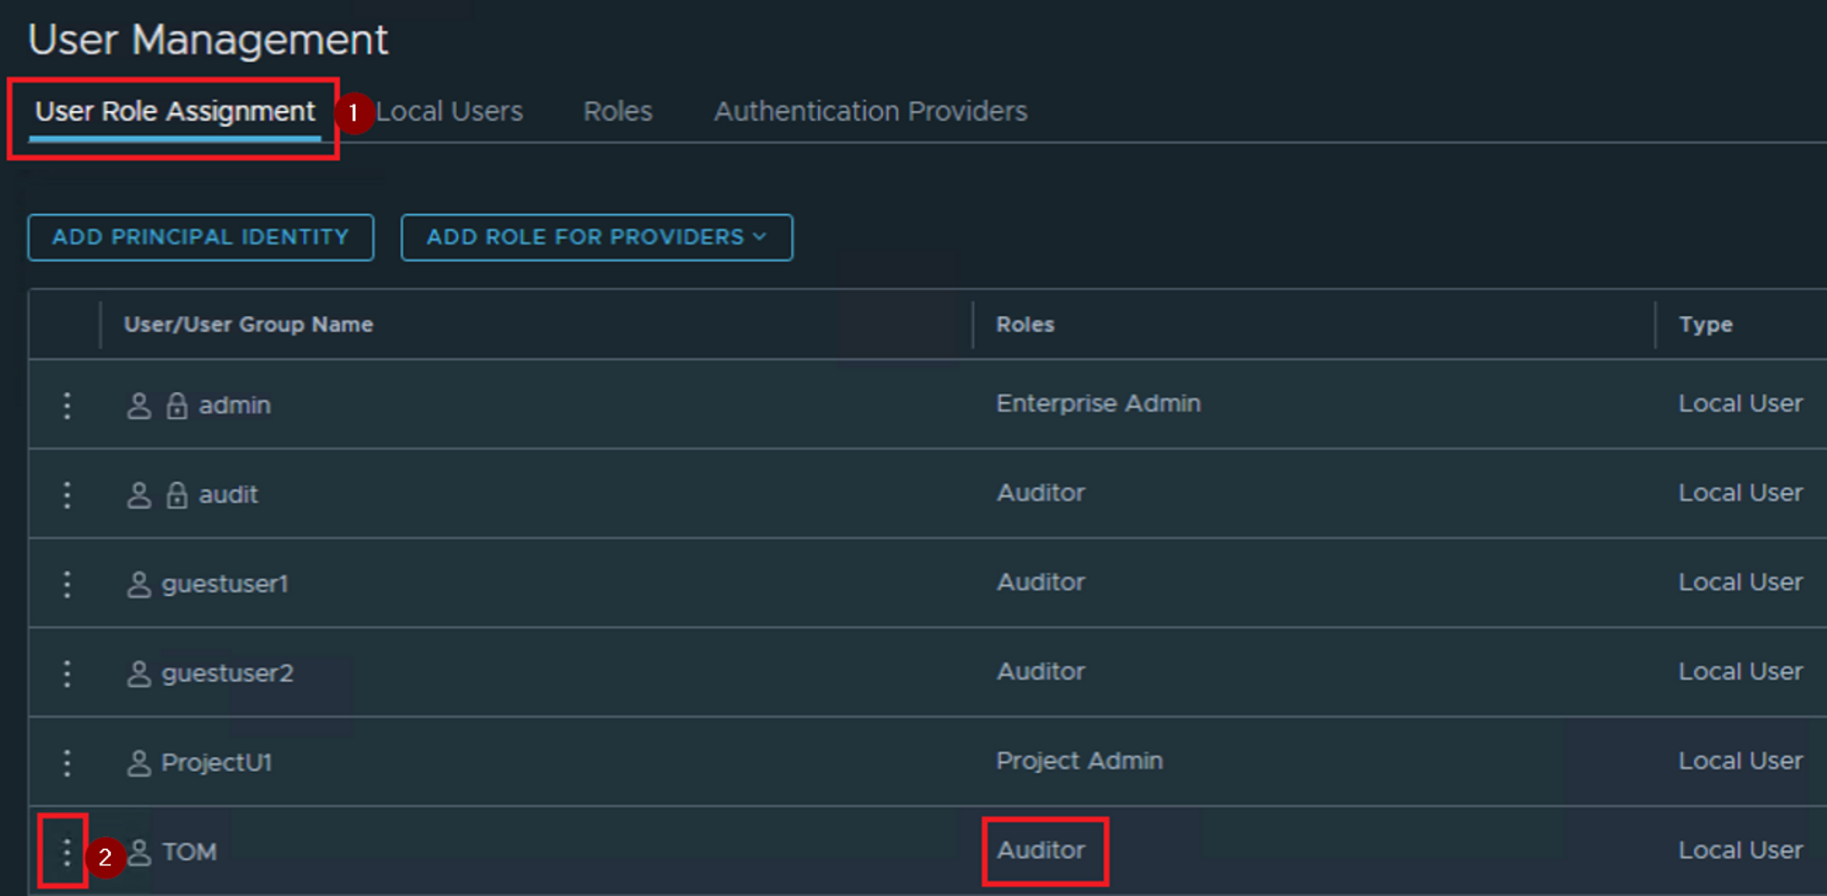
As per the capture 6 we are changing the role.
Step 1: – Click on user role assignment.
Step 2: – Click on 3dots in front of the user “TOM”. Right now “Auditor” role is assigned.
Capture 7: –

As per the capture 7 we are changing the role.
Step 1: – click on numeric value 1.
Capture 8: –
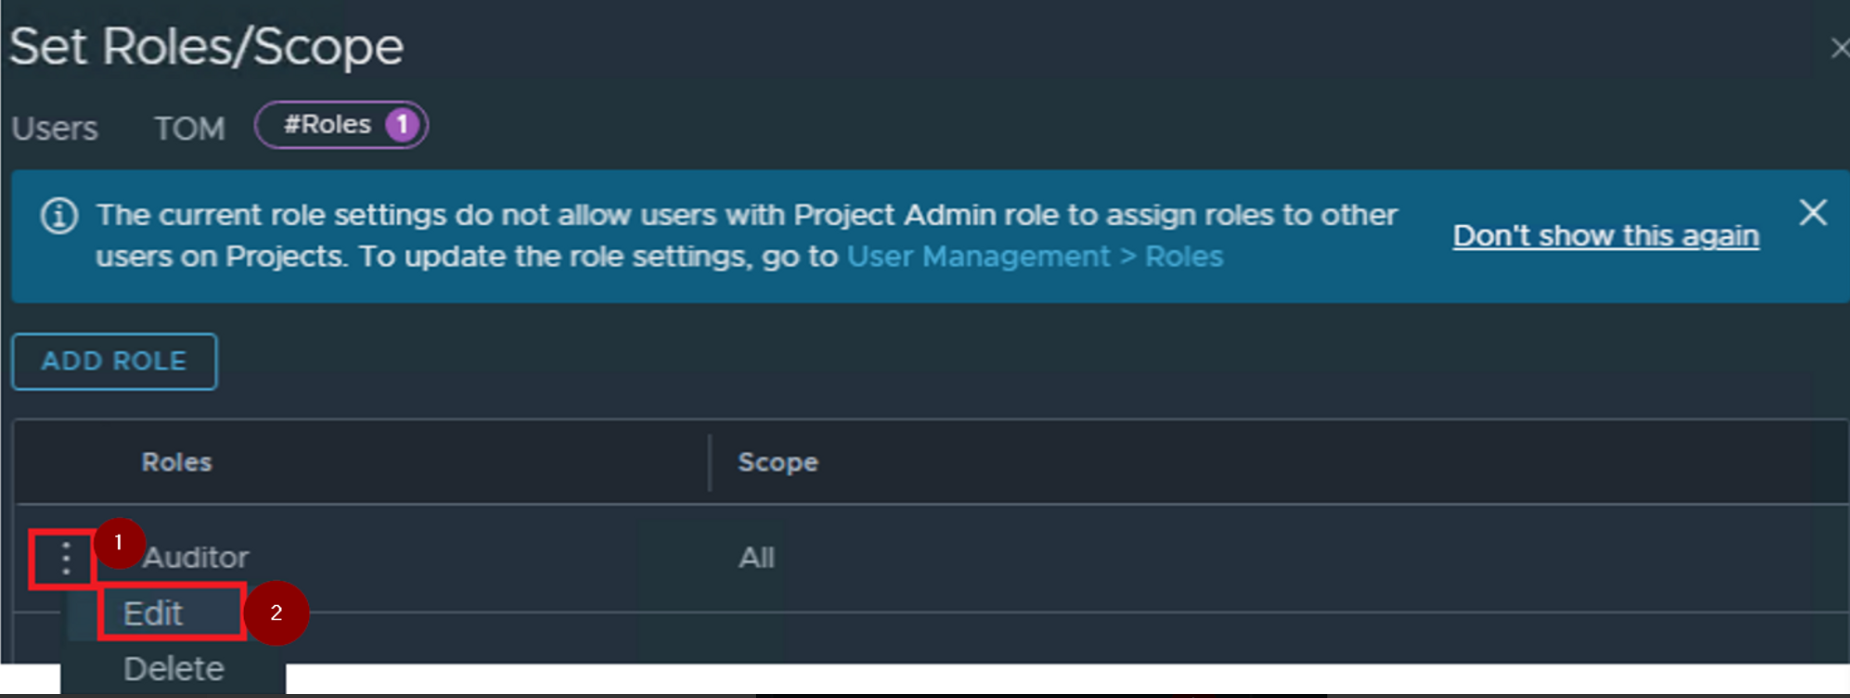
Step 1:- Click on 3 dots in front of the Auditor role.
Step 2: – click on Edit.
Capture 9: –
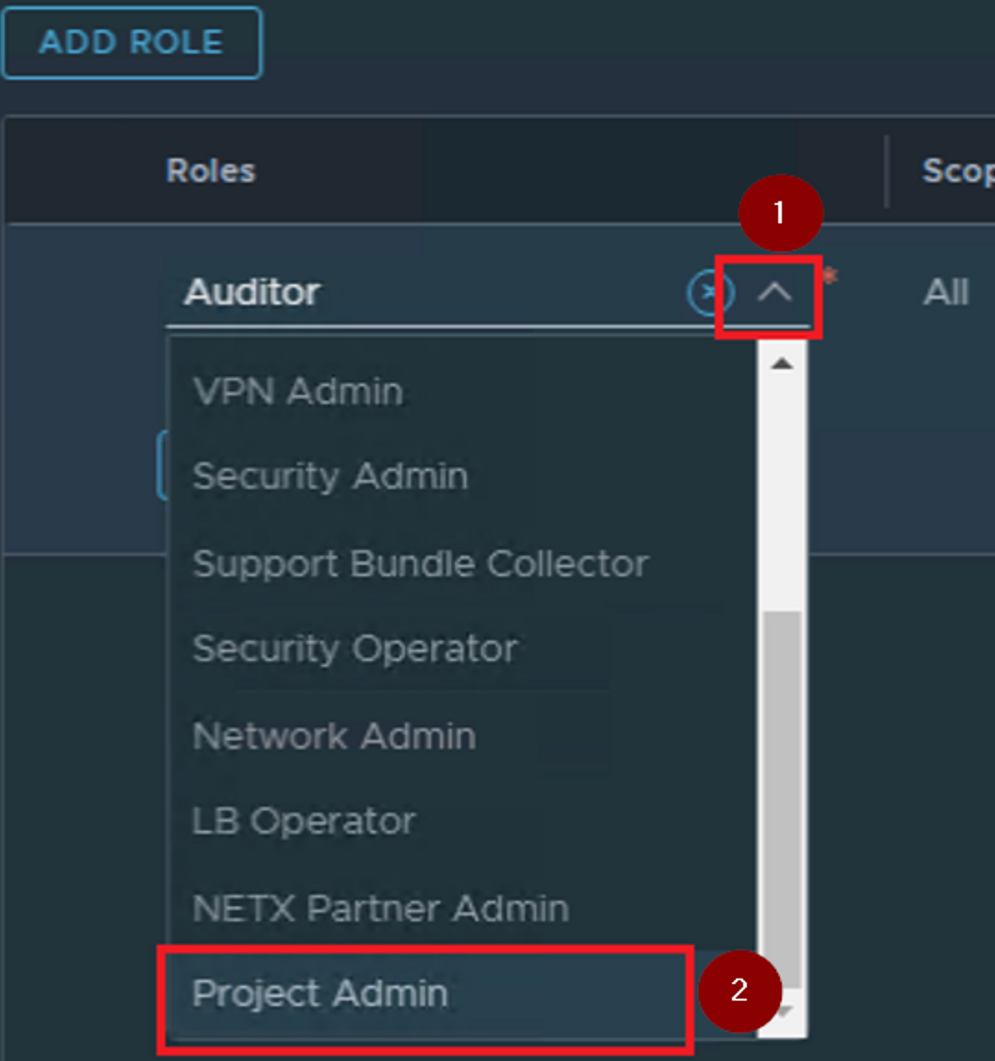
Step 1:- Click on Scroll down Arrow.
Step 2:- Search the Project Admin role and click on it.
Capture 10: –
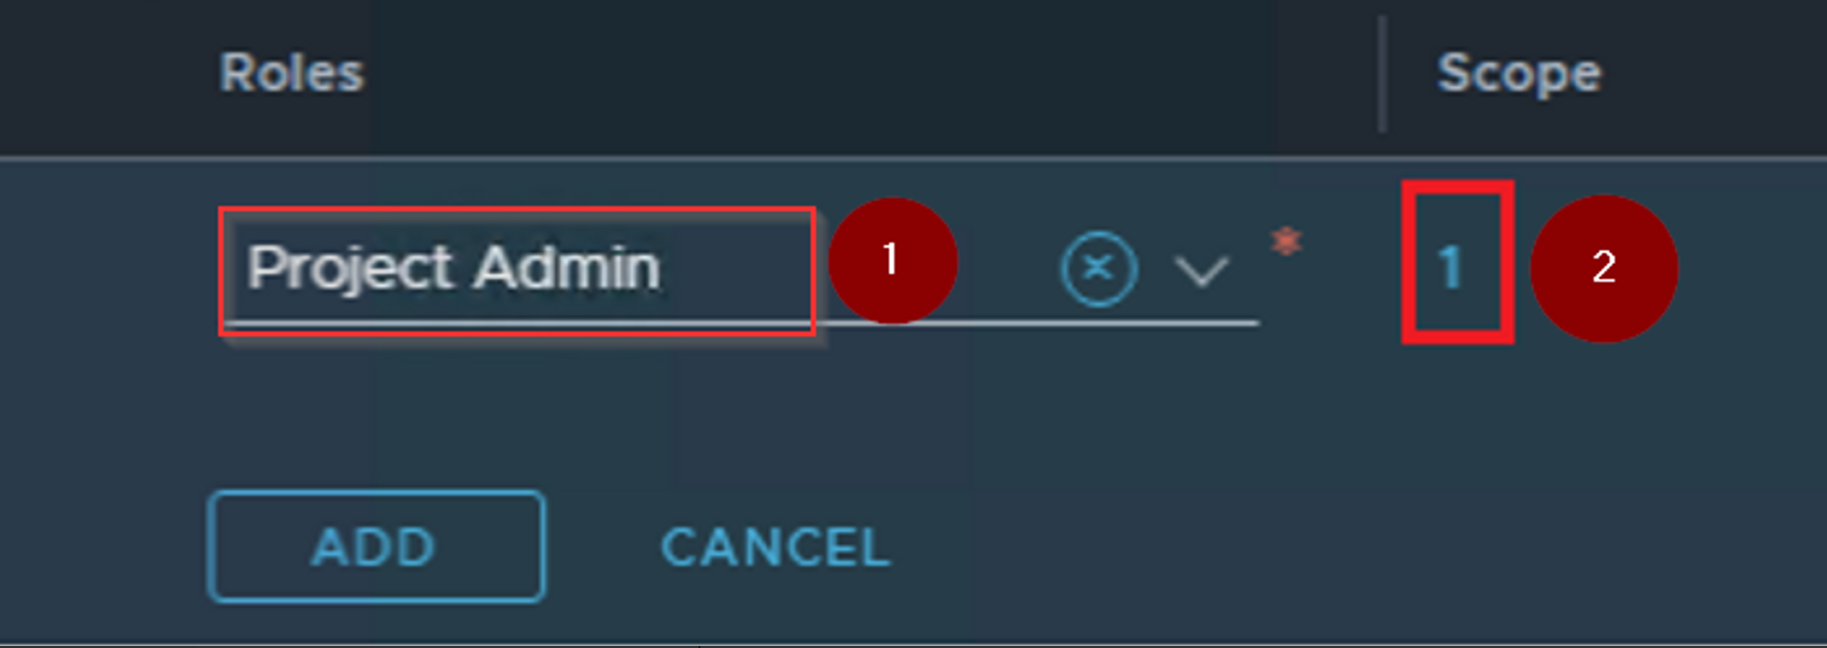
Step 1: – We can see the project Admin under the scrolling bar.
Step 2: – Click on numeric value 1 under the scope.
Capture 11: –
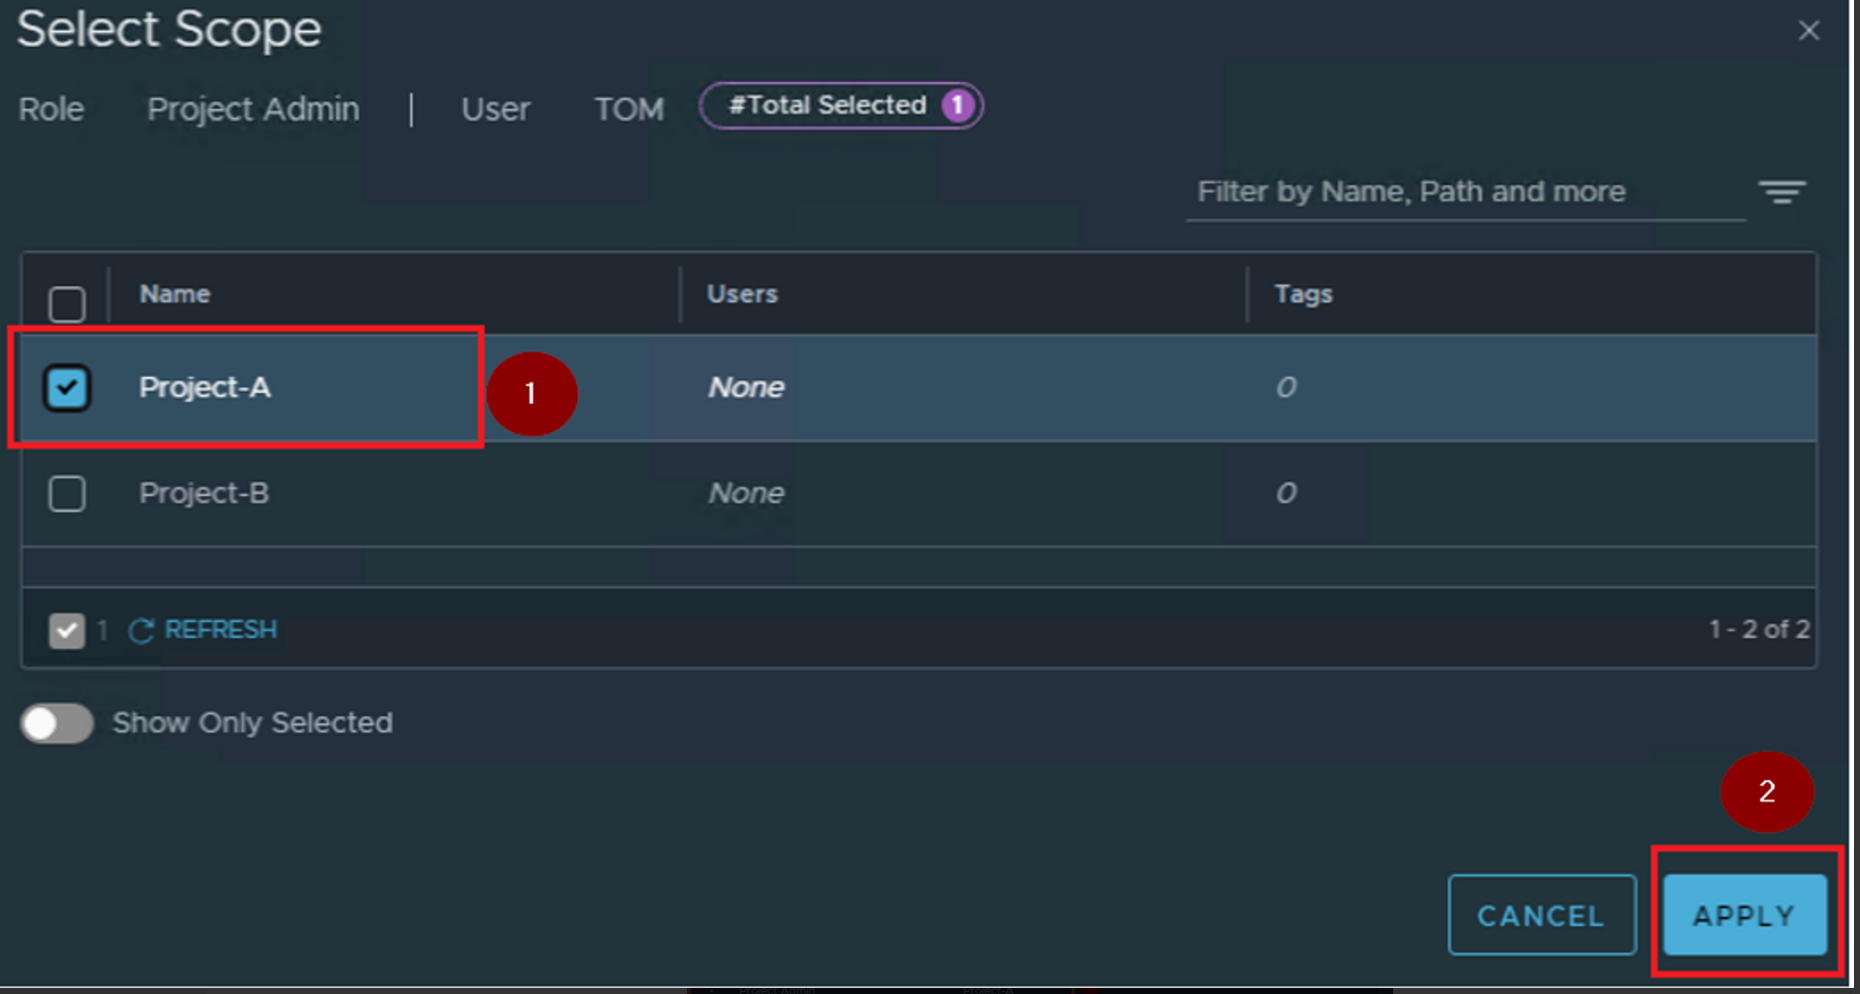
Step 1: – Click on the radio button infront of the Project -A.
Step 2: – Click on Apply.
Capture 12: –

Step1: – As we can in the capture 12 Role selected “Project Admin” and Scope selected “Project-A”.
Step 2: – Click on Apply.
Capture 13: –

Step 1: – As per the capture 13 we can see the user “TOM” has the numeric value 1 (means scope is assigned to user).
Step 2: – As per our scenario we are using the user “TOM” as a local user.
Step 3:- click on save.
Capture 14: –
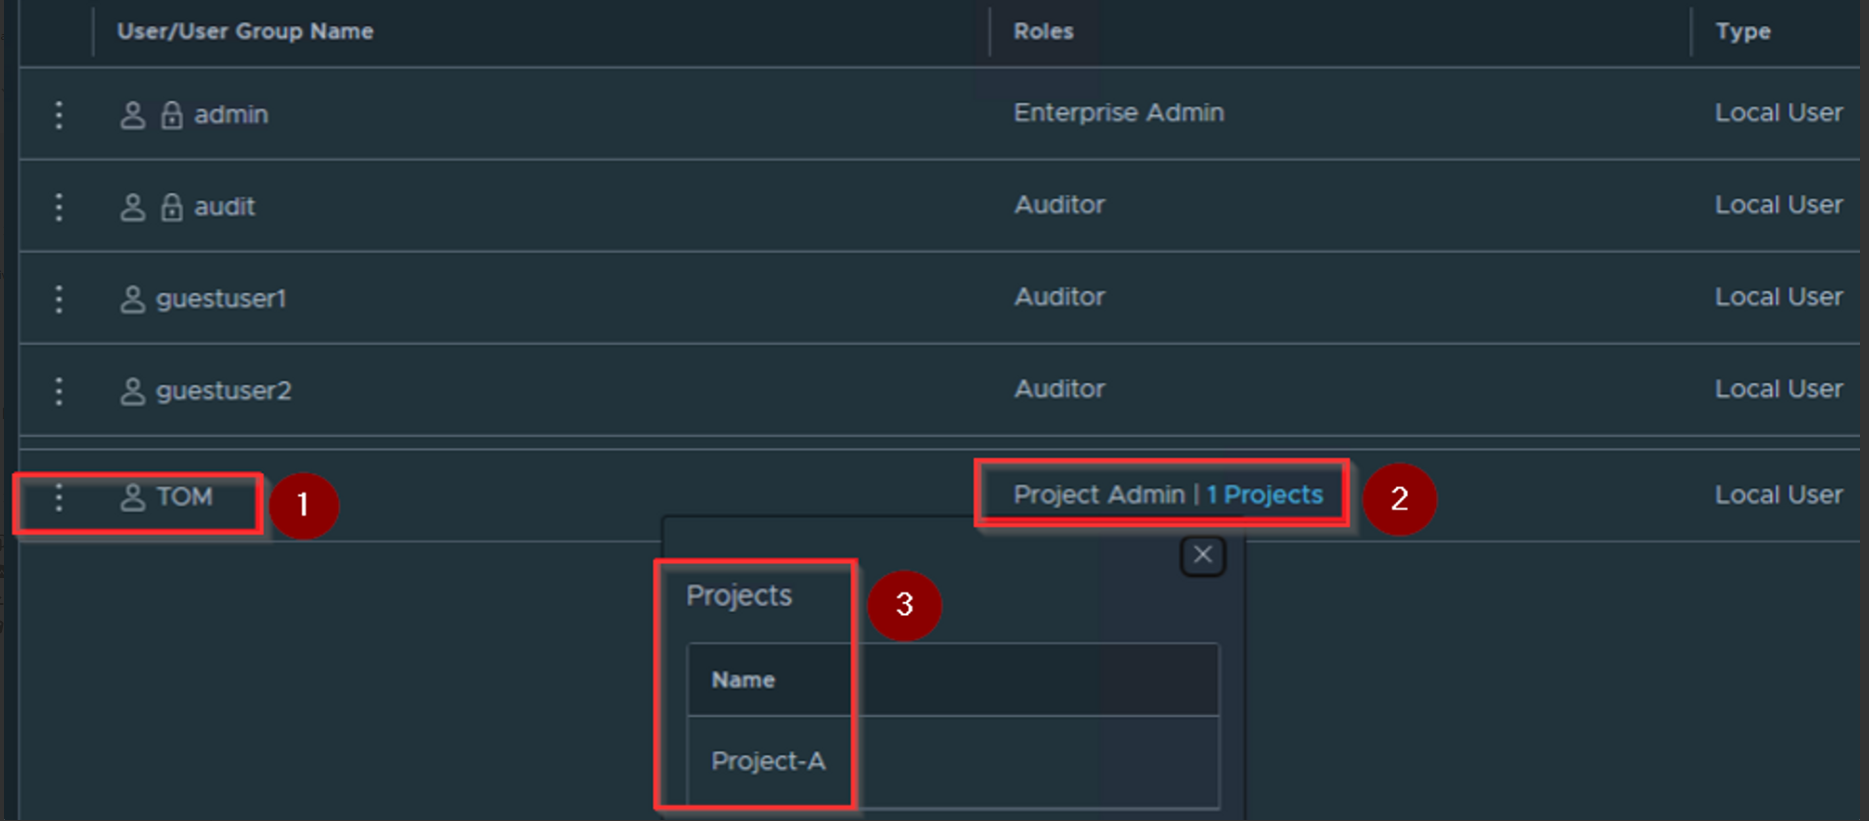
Step 1: – We can see the user “TOM” under the tab “user/user group name”.
Step 2: – Under the Roles we can see the role assigned as a “Project Admin” and 1 Projects assigned. Click on this.
Step 3: – Under projects we can see the “Project-A”.
Capture 15: –
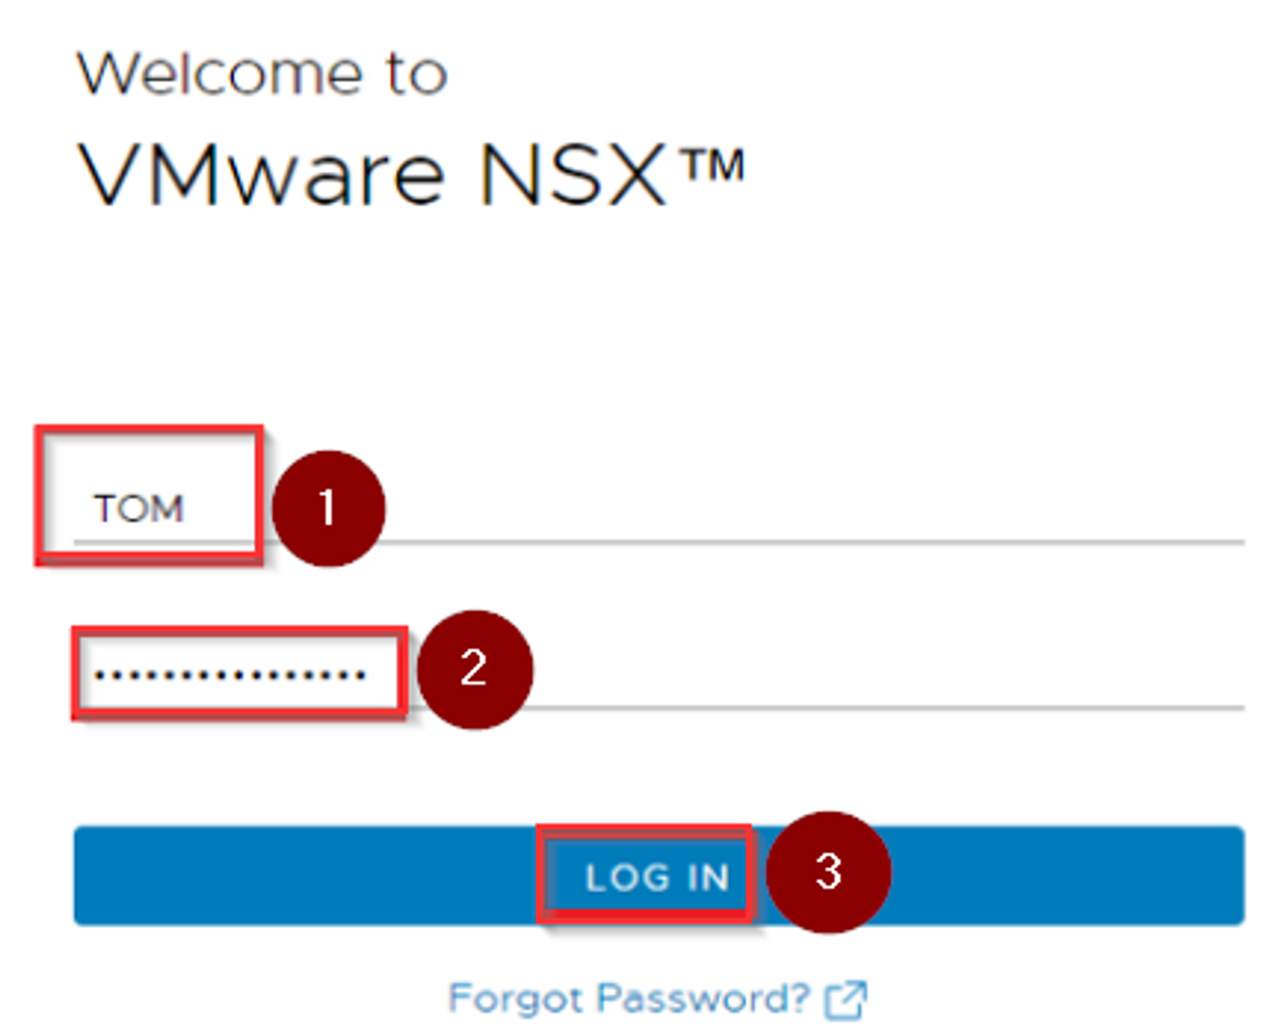
As per the capture 15 we are now login in the NSX-T UI with the User “TOM” credentials.
Step 1: – User name “TOM”
Step 2: – Give the password ******
Step 3: – Click on LOG IN
Capture 16: –

Step 1: – We are successfully login with the user “TOM”.
Step 2: We can see the Project assigned to user “TOM” is “Project-A”.
Step 3: – We can the see the assigned & allowed feature to “Project-A”.
Now , let’s create a user “CHRIS” for “Project-B”
Note: – Please follow the capture from capture 1 till 14 for creating the user , assigning the user & the project to the user.
Capture 17:-

Step 1: – login as a Enterprise administrator rights “Admin”.
Step 2: – Under project switcher select the “Default”.
Step 3: – Click on “System”.
Step 4: – Click on “User Management” under Settings.
Step 5: – We can see the user name “CHRIS”
Step 6: – Role assigned Project-Admin.
Step 7: – Click on “1 Projects”.
Step 8: – We can see under Projects the name “Project-B”.
now let’s login on the NSX-T UI with the user name “CHRIS”
Capture 18: –
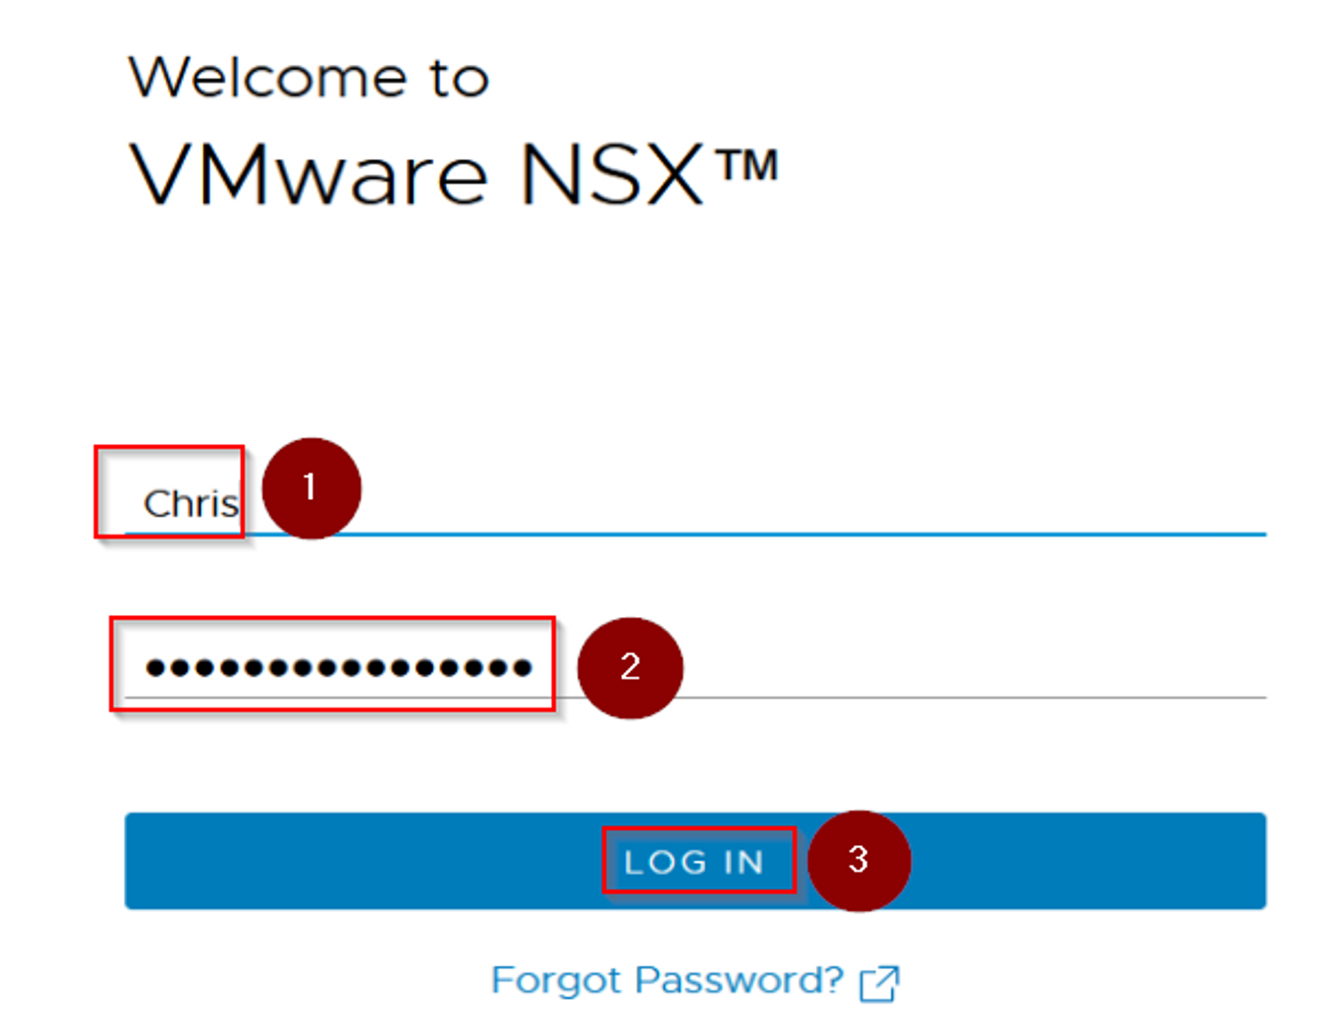
As per the capture 18 we are now login in the NSX-T UI with the User “Chris” credentials.
Step 1: – User name “Chris”
Step 2: – Give the password ******
Step 3: – Click on LOG IN
Capture 19:-

Step 1: – We are successfully login with the user “Chris”.
Step 2: We can see the Project assigned to user “Chris” is “Project-B”.
Step 3: – We can the see the assigned & allowed feature to “Project-B”.
Step 3: – Resource Sharing
Hey there! We noticed that while creating projects from the default view, a new tab called “Resource Sharing” automatically pops up. We also learned that when deploying NSX, certain default objects are created, which are known as system-defined NSX objects. Interestingly, some of these default objects are shared from the default space to manually created projects.
Capture 1: –
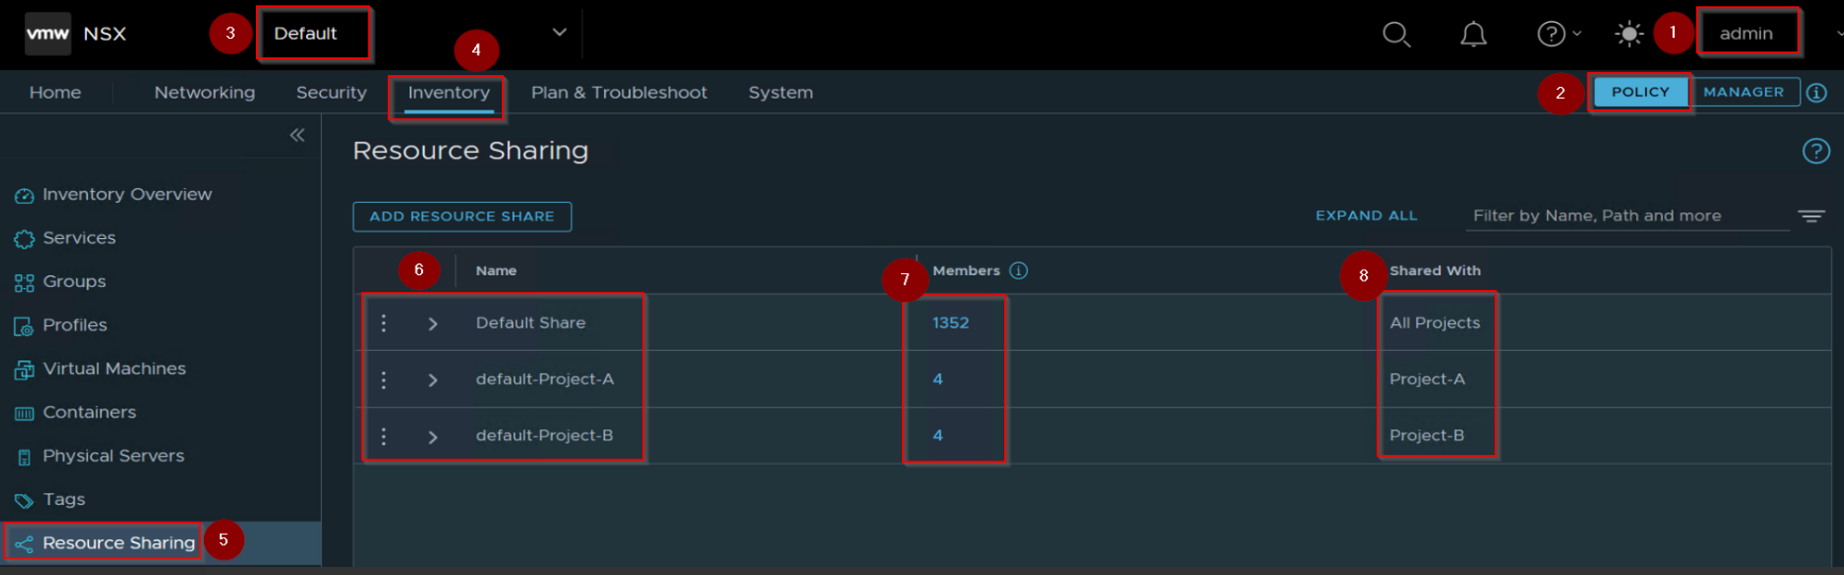
Step 1: – Login as a enterprise administrator rights “admin”.
Step 2: – User Interface is “Policy”.
Step 3: – Project Switcher is “Default’.
Step 4: – Click on Inventory.
Step 5: – Click on “Resource Sharing”.
Step 6: – Under name we can see the “Default” word is auto-popup in front of the both projects.
Step7: – We can see under default share there are 1352 members and under each projects there are 4 members.
Step 8: – Under shared with we can see the associated projects name.
Now let’s see the 4 members under the Project -A.
Capture 2: –

Step 1:- Got to “default-Project-A”.
Step2: – Click on numeric value 4.
Be remember, there is no groups shared by default, but all services are shared.
Capture 3: –
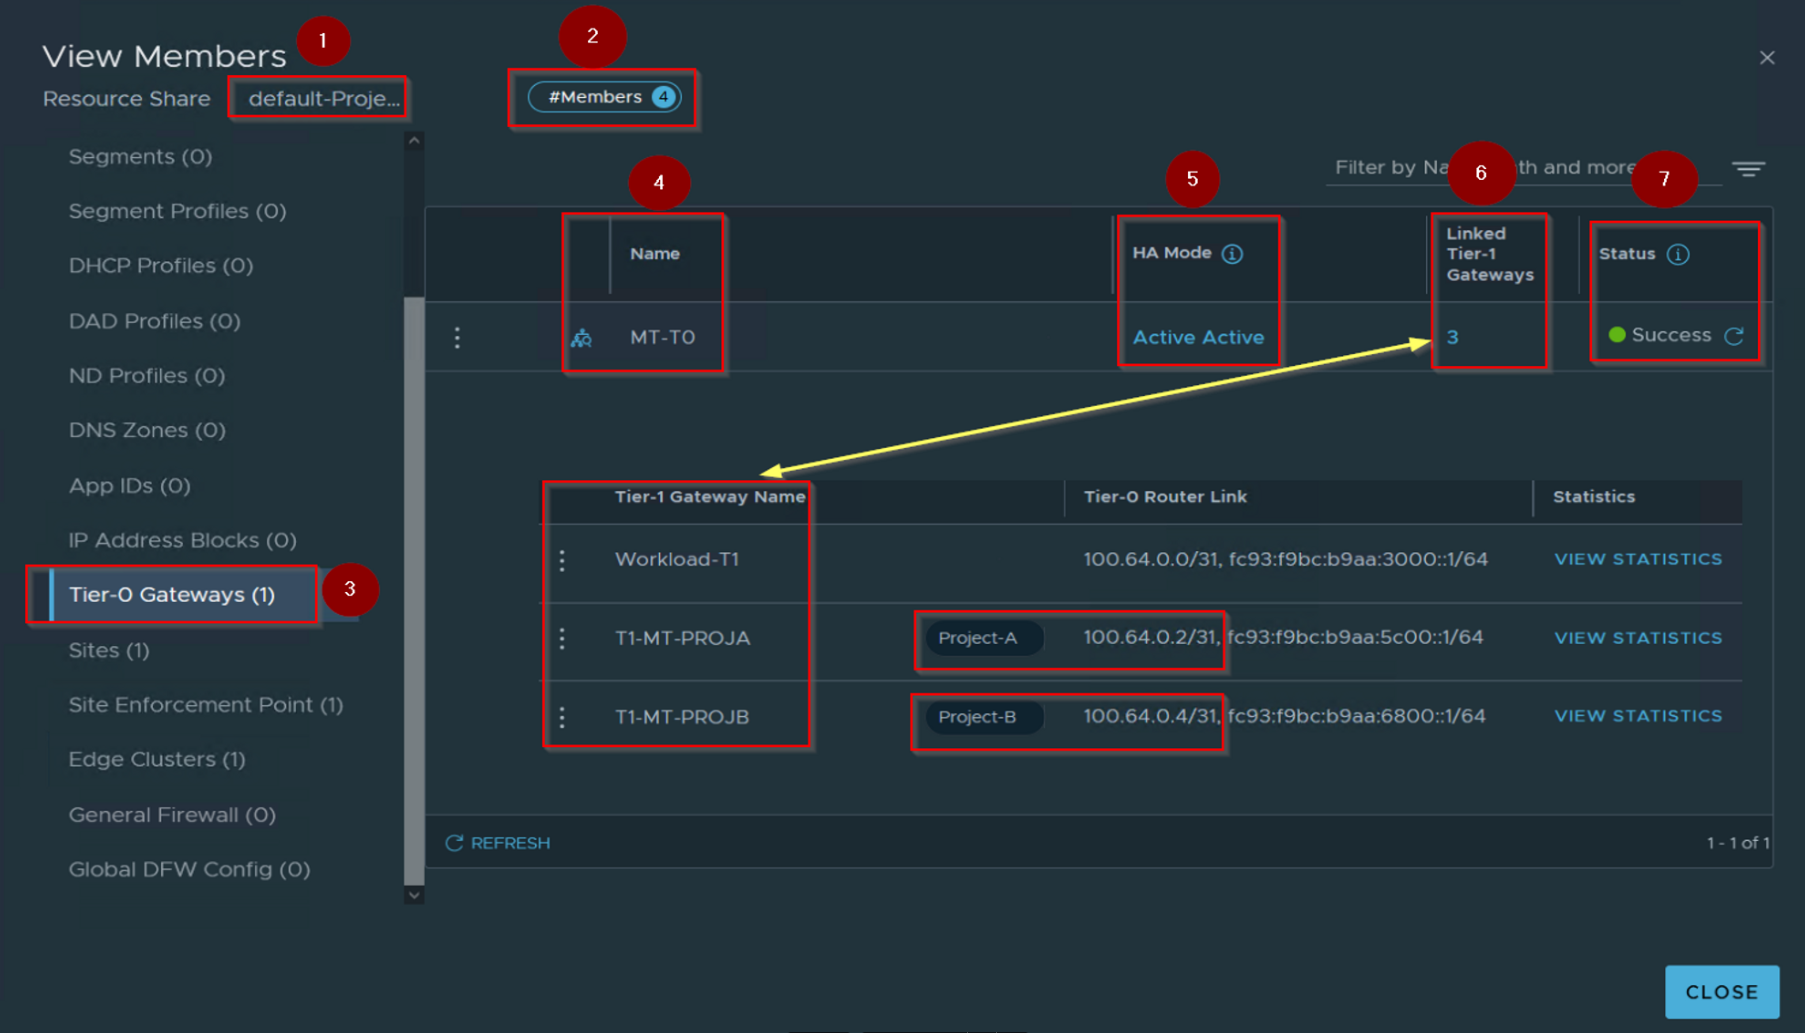
Step 1: – We can see the default-Project-A.
Step2: – We can see the 4 members.
Step 3: – Click on “tier-0 gateways”
Step 4: – Under name we can see the default share Tier-0 gateway name “MT-T0”.
Step 5: – Under HA mode we can see “Active-Active”.
Step 6:- Under linked Tier-1 gateways we can see the numeric value 3. and can see the Tier-1 gateways names and transit subnets.
Step 7: – We can see the status is “Success”.
Capture 4: –
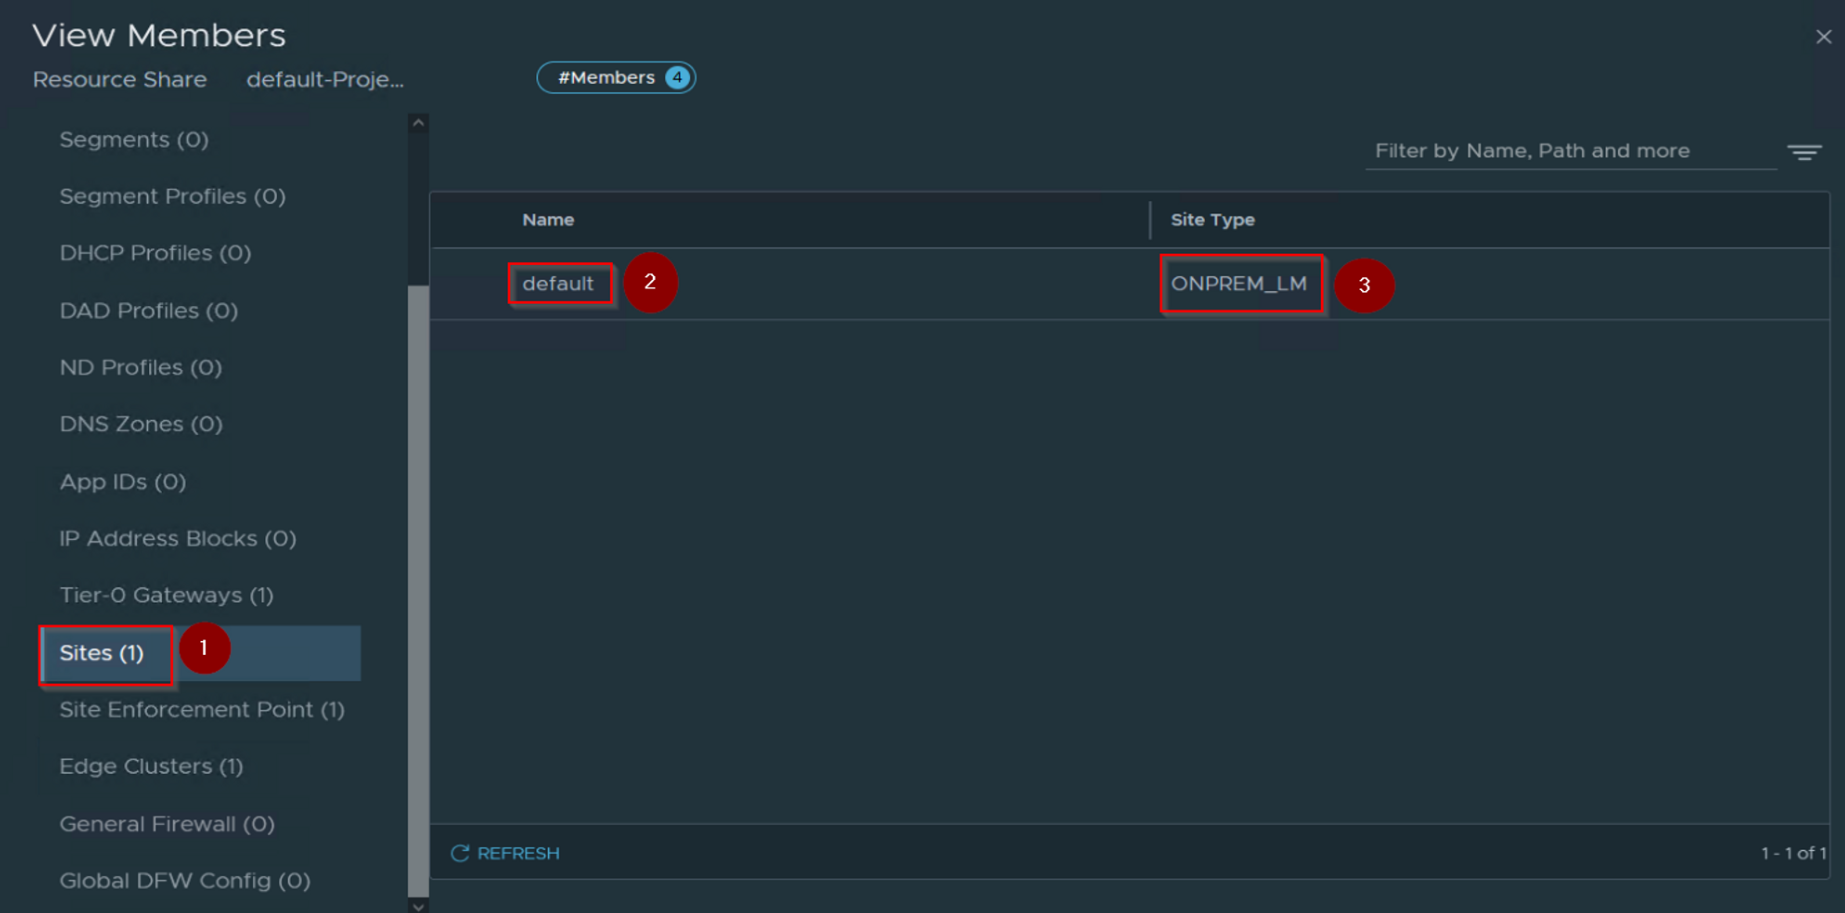
Step 1: – Click on Sites(1)
Step 2: – Under name we can see the “default”.
Step 3: – Under Site type we can see “ONPREM_LM”.
Capture 4: –
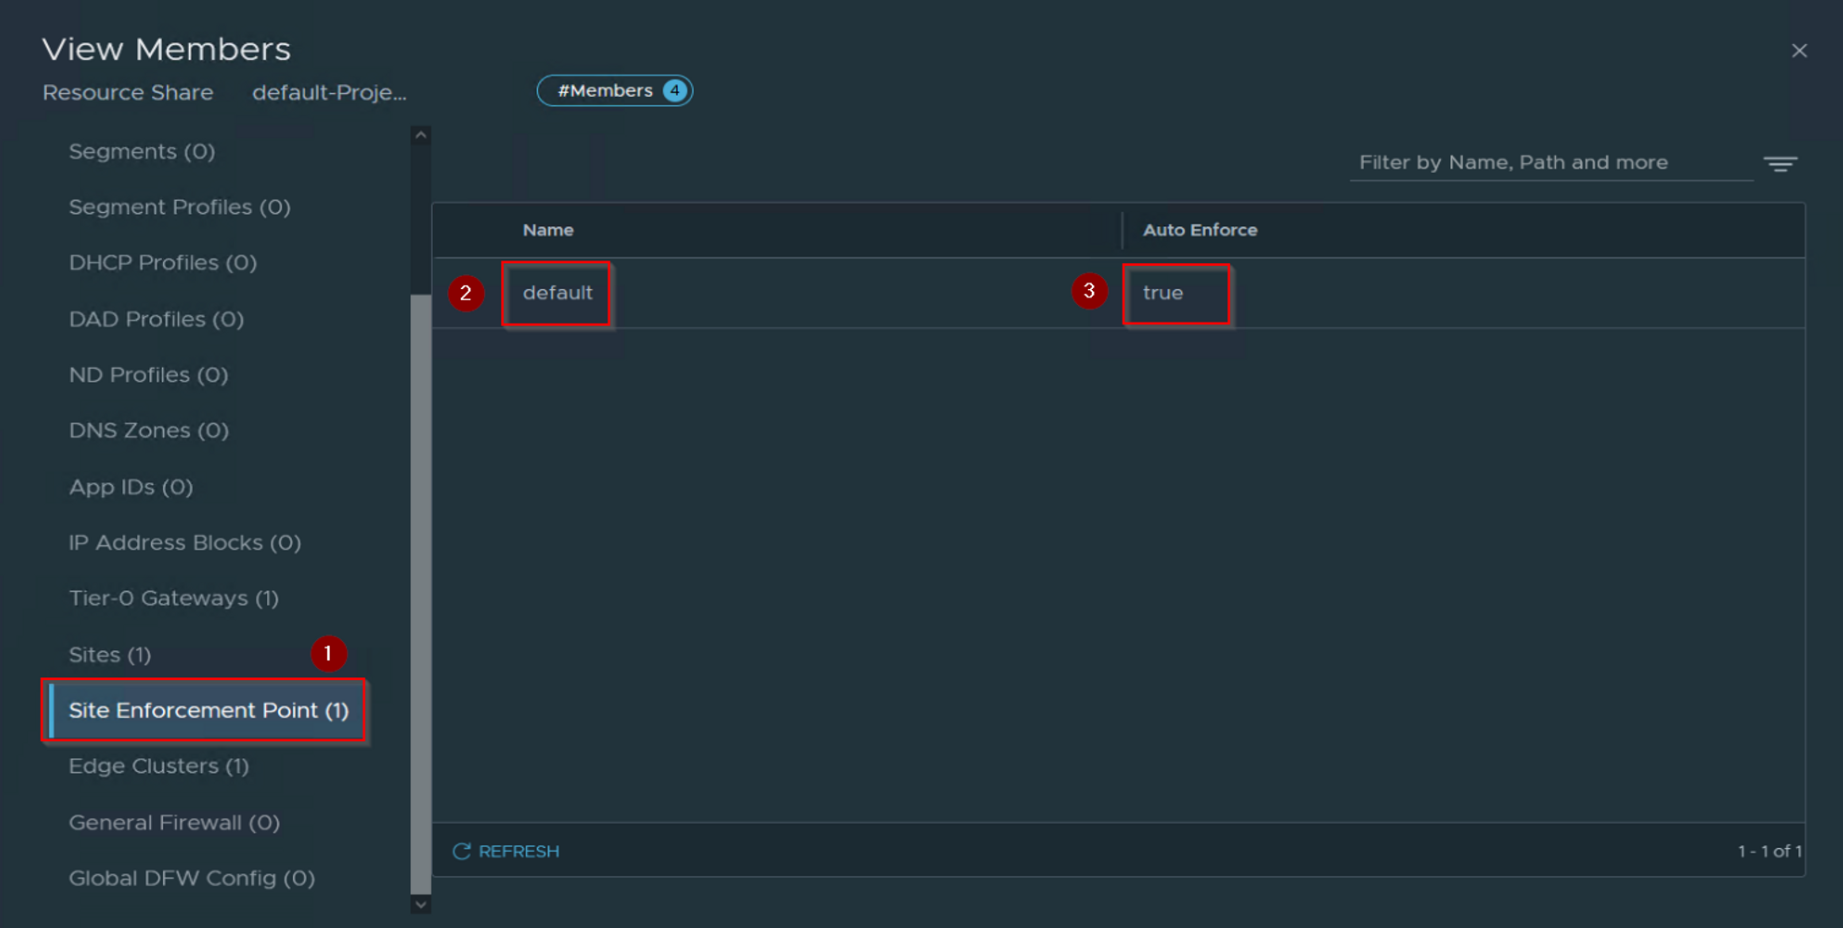
Step 1: – click on Site Enforcement Point.
Step 2: – Under name we can see the “default”.
Step 3: – Under Auto Enforce we can see the value “TRUE”.
Capture 5: –
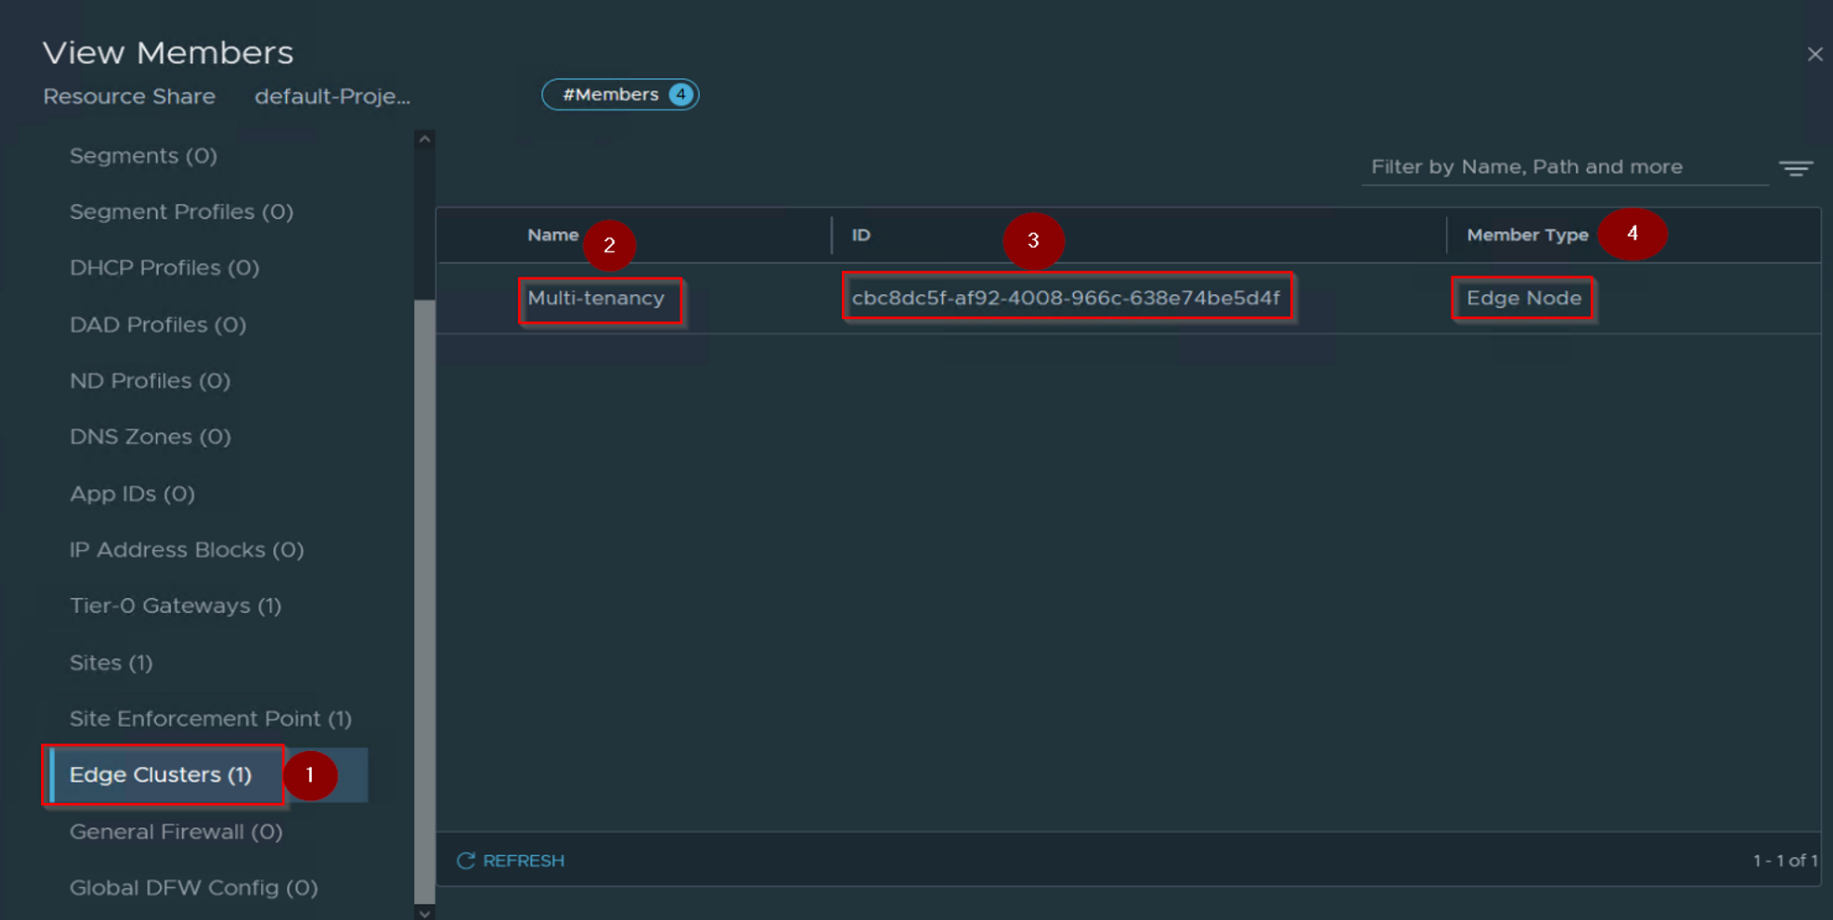
Step 1: – Click on the Edge Cluster.
Step 2: – Under name we can see the edge cluster name “Multi-tenancy”.
Step 3: – Under ID we can see the UUID of the Edge cluster.
Step 4: – Under member type we can see the “Edge node”.
It’s worth noting that we possess the capacity to distribute supplementary resources from the default share to specific projects, all of which are customized to meet particular use cases. These resources include sharing a segment with a project, sharing groups, services, and context profiles, and sharing DHCP profiles, DAD profiles, ND profiles, and DNS zones.
Capture 6:-

Step 1: – Login with the enterprise administrator rights “Admin”.
Step 2: – Project switcher is “Default”.
Step 3: – Click on Inventory.
Step 4: – Click on “Resource Sharing”.
Step 5: – Click on “ADD Resource Share”.
Step 6: – Give the identical name. As per the capture 6 we can see the name is “Resource-allow -for -Project-A”.
Step 7: – Under members we can click on “set”.
Step 8 : – Under share with click on “set” and chose the appropriate option for set members.
For further details about the add resource share & use cases click here.
Step 4: – Quota
Quota is an indispensable tool for enterprise administrators to effortlessly manage resource consumption in their projects. It effectively establishes a boundary on the amount of resources that can be assigned to each project. The project-level quota can be regulated by project administrators who have been allotted the quota by enterprise administrators. It’s crucial to understand that only enterprise administrators have the authority to expand or lessen the quota limit. Project administrators do not possess this power. In situations where the quota limit is not assigned by the enterprise administrator, project admins can implement the maximum limits for NSX objects. If you wish to view the maximum objects configuration, click here.
To better understand how QUOTA works, let’s consider an example where we assign a one-segment creation limit to Project-A administrator.
Capture 1: –

Step 1: – Login as an enterprise administrator rights “admin”.
Step 2: – Select the default from the Project Switcher.
Step 3: – Click on Manage.
Capture 2: –

Step 1: – click on “Quotas”
Step 2: – Click on “Add Quota”.
Capture 3: –
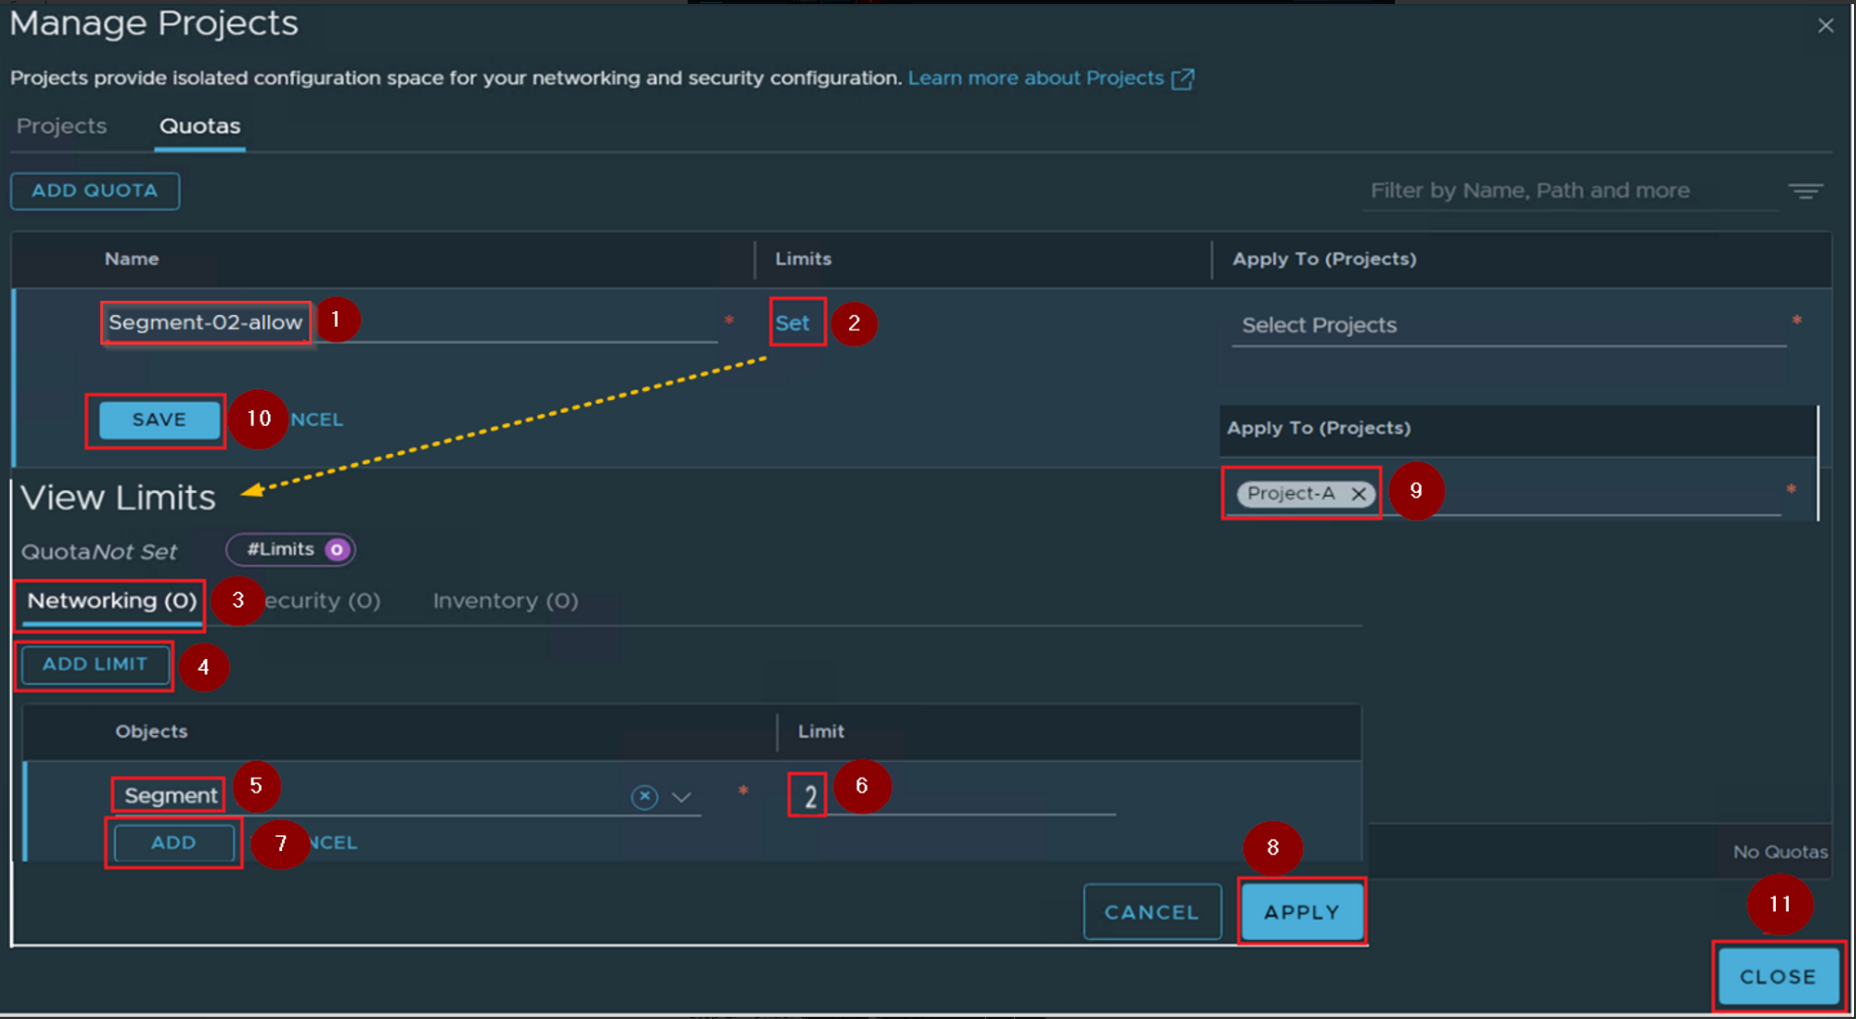
Step 1: – Under Name give the identical name. As per the capture 3 we are using “Segment-02-Allow”.
Step 2: – Under Limit click on “Set”.
Step 3: – Click on “Networking”.
Step 4: – Click on “Add limit”.
Step 5: – Under objects select the object call “segment”.
Step 6:- under limit set the limit 2 (because we are creating only 2 segments).
Step 7: – Click on ADD.
Step 8: – click on Apply.
Step 9: – Under Applied to (Projects) select the Project-A.
Step 10. Click on save.
Step 11: – Click on Close.
Quota Status will helps an Enterprise administrator to monitor the quota status.
Capture 4: –
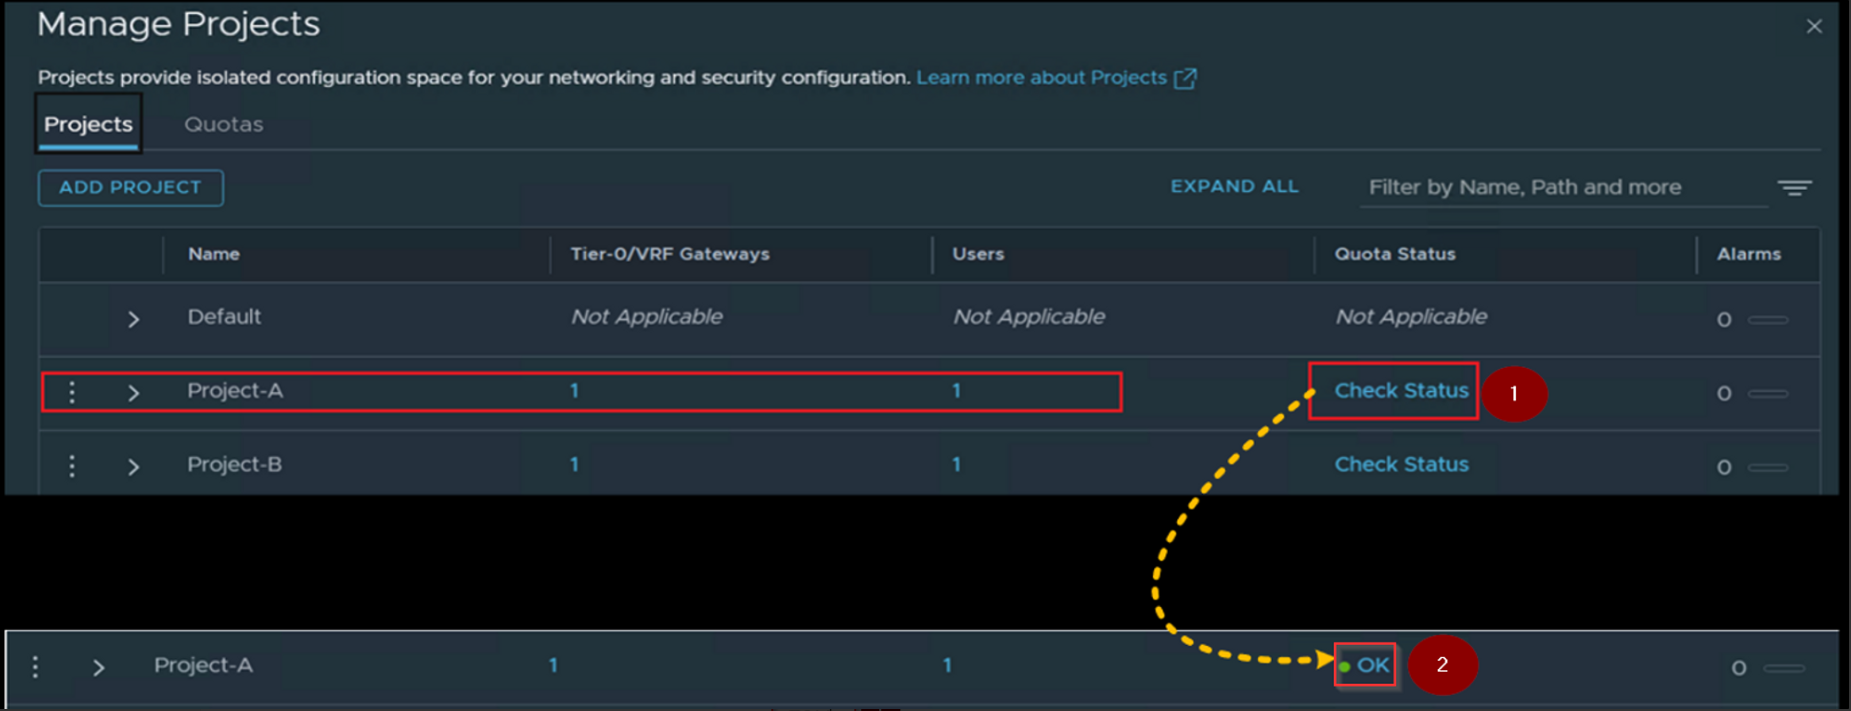
Step 1: – Click on “Check Status” under the Quota Status.
Step 2: – We will find the status “OK”.
Capture 5:-
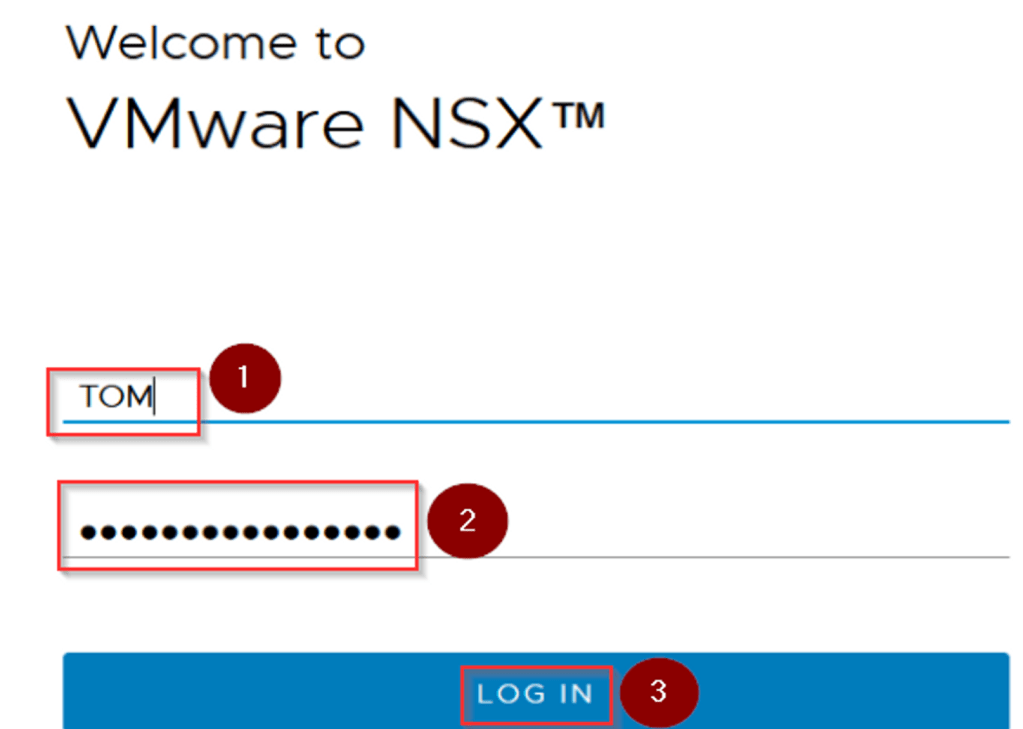
Step 1: – Now we will login on the NSX-T Ui with the user name “TOM”.
Step 2: – Give the password ********
Step 3: – Click on LOG IN.
Capture 6: –
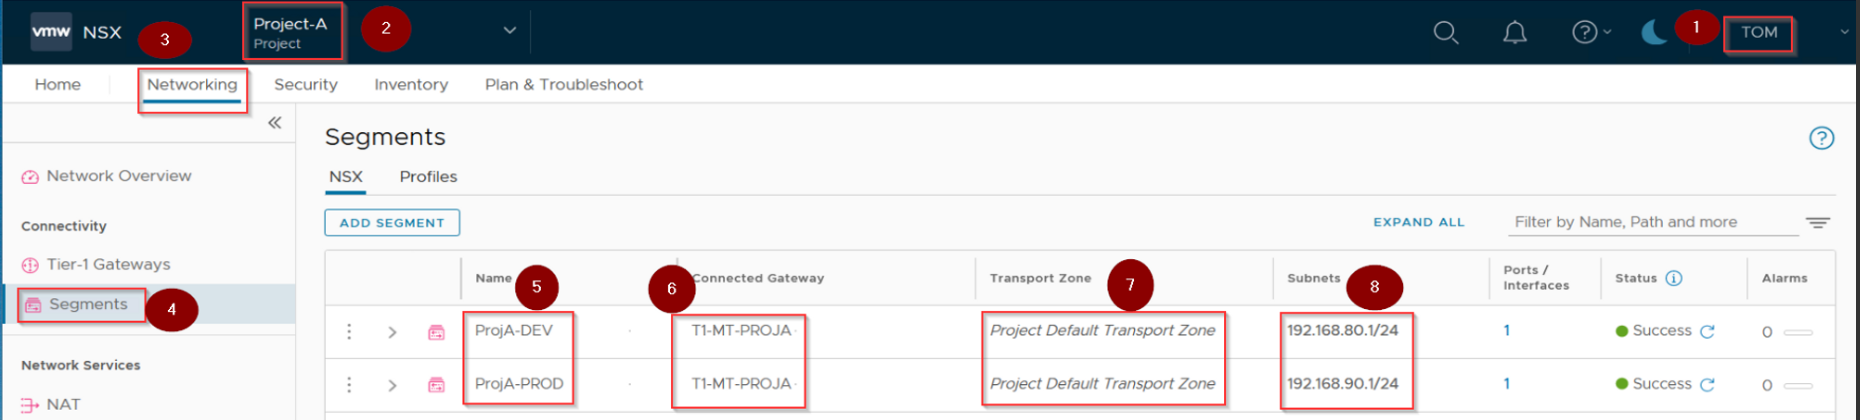
Step1: – Login as a project administrator role “TOM.”
Step 2: – Under Project Switcher we can see the Project-A.
Step 3: – Click on Networking.
Step 4: – Click on Segment.
Step 5: – Under names we can see there are 2 no’s of segments (ProjA-DEV & ProjA-PROD).
Step 6: – Under Connected gateways we can see both segments are connected to the “T1-MT-PROJA”.
Step 7: – We can see the default transport zone assigned.
Step 8: – We can see the subnets of the each project.
Capture 7: –
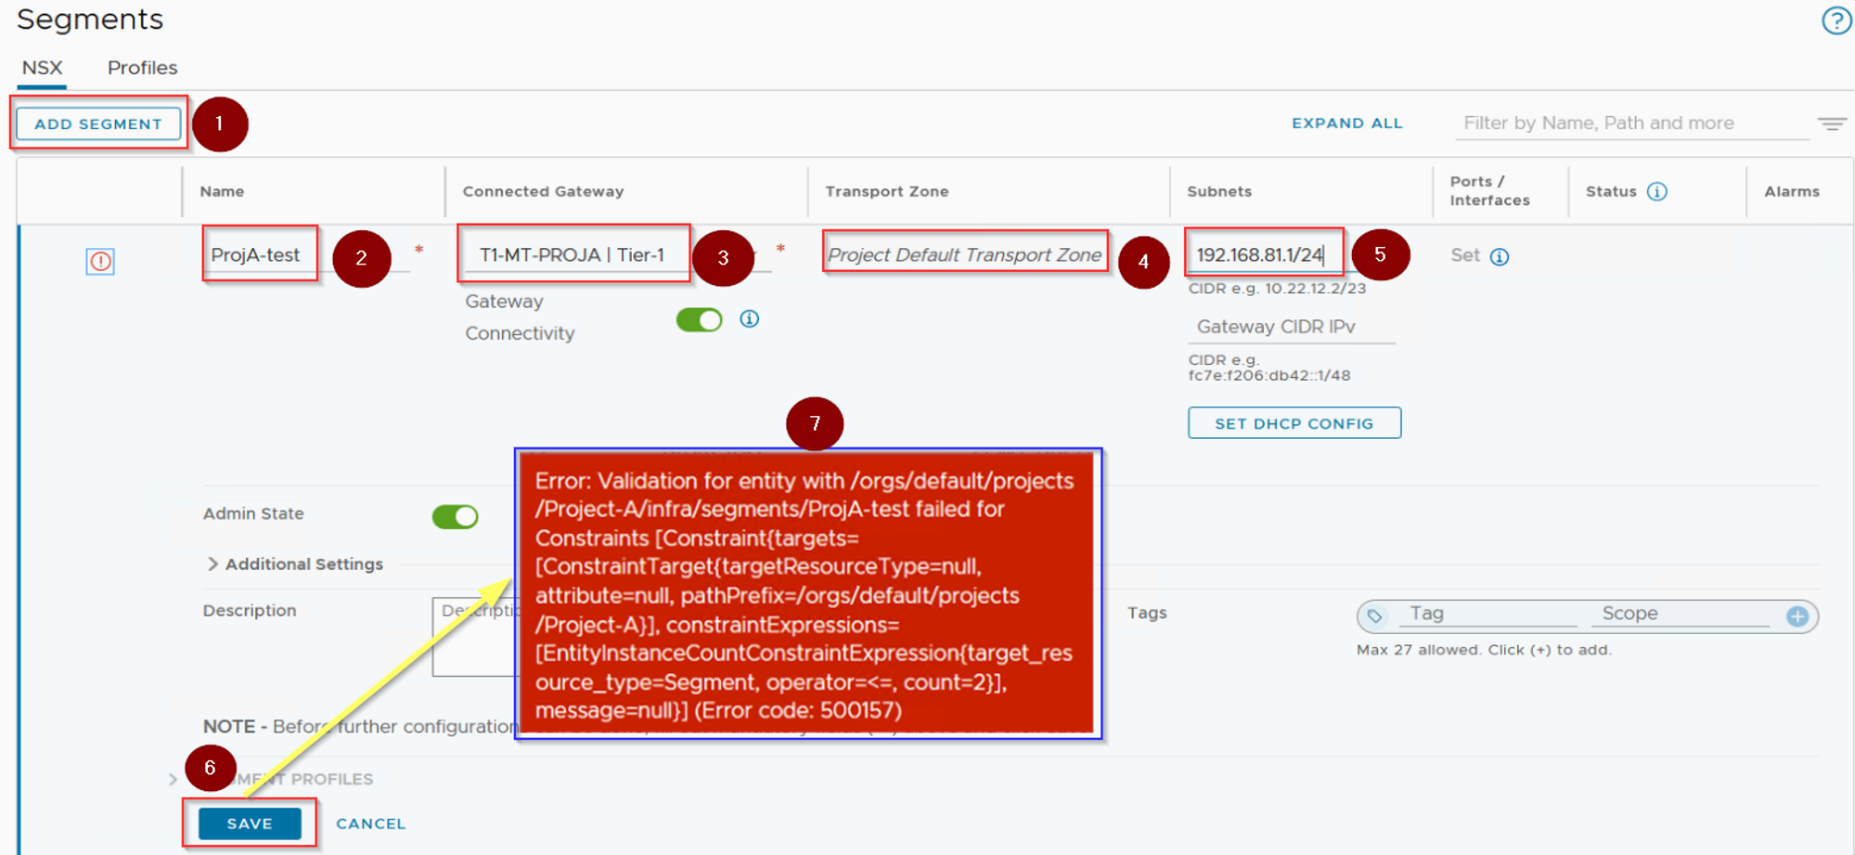
Step 1: – Click on “Add Project”.
Step 2: – Under name we can give the identical name. We have given “ProjA-Test”.
Step 3: – Under Connected gateway select the associated Tier1(T1-MT-PPROJA|Tier 1).
Step 4:- default transport zone auto assigned.
Step 5: – Give the Subnet for the segment.
Step 6: – Click on save.
Step 7:- We can see the error because we have given the limit 02 numbers for segments.
Capture 8: –
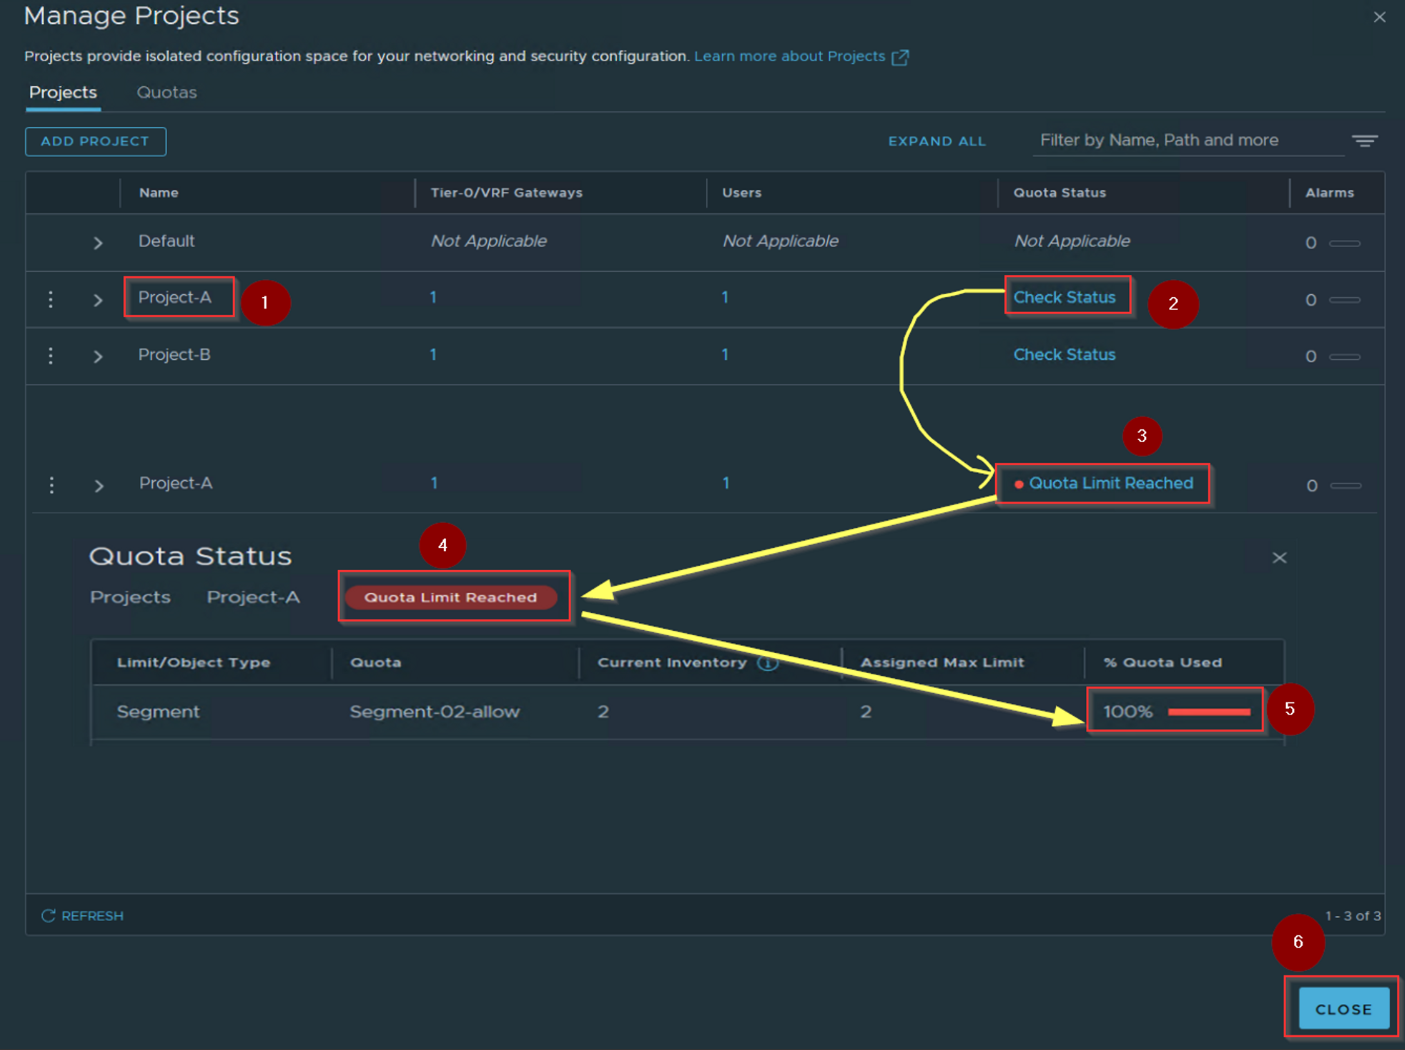
Step 1: – Click on Project-A.
Step 2:- under Quota status click on “Check Status”.
Step 3: – We can see the “Quota limit Reached” alert. click on this alert.
Step 4: – We can expand the alert.
Step 5: – Under quota used we can see the limit is 100% exhausted.
Step 6:- Click on Close.
Note: – Project User can’t see the status of the QUOTA from the NSX-T GUI. Only the default space Enterprise administrator has this privilege.
As an enterprise administrator, it’s crucial to have complete visibility of all project objects, even if you’re in the “Default Space”. If you can’t see these objects from the “Policy” toggle interface, don’t worry. You can simply access the “Manage” toggle interface or switch to the “All Projects” Space in the Switcher Menu to gain the necessary visibility. With these tools at your disposal, you’ll be able to effectively manage and oversee all projects within your organization with confidence.
Capture 9: –
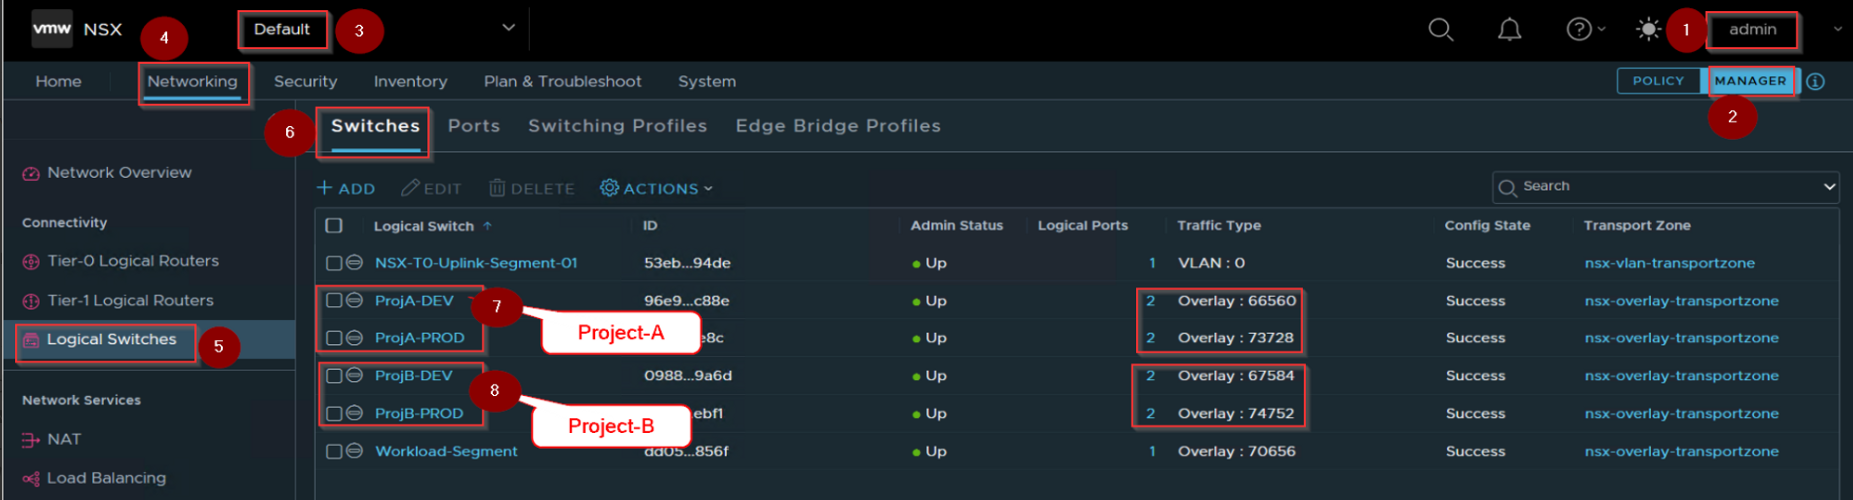
Step 1: – login as an enterprise administrator “Admin”.
Step 2: – Click on toggle interface “Manage”.
Step 3: – Click on “Default” under project switcher.
Step 4: – Click on Networking.
Step 5: – click on logical switches under the connectivity.
Step 6: – Click on Switches.
Step 7: – We can see the Project-A —logical switches(ProjA-DEV & ProjA-Prod)
Step 8:- We can see the Project-B—logical switches(ProjB-DEV & ProjB-Prod).
Capture 10: –
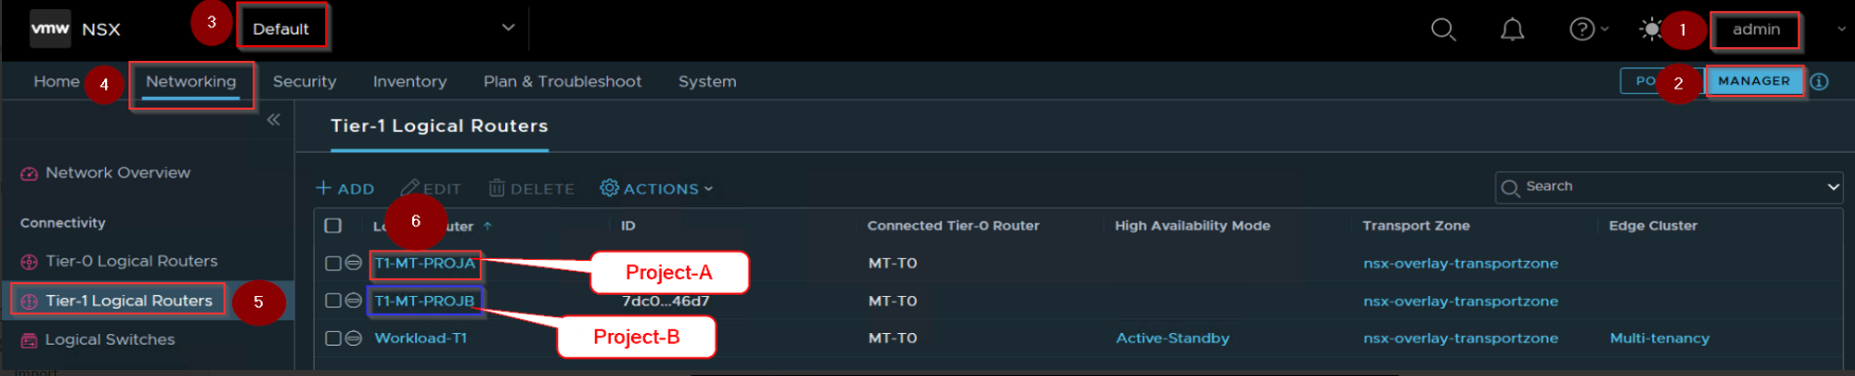
Step 1: – login as an enterprise administrator “Admin”.
Step 2: – Click on toggle interface “Manage”.
Step 3: – Click on “Default” under project switcher.
Step 4: – Click on Networking.
Step 5: – click on Tier-1 logical routers under the connectivity.
Step 6: – We can see the logical router of Project-A(T1-MT-PROJA) & Project-B (T1-MT-PROJB).
Capture 11: –
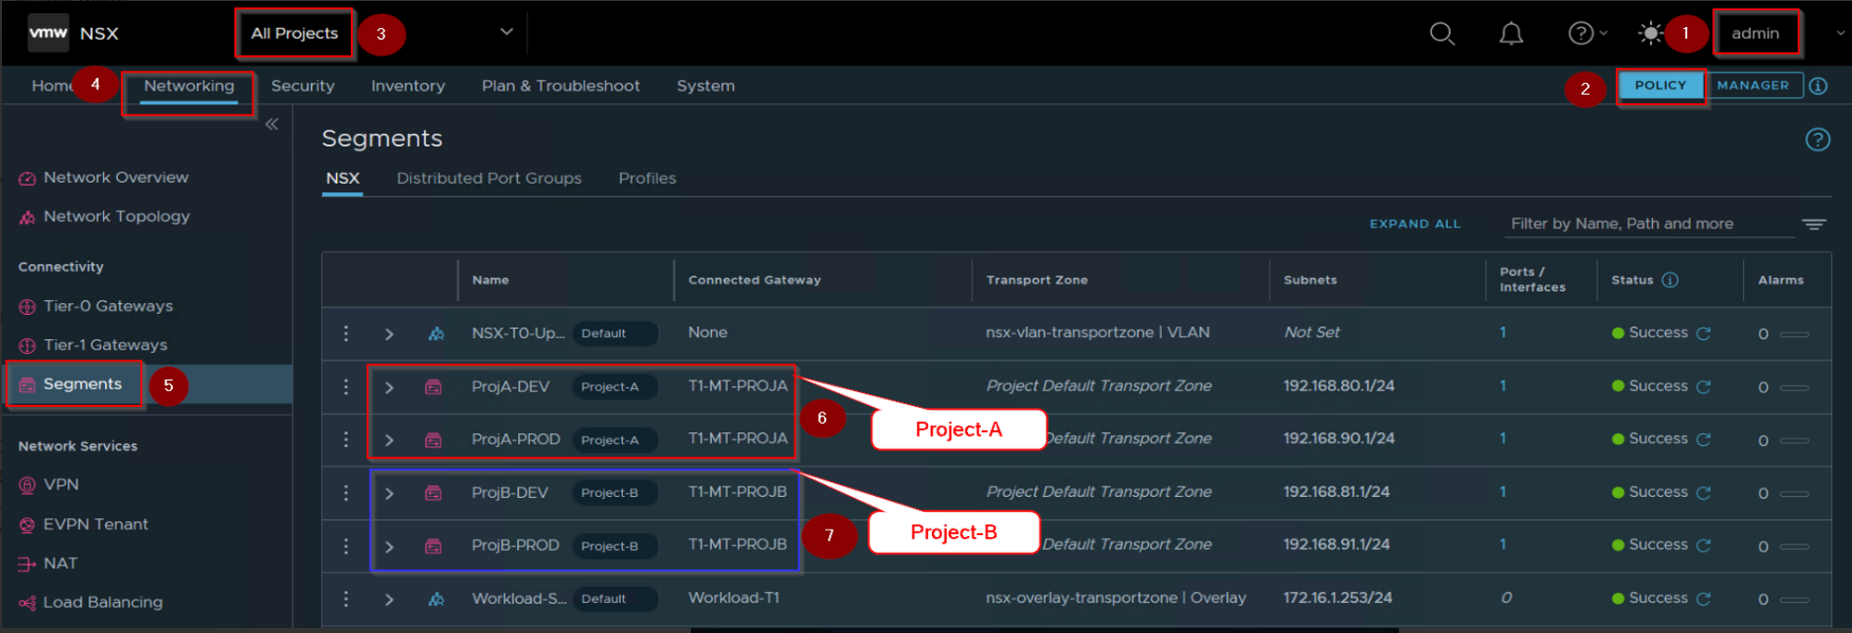
If you want to see the consolidated view of all projects from the policy toggle interface then follow the below.
Step 1: – login as an enterprise administrator “Admin”.
Step 2: – Click on toggle interface “Policy”.
Step 3: – Click on “All Projects” under project switcher.
Step 4: – Click on Networking.
Step 5: – click on segments under the connectivity.
Step 6: – We can see the Project-A —logical segments(ProjA-DEV & ProjA-Prod) connected to associated T1 Gateway(T1-MT-PROJA).
Step 7: – We can see the Project-B—logical segments(ProjB-DEV & ProjB-Prod) connected to associated T1 Gateway(T1-MT-PROJB).
Conclusion
Thank you for taking the time to read this!
In Part 3, we will cover critical topics that are essential for your project’s success. We will dive into configuring project networking and effective communication practices within the project.
Stay tuned for valuable insights and tips that will help you take your project to the next level!

Leave a reply to Chanpreet Cancel reply