
- Introduction
- High level diagram with Prerequisite
- Terraform implementation workflow
- Deleting Configuration Objects From Terraform
- Conclusion
Introduction
NSX version 4.1.2 has introduced Multi-tenancy’s Project feature support through terraform provider version 3.5.x. Terraform has earned recognition as an Infrastructure as a Code (IAAC) tool utilized to manage infrastructure resources. The Project feature is the first level of tenancy in NSX, designed to facilitate collaboration among multiple users on the platform. This feature enables the isolation of configurations and the definition of security scopes specific to the project. Note that the distributed security configured in a Project applies only to VMs connected to networks from that Project.
The latest update of the NSX Terraform Provider adds support for Projects and configuration within the context of a Project. This allows NSX consumption via Terraform but within a tenant (Project). Terraform now provides support for the following Multi-tenancy feature sets:
- Terraform Support for NSX Project: The NSX Terraform Provider supports Project creation, which allows the creation of a tenant for a group of users to work collaboratively. This feature enables the consumption of NSX through Terraform within a Project.
- Tenant Aware Logging: The labeling of the logs in Project/VPC with the short ID has been extended to include routing and service logs (such as NAT and Edge datapath). This feature enables the identification of the Project to which the logs belong. In addition, it is possible to assign a Tier-0/VRF to a Project to have its logs labeled with the Project short ID. However, the configuration of Tier-0/VRF remains the responsibility of the Enterprise Admin.
This update enhances the multi-tenancy capabilities of NSX and provides a more efficient and secure platform for collaboration among multiple users.
Note: – The NSX platform has recently introduced NSX VPCs, which bring a second layer of tenancy and cloud consumption capabilities. NSX VPCs essentially allow users to create multiple isolated environments within a single NSX instance, enabling them to better manage their cloud resources. However, it’s worth noting that the current version of Terraform Provider does not yet fully support NSX VPCs. Therefore, users who rely on Terraform for their infrastructure management may need to explore other options until support for NSX VPCs becomes available.
High level diagram with Prerequisite
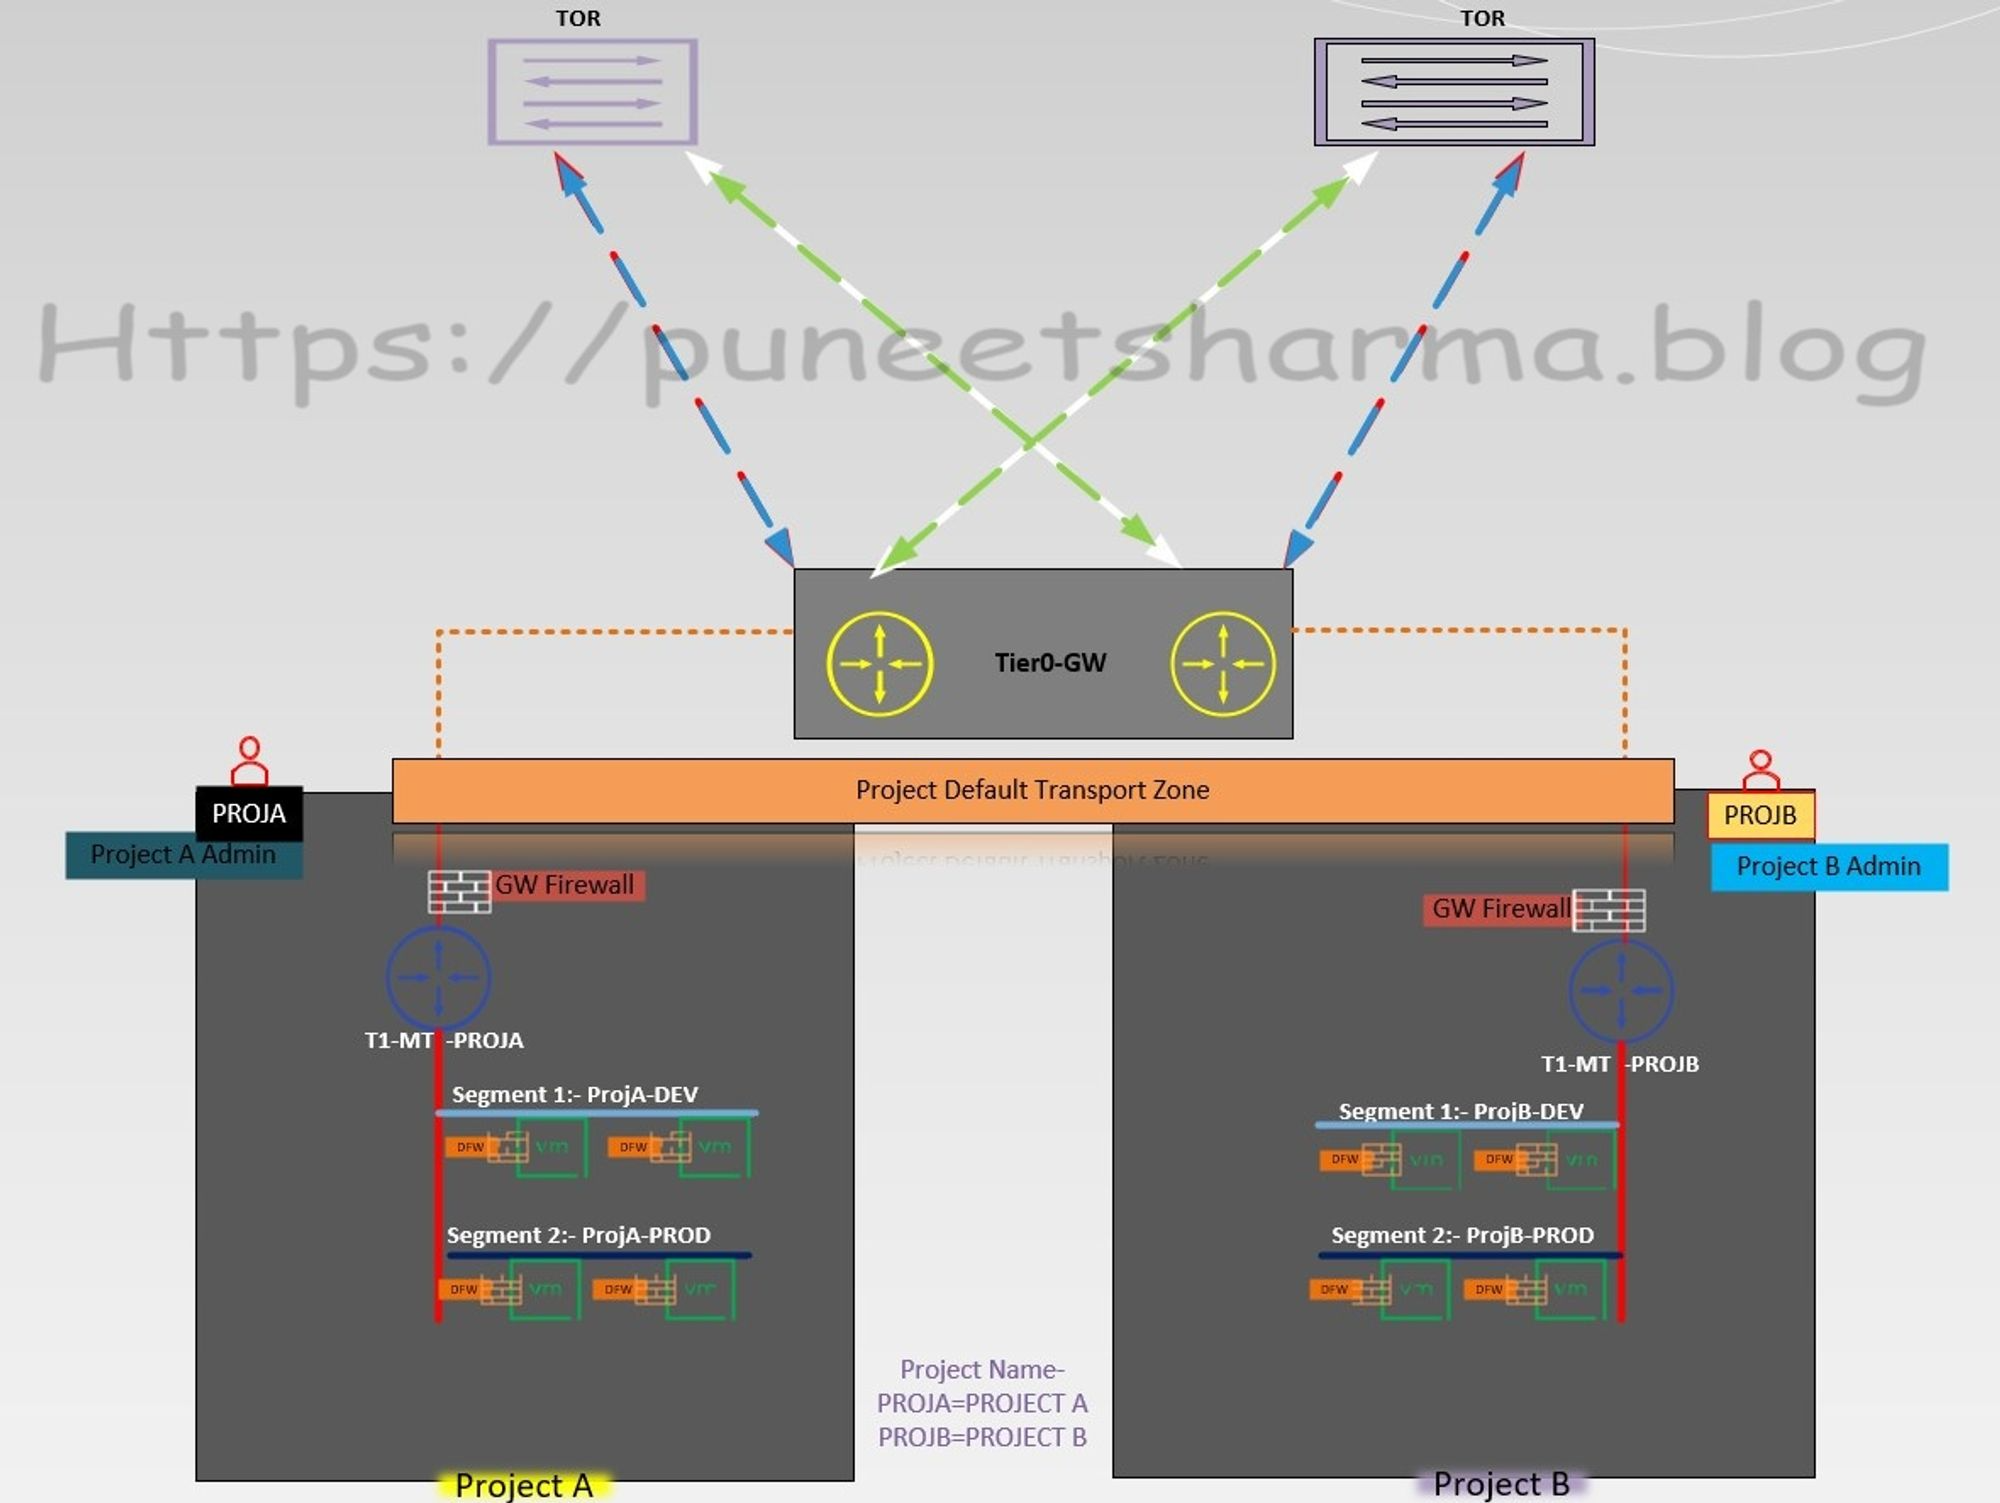
- Before exploring the feature sets of NSX Multi-tenancy, it is important to take a closer look at the prerequisites. Firstly, it is recommended to install Terraform on either a Windows machine or a Linux server. In my environment, I am using a Windows binary (https://developer.hashicorp.com/terraform/install) to facilitate pushing the Terraform commands towards the NSX platform, with GITBASH (https://git-scm.com/downloads) being utilized as well.
- To ensure smooth NSX consumption, it is crucial to prepare the ESXi hosts and Edges under the default transport zone, with the edges being a part of the edge cluster. This ensures that the setup is in line with the recommended guidelines and leads to a more efficient and effective setup.
- With respect to the default Tier-0 and its respective components, Terraform will be used to configure them. This includes uplink interfaces, default transport zones, and BGP. However, it is important to note that RBAC for projects will be created manually, as this will lead to increased security and better control over the projects.
- When it comes to projects associated with Tier-1 and its respective components, Terraform will be utilized for configuration. This includes HA-Mode, linked Tier-0 gateway, Edge cluster, and route advertisement. This will ensure that the projects are configured in a consistent and efficient manner.
- Similarly, Terraform will be used to configure the projects associated with segments and connected with their respective Tier-01. This will ensure that the projects associated with segments are set up correctly, leading to a better overall experience.
Terraform implementation workflow
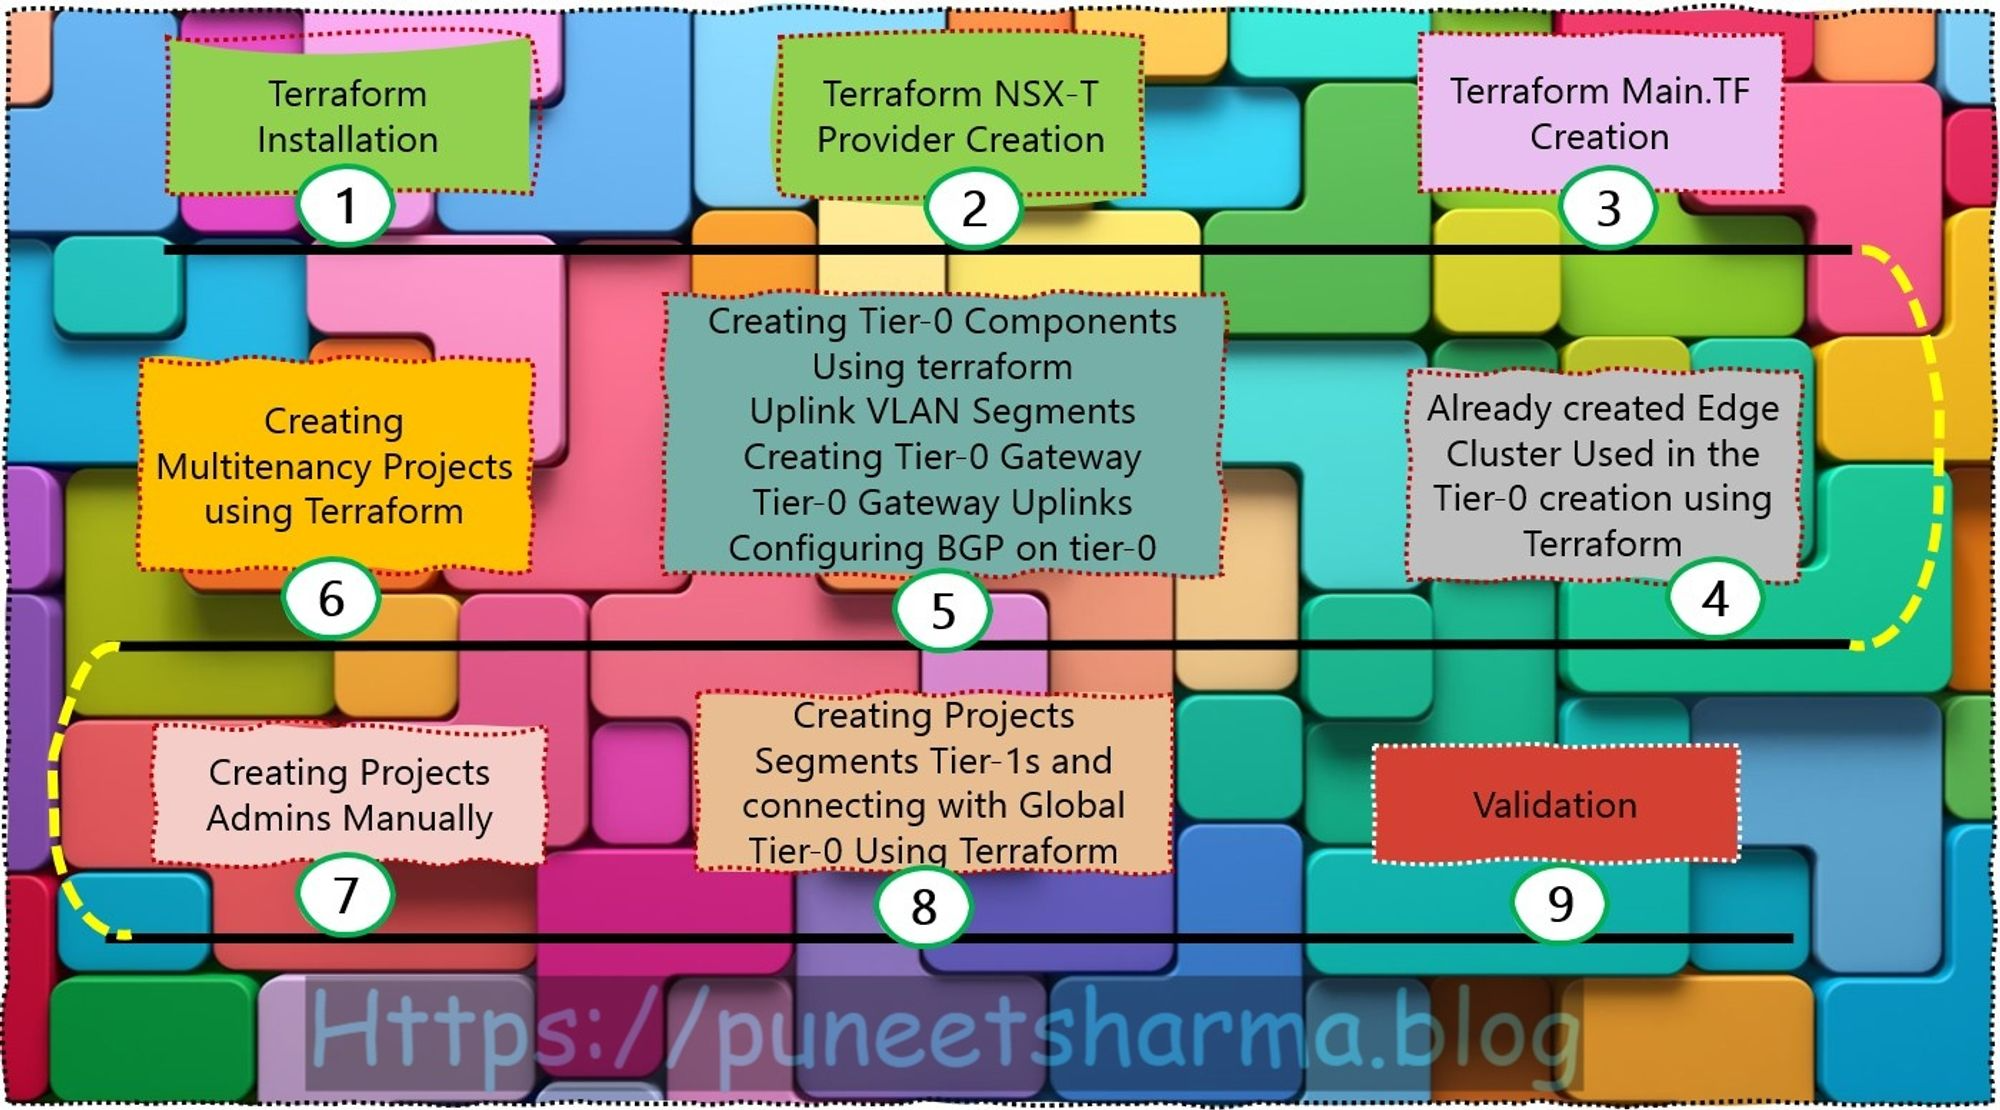
Step 1: – Terraform installation- There exist various methods to install Terraform. In my case, I am using a Windows binary from https://developer.hashicorp.com/terraform/install to facilitate the execution of Terraform commands towards the NSX platform. Additionally, I am utilizing Git Bash (https://git-scm.com/downloads) as well. This approach aids in the flexibility and ease of managing infrastructure as code in a consistent and predictable manner.
Capture 1: –
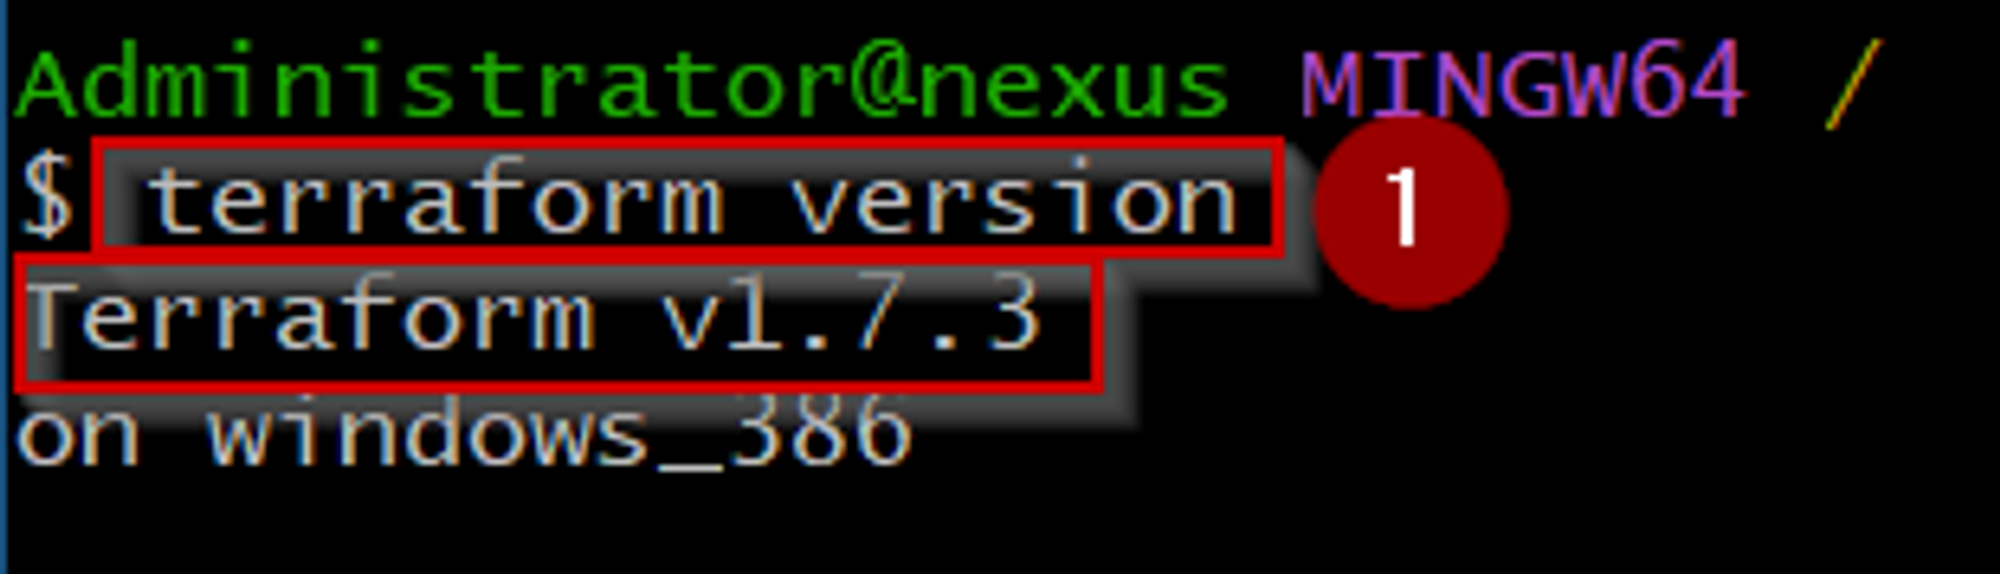
As shown in Capture 1, we are running the cmd “terraform version” on the GITBASH platform to know the currently running version of terraform.
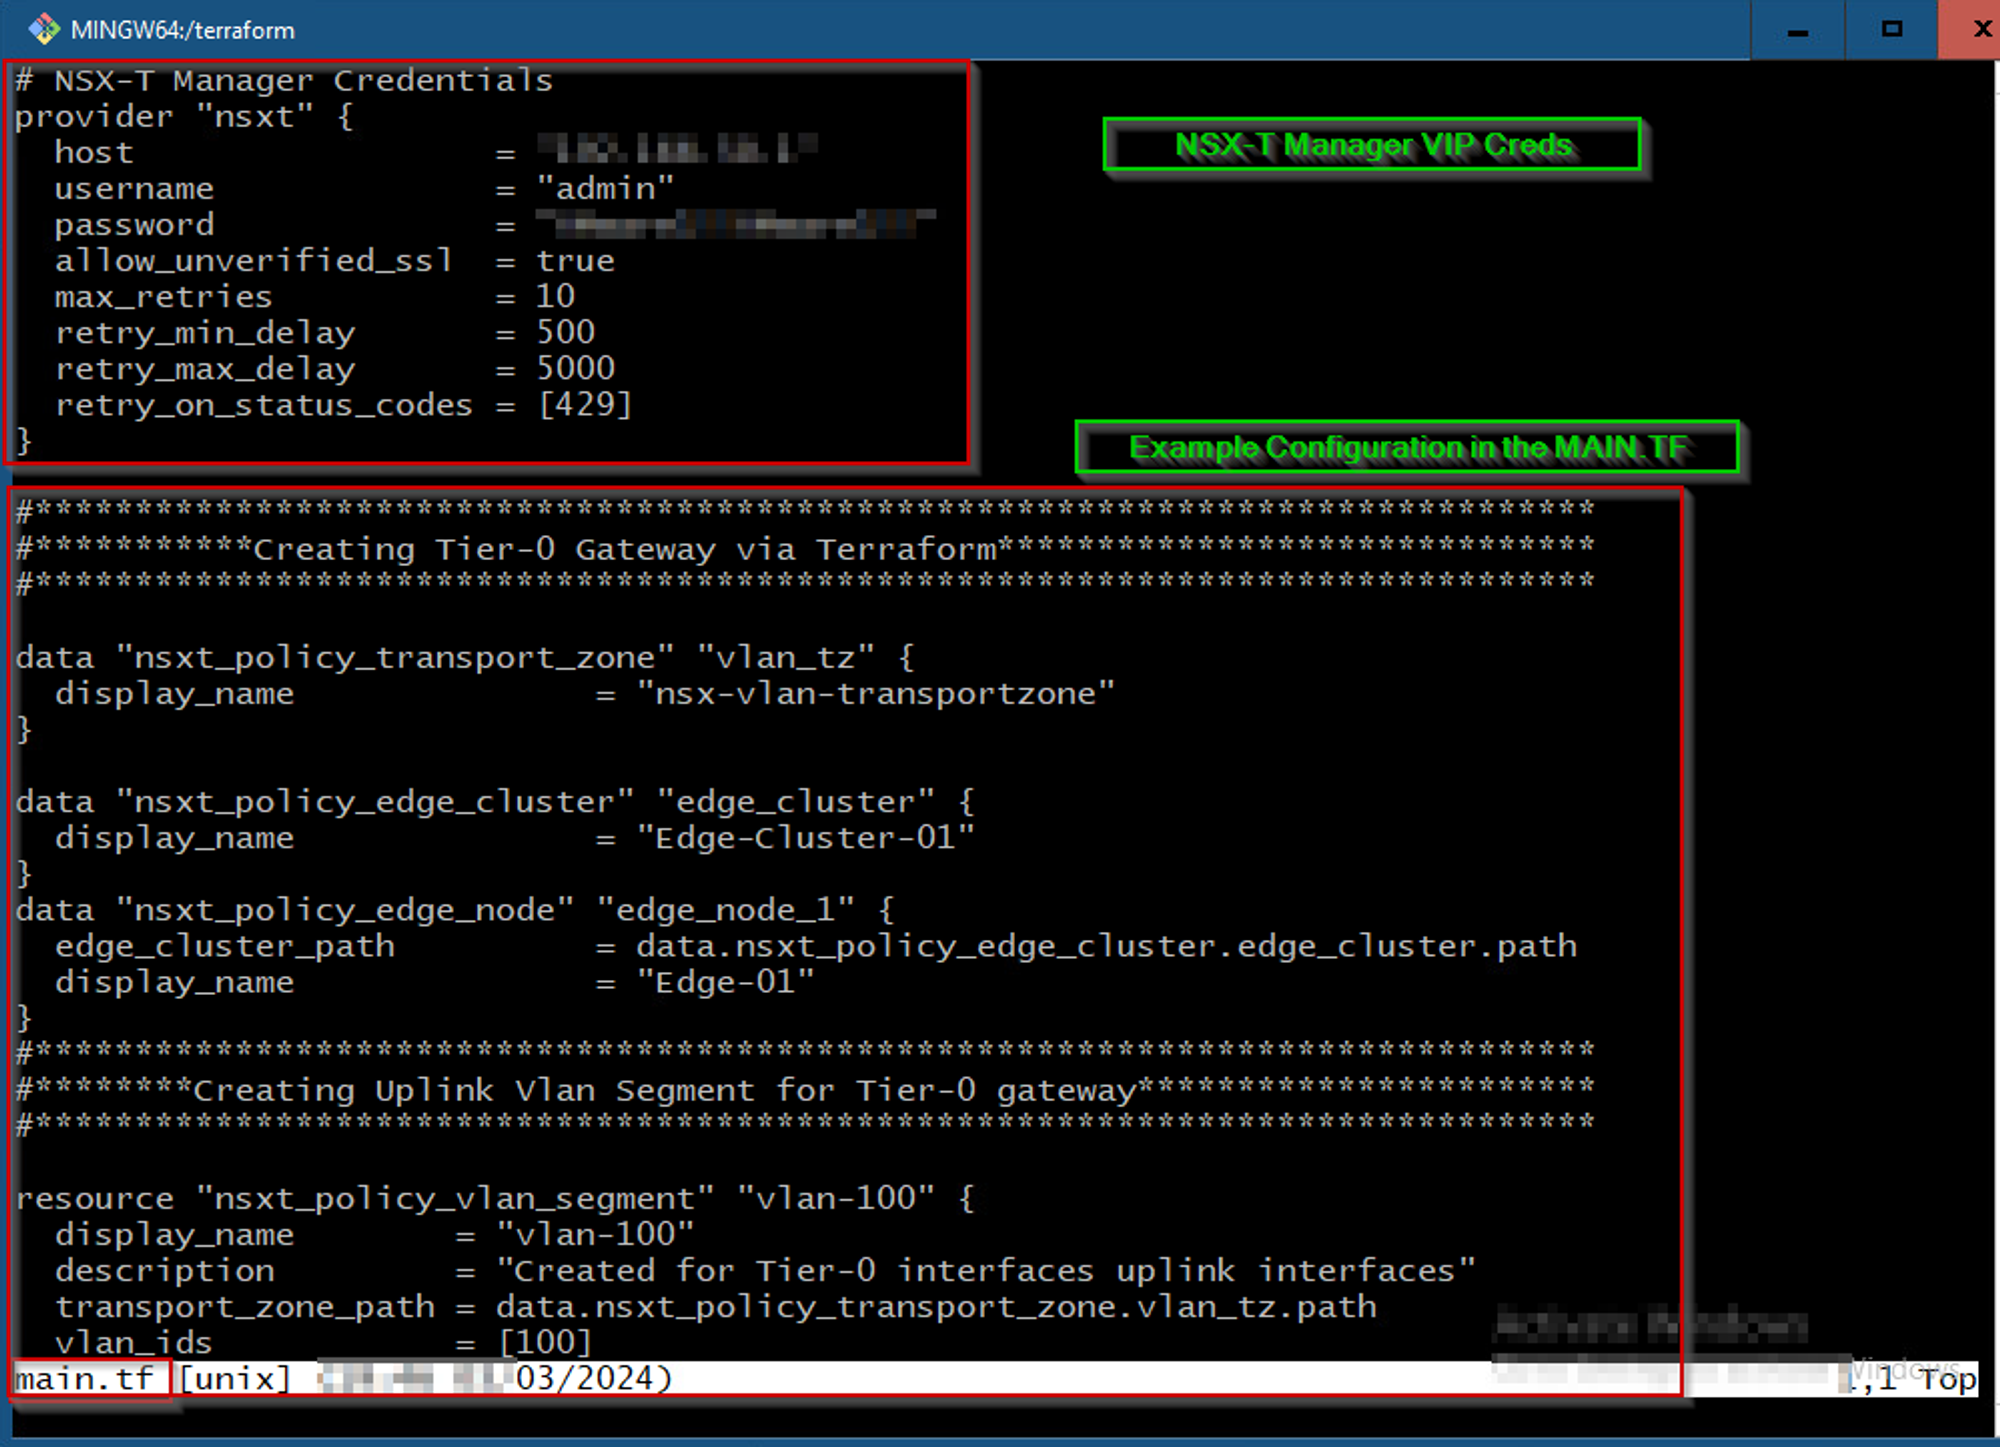
Step 2:- Terraform NSX-T Provider: – This file will include the VMware NSX-T providers. This file object will make a connection between Terraform & NSX-T managers.
Capture 2: –
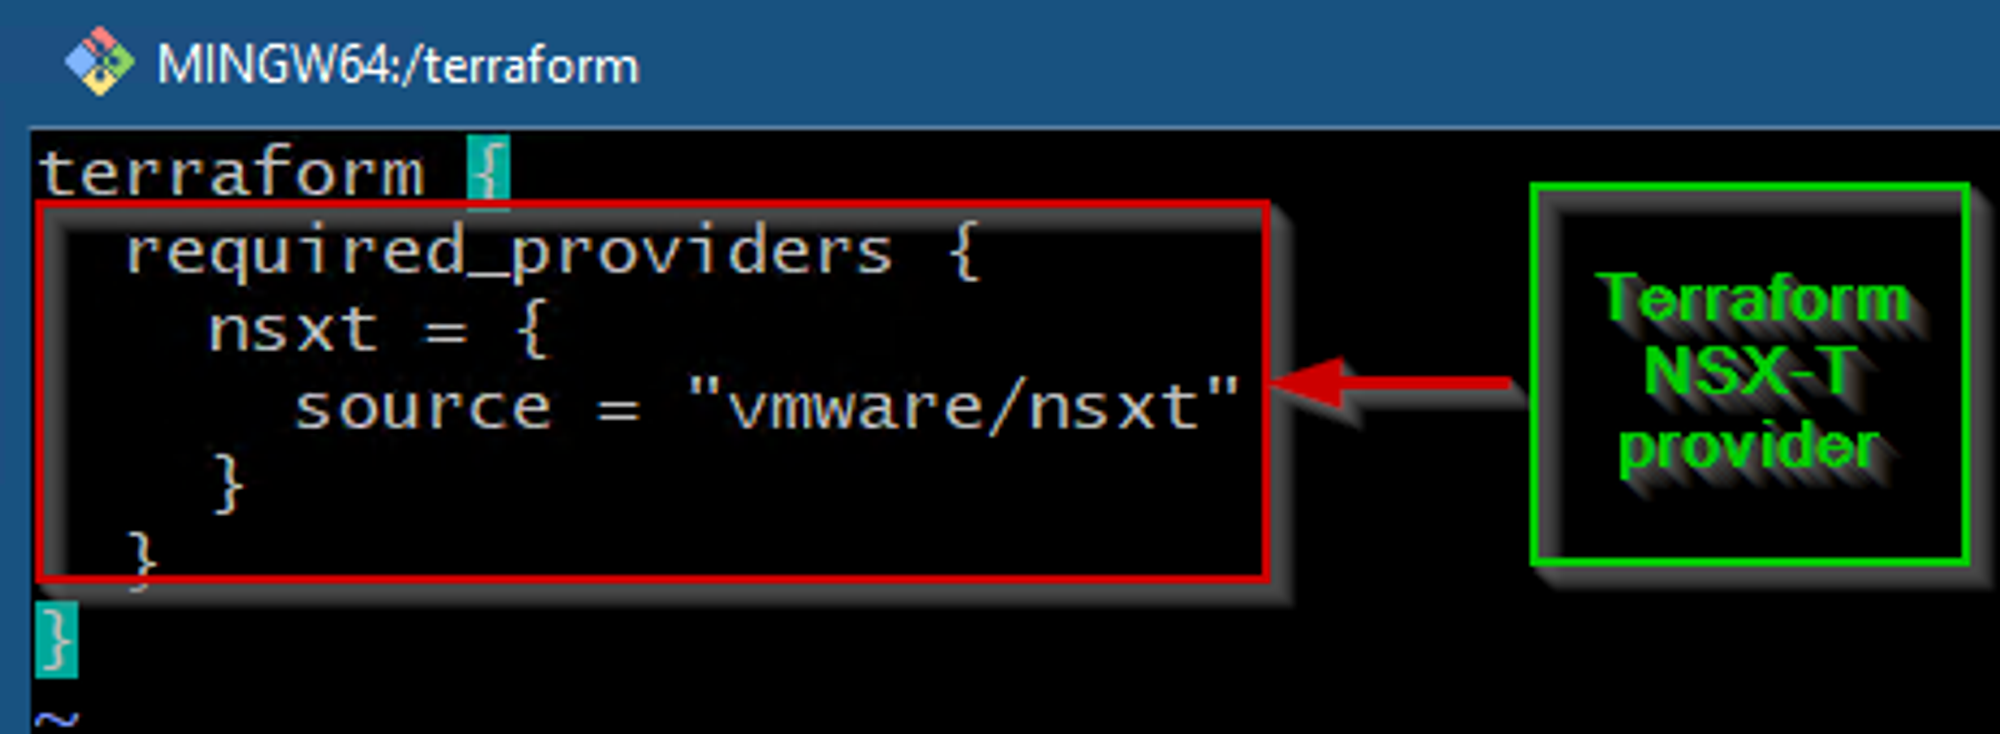
As shown in Capture 2, we can see NSXT we have given as provider and the source is vmware/nsxt.
Step 3: – Terraform Main.TF creation —The following terraform file comprises a configuration that effectively generates the necessary NSX-T, vSphere, and Edges objects. It is worth noting that this document solely pertains to terraform providers within the specified scope and does not extend to any other providers.
Capture 3: –
Step 4: – Already created Edge Cluster Used in the Tier-0 creation using Terraform— We have manually created the edge cluster and manually added the respective edges in the edge cluster.
Capture 4: –
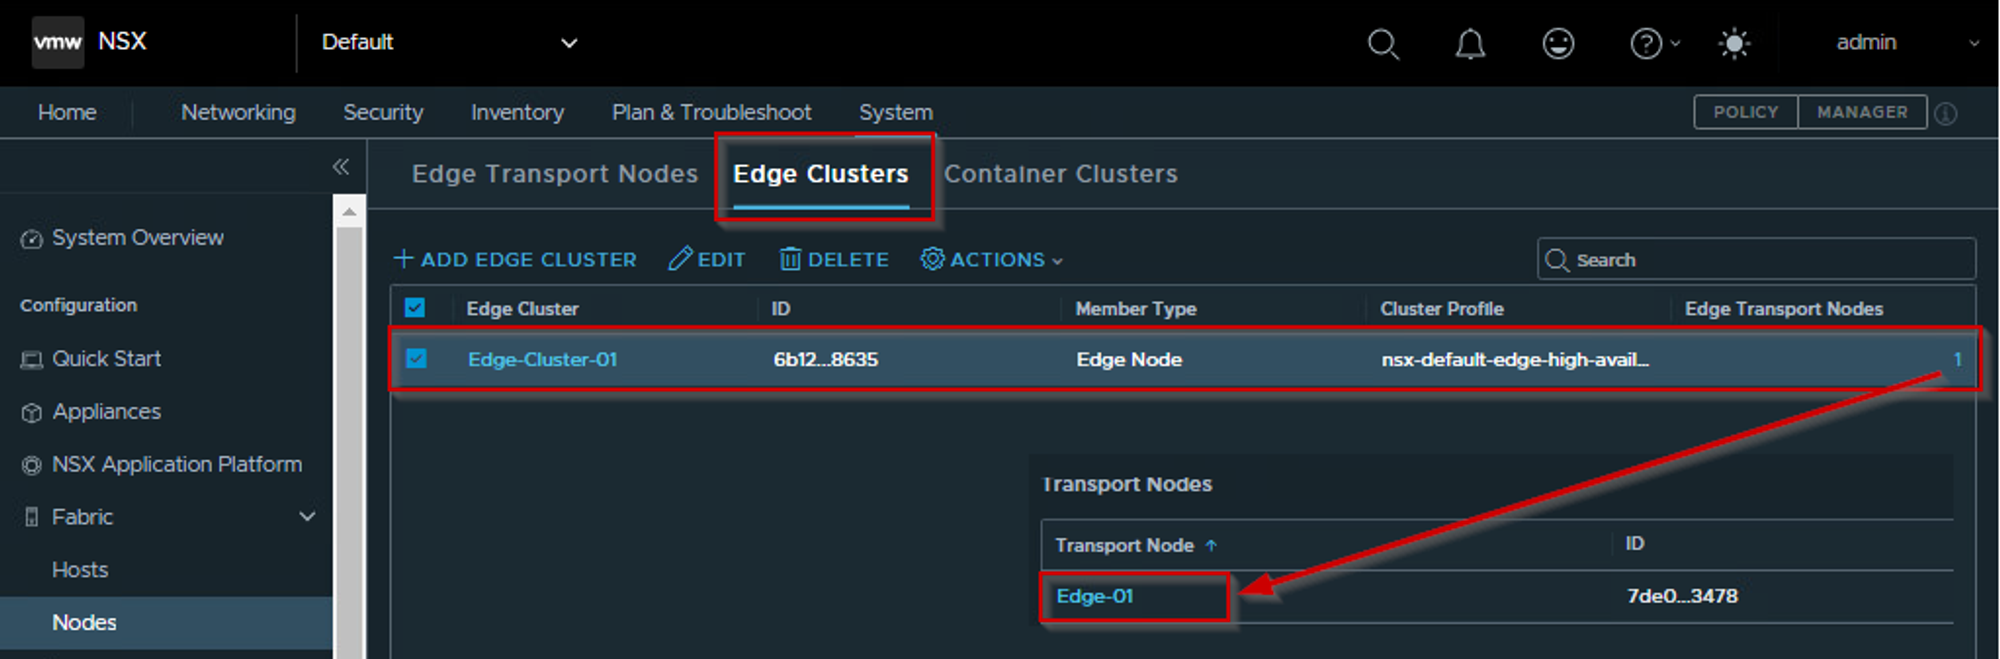
Capture 4.1: –
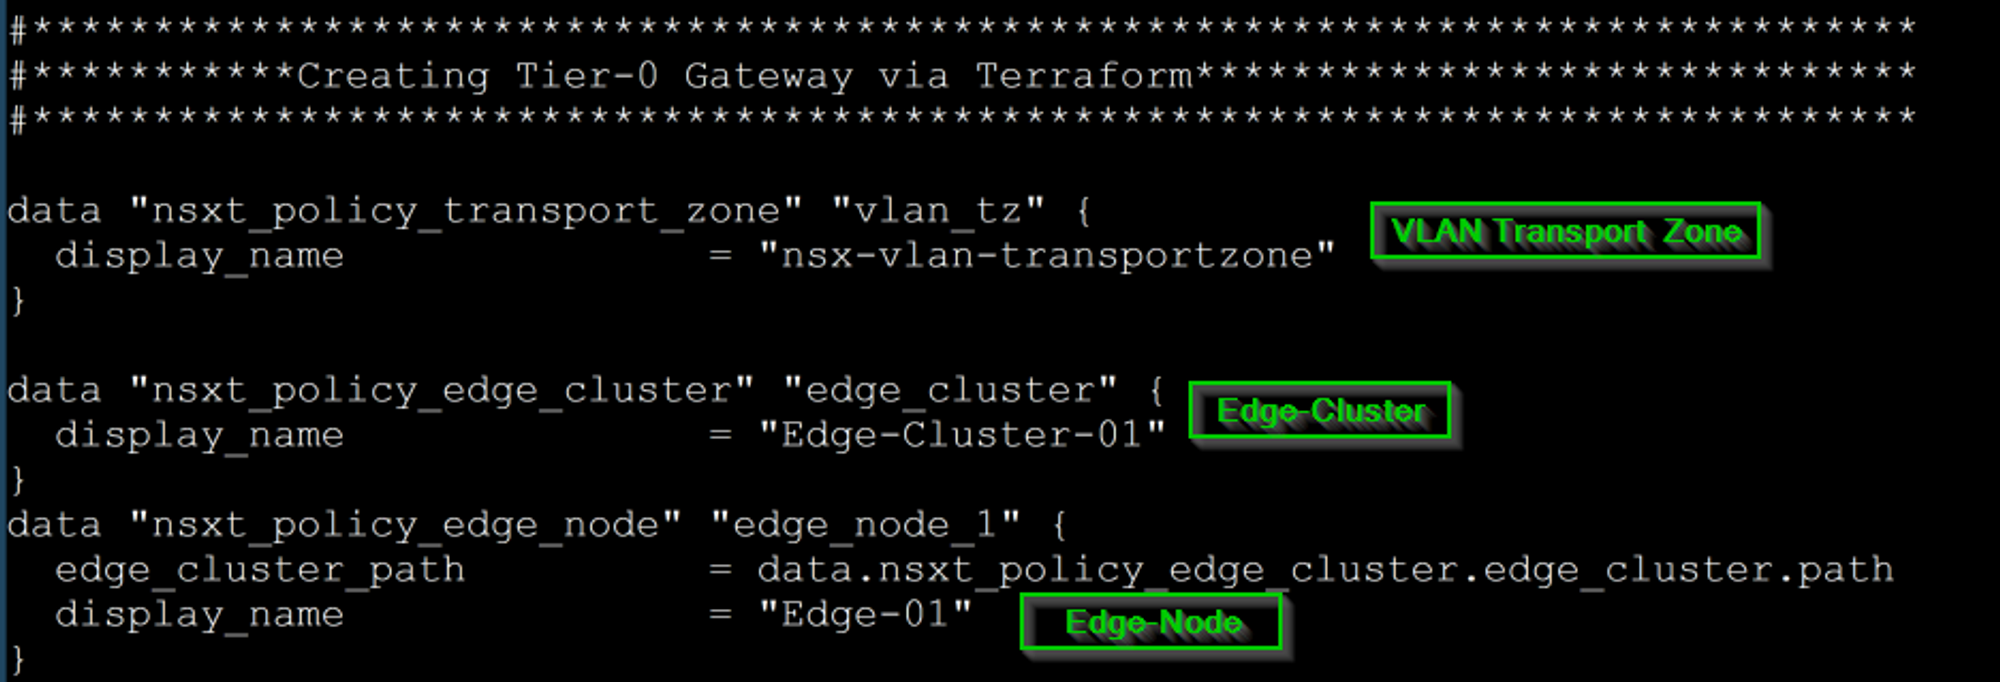
As shown in Capture 4.1, we can see the already defined Edge Cluster ”Edge-Cluster-01” and Edge Node – ”Edge-01” are calling in the Tier-0 creation body.
Step 5: – Creating Tier-0 Components Using Terraform — We will create Tier-0 & its components using Terraform scripts.
Capture 5: –
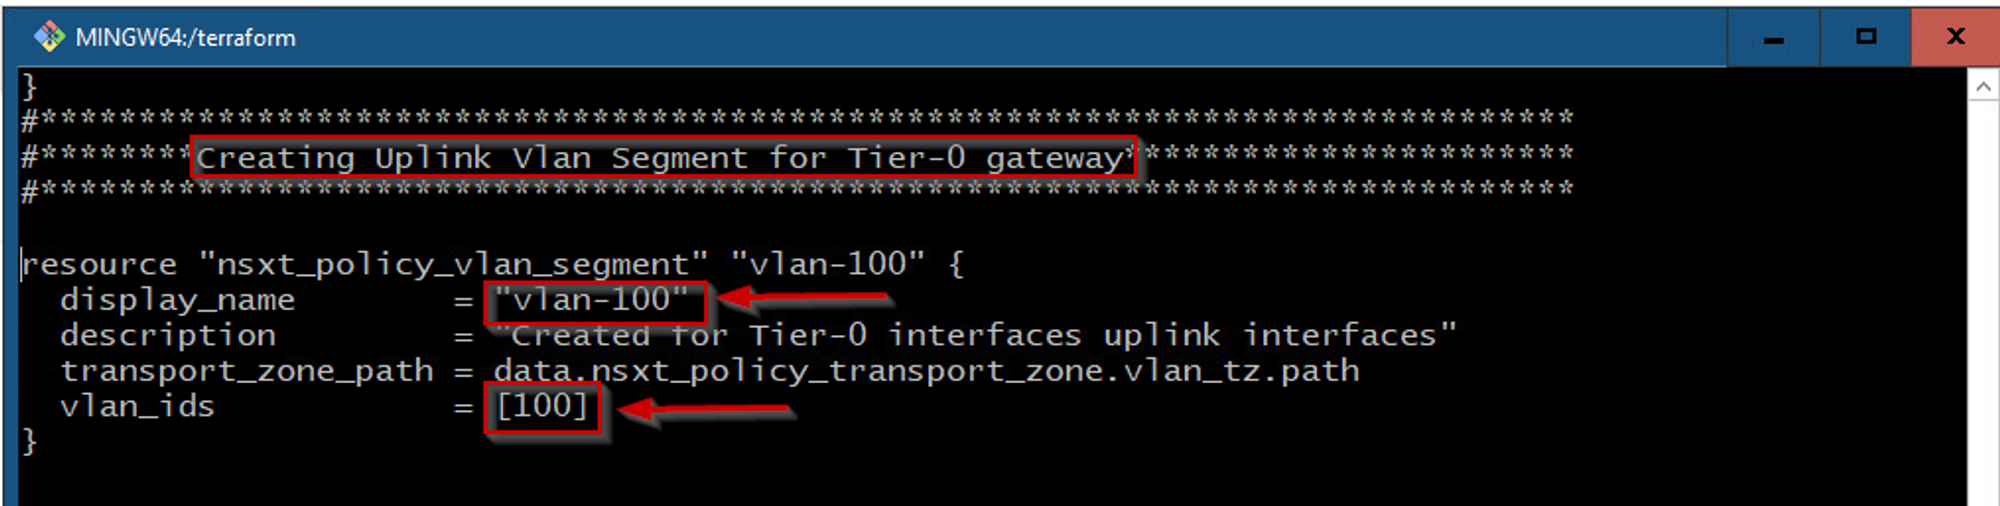
As shown in Capture 5, we can see ,that we are creating the VLAN-based segment with Vlan id 100.
Capture 5.1: –
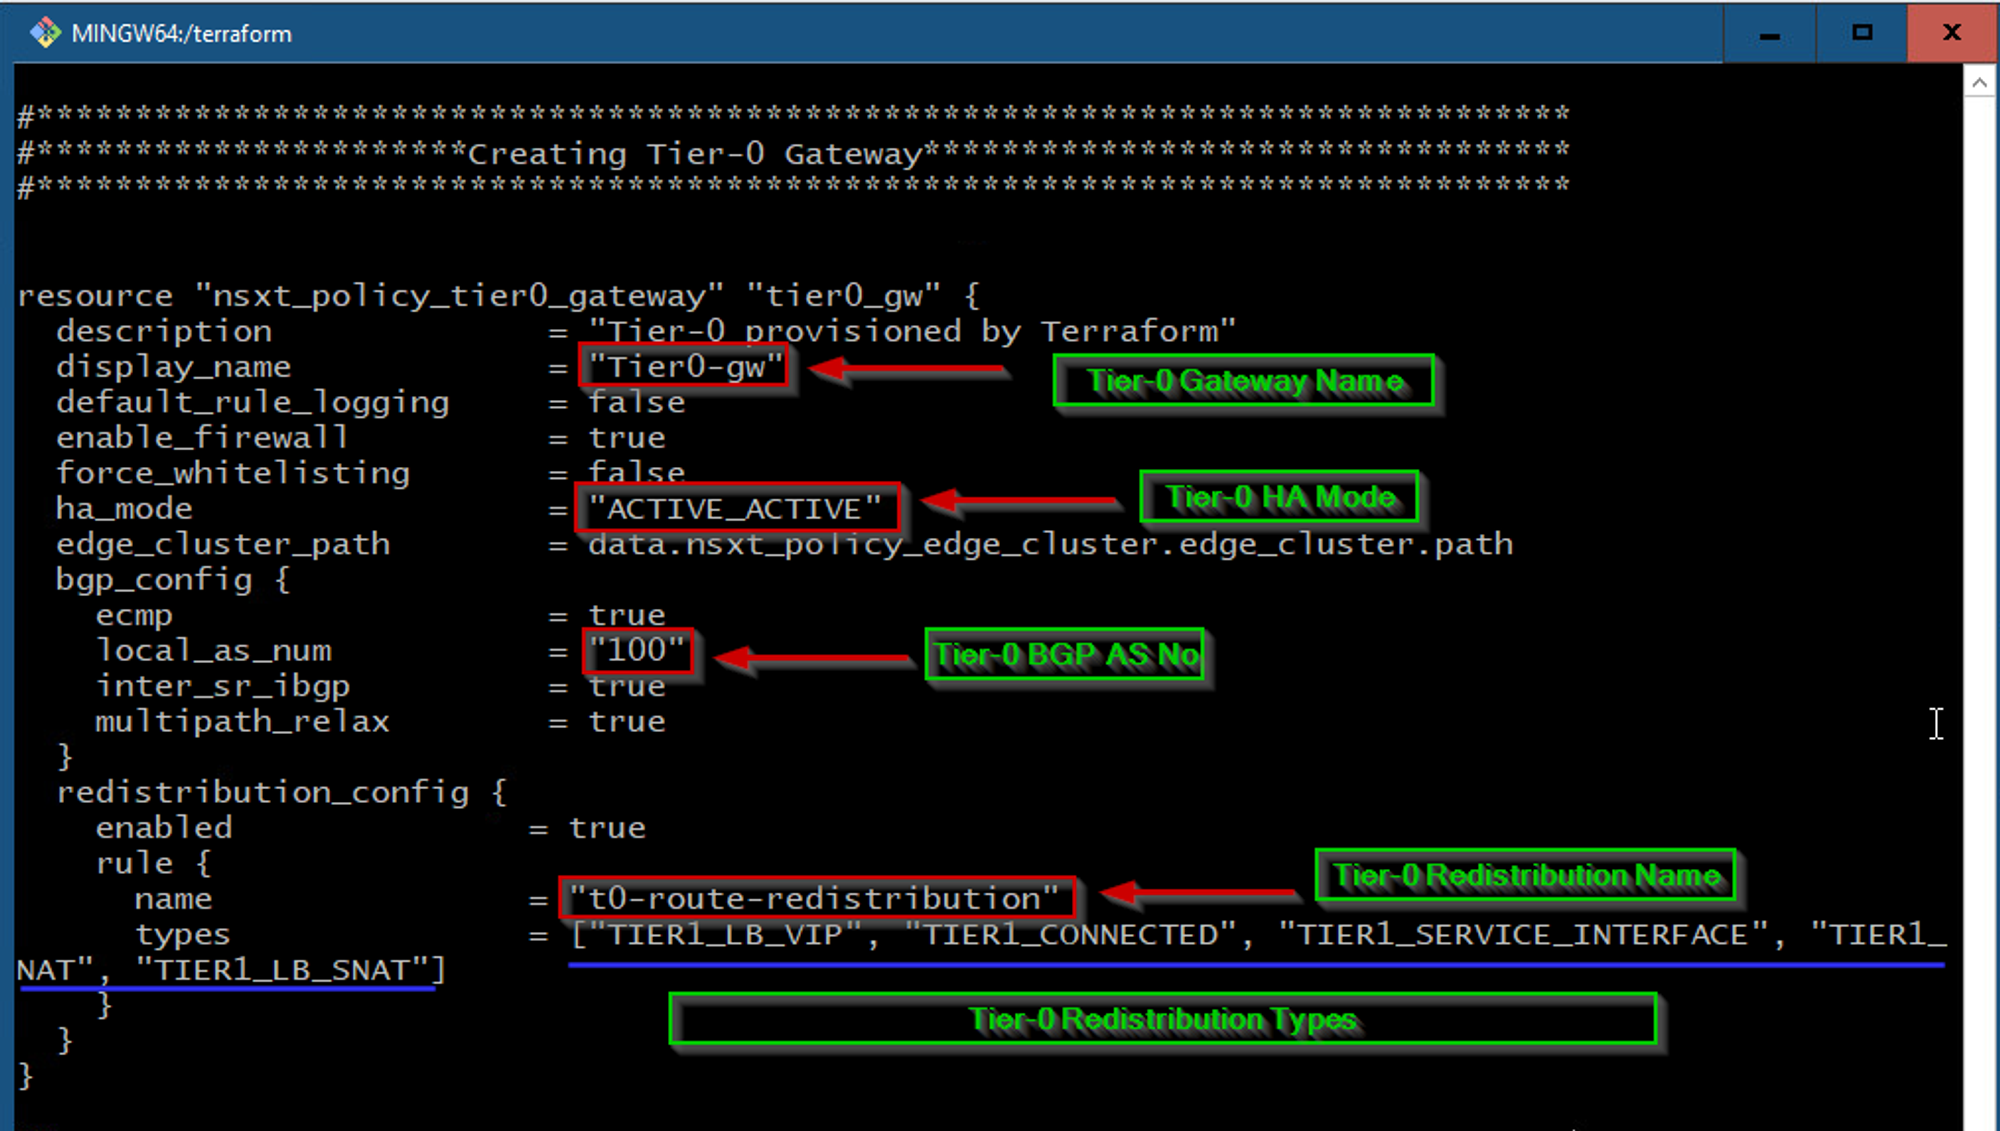
As shown in Capture 5.1, we can see the Tier-0 gateway name, HA mode, local AS Num, and the most important Redistribution Name & Type.
Capture 5.2:-

As shown in Capture 5.2, we can see the body of creating the Uplink Interface with the respective components.
Capture 5.3: –
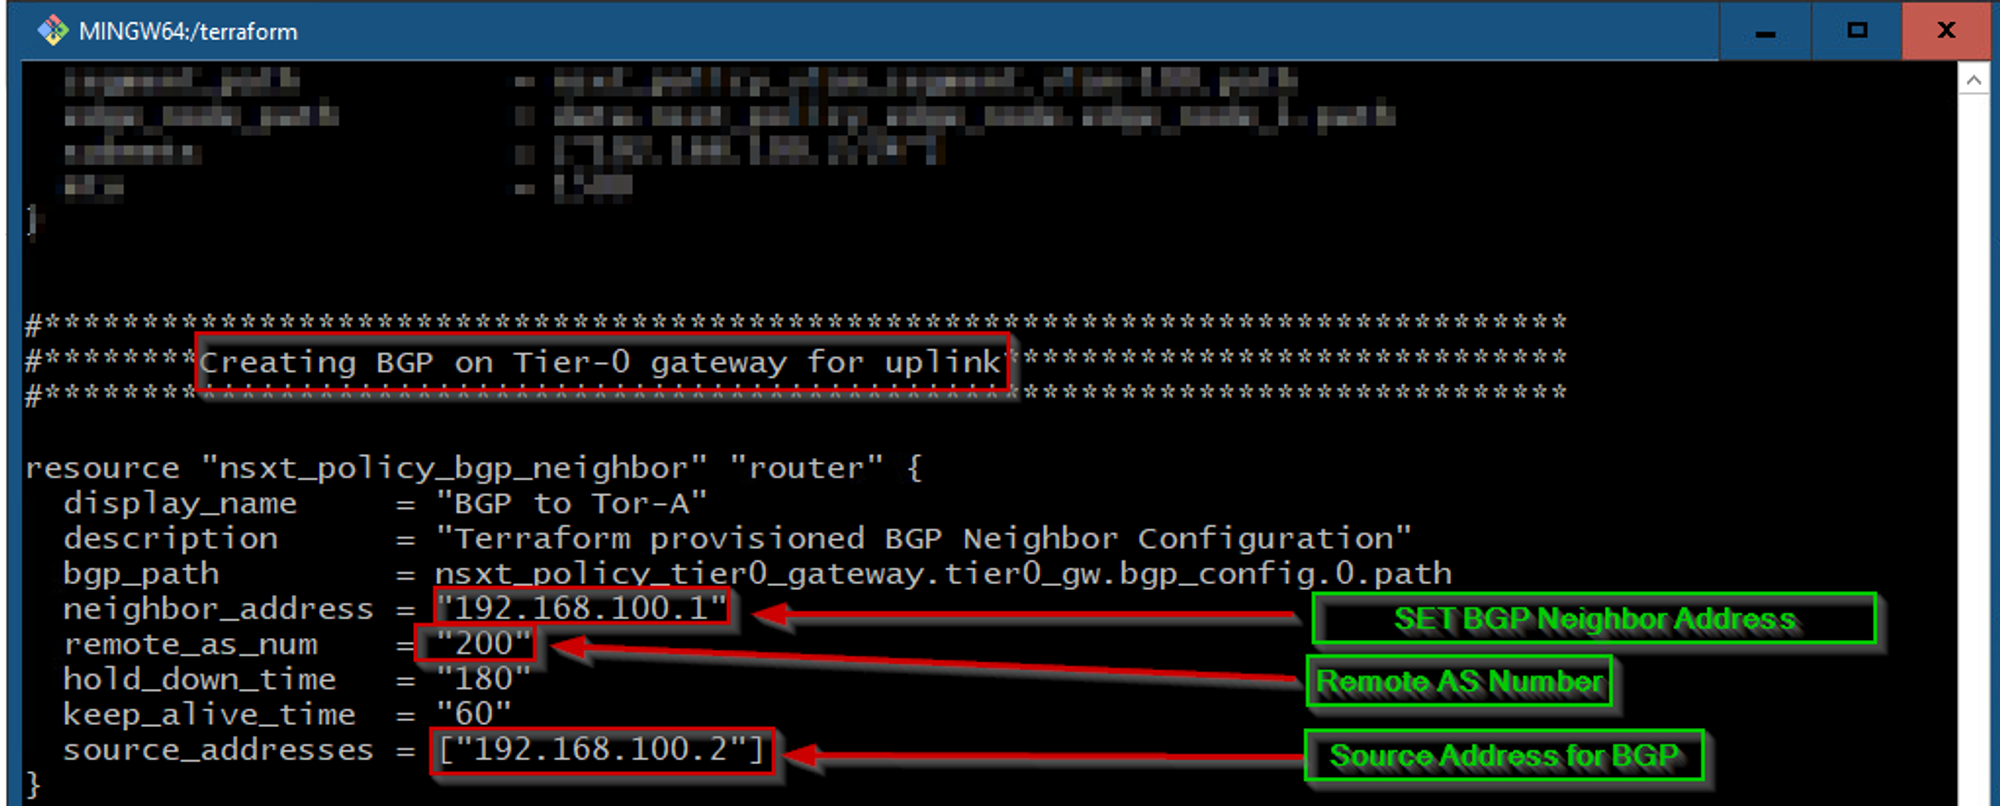
As shown in Capture 5.3, we can see the body of setting the BGP Neighbor, Remote AS Number, Source Address with respective attributes.
Step 6: – Creating Multitenancy Projects Using Terraform— In accordance with the aforementioned high-level design, it has been determined that two distinct projects, namely PPROJECTA and PROJECTB, shall be instantiated through the utilization of Terraform. This decision has been reached after a thorough evaluation of the design and its associated requirements, and is deemed to be the most appropriate course of action to achieve the desired outcome. It is expected that the utilization of Terraform will offer a robust and comprehensive solution to the project instantiation process, and will enable a streamlined and efficient development cycle.
Capture 6: –
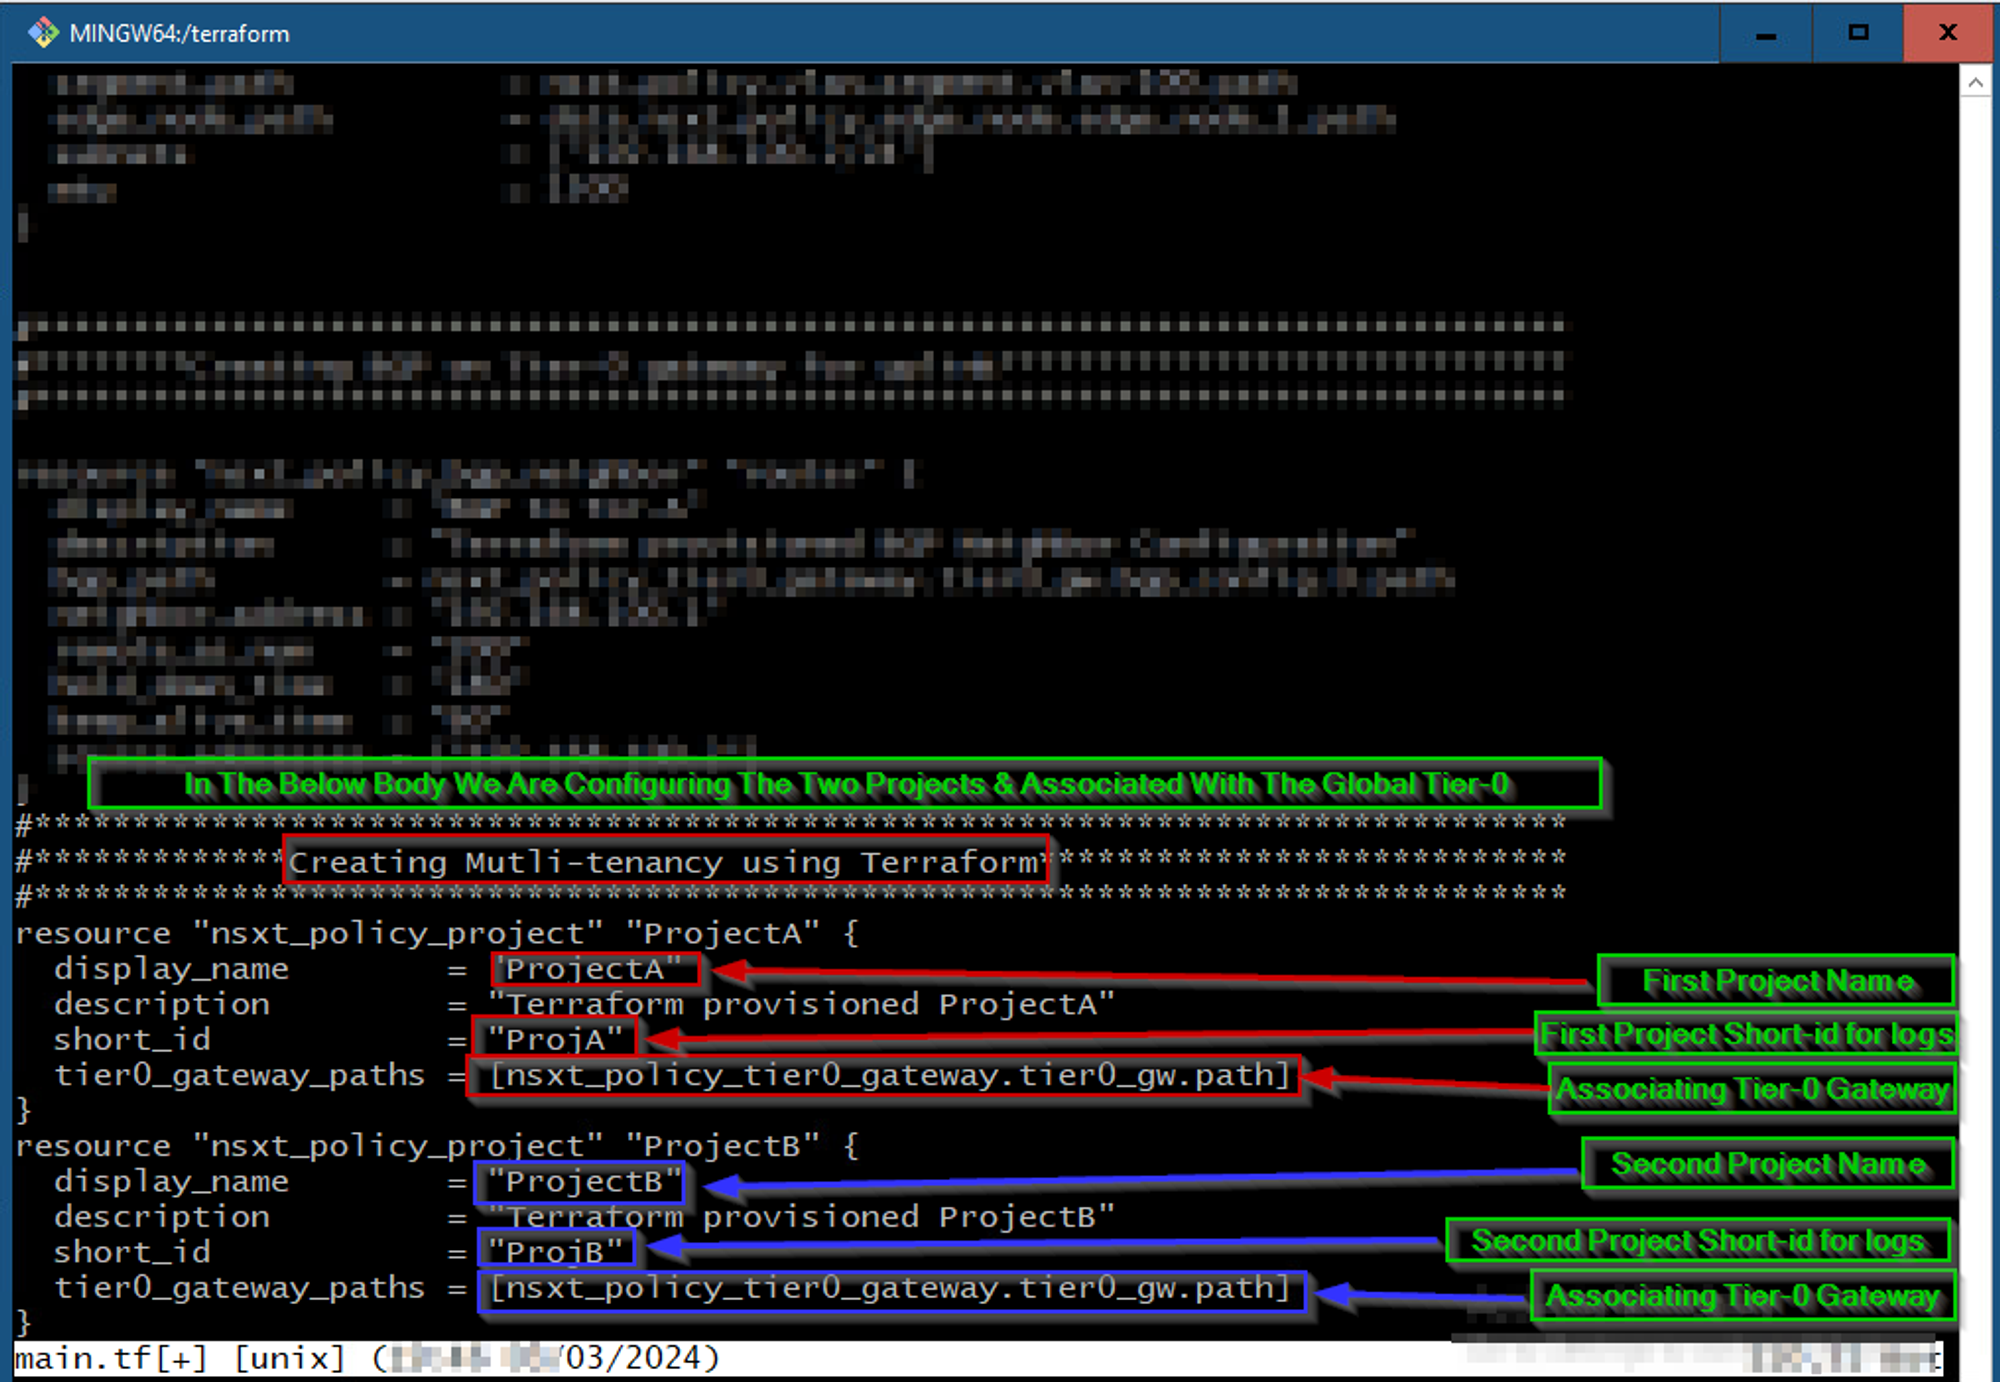
As shown in Capture 6, we can see the body of Creating the Projects under the Multitenancy.
Before proceeding to step 7 ,we must execute step 3 through 6.
Step 7: – Execute the Global Config:- In this step, we are executing and initializing the steps from 3 to step 6 because without this execution we can’t move further to step 8.
Capture 7:-
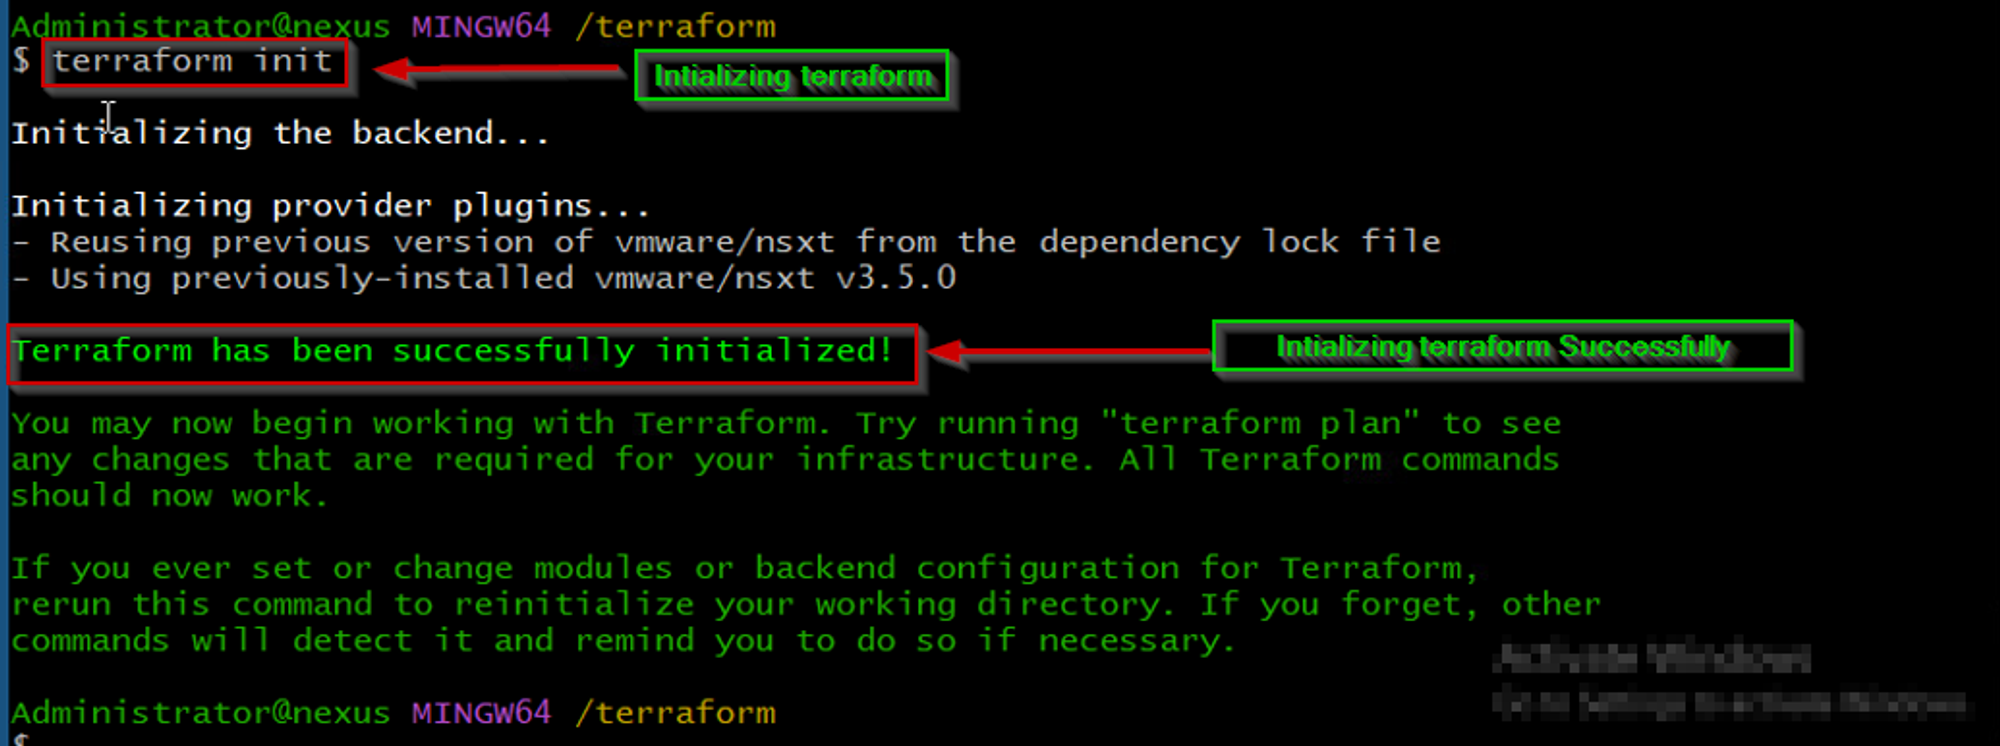
As shown in Capture 7, we are initializing the terraform. In this stage, the root configuration directory is consulted for backend configuration and the chosen backend is initialized using the given configurations setting.
Capture 7.1: –
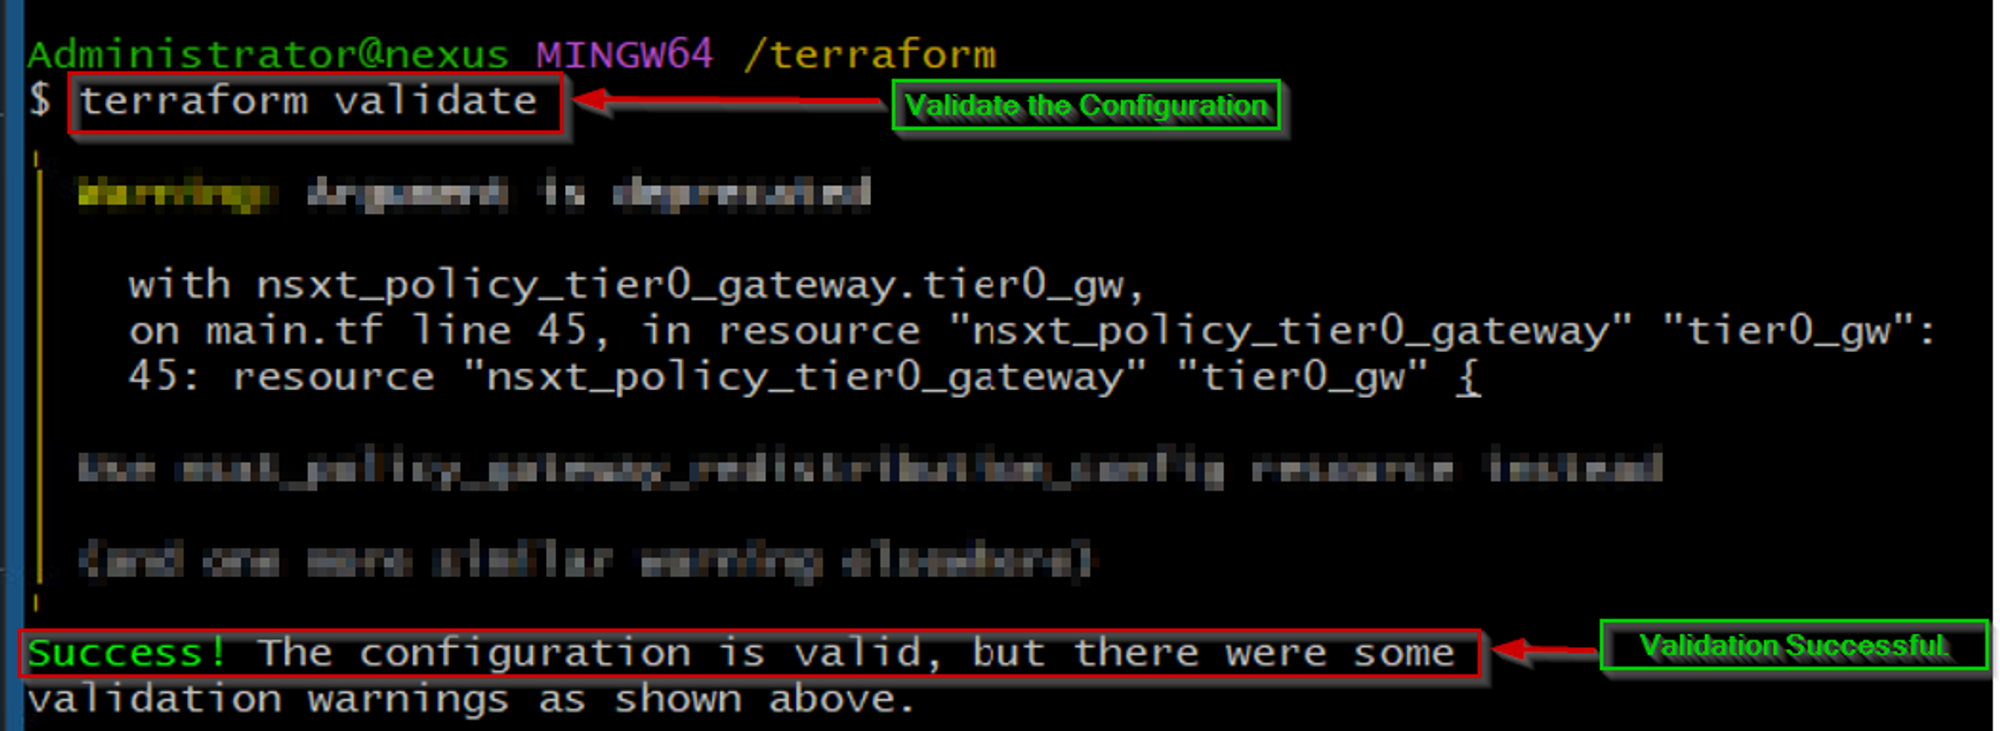
As shown in Capture 7.1, we are validating the terraform configuration. In this stage, we are verifying the configuration is syntactically valid and internally consistent.
Capture 7.2: –
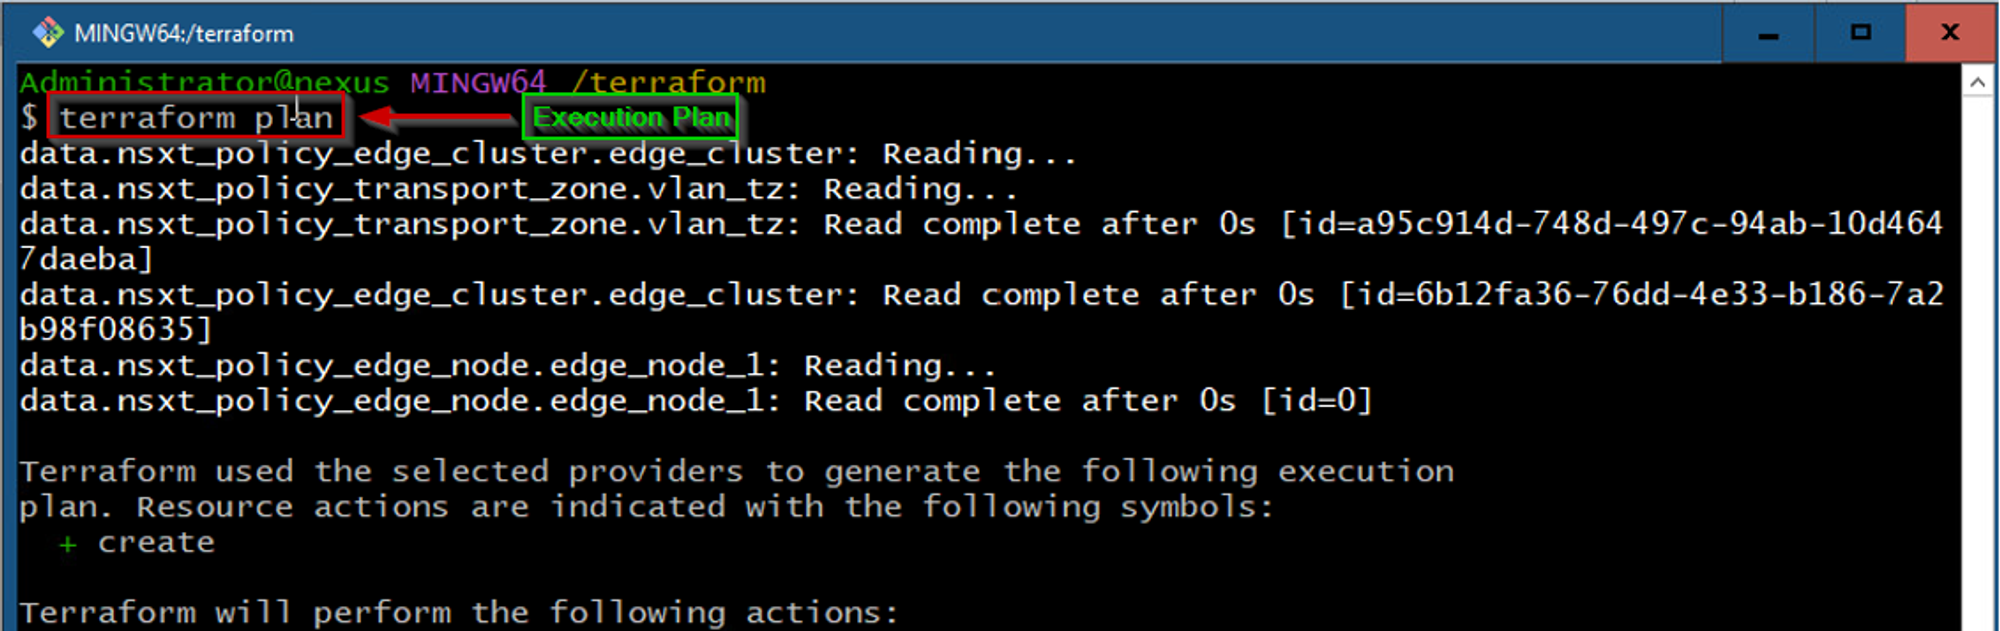
As shown in Capture 7.2, we are creating the execution plan as per our desired actions.
Capture 7.3: –
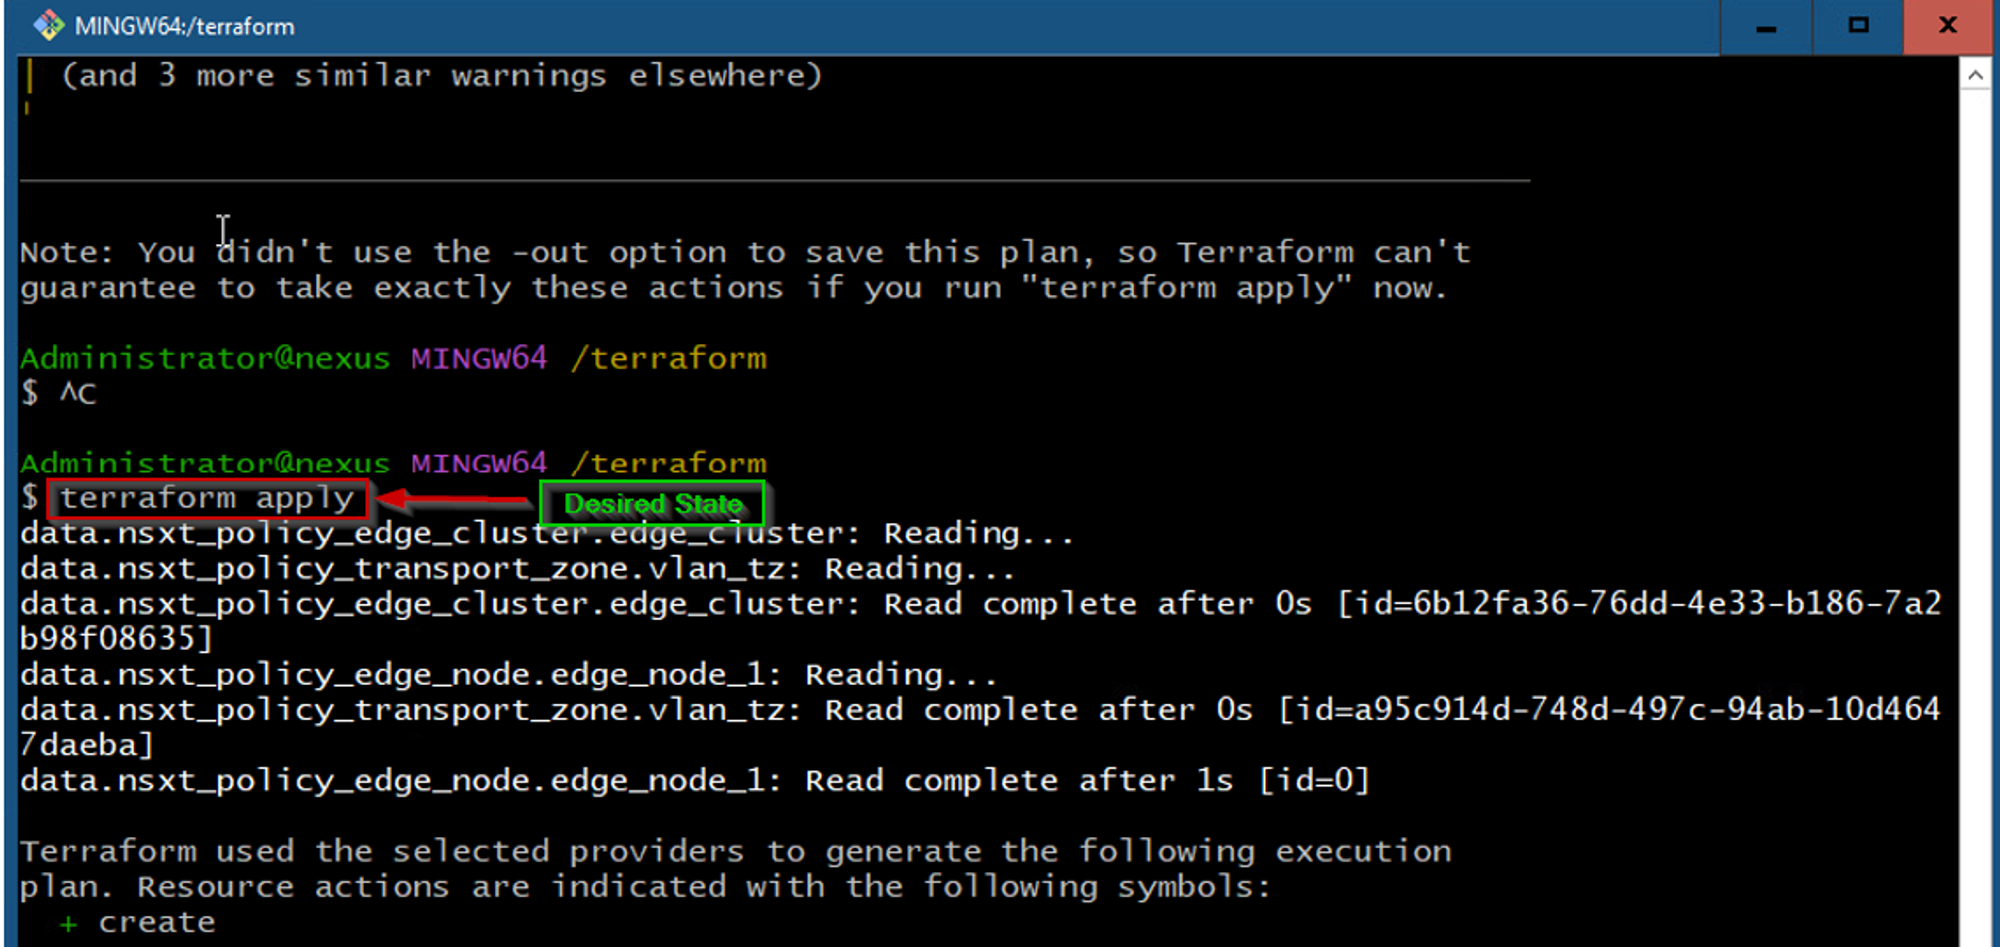
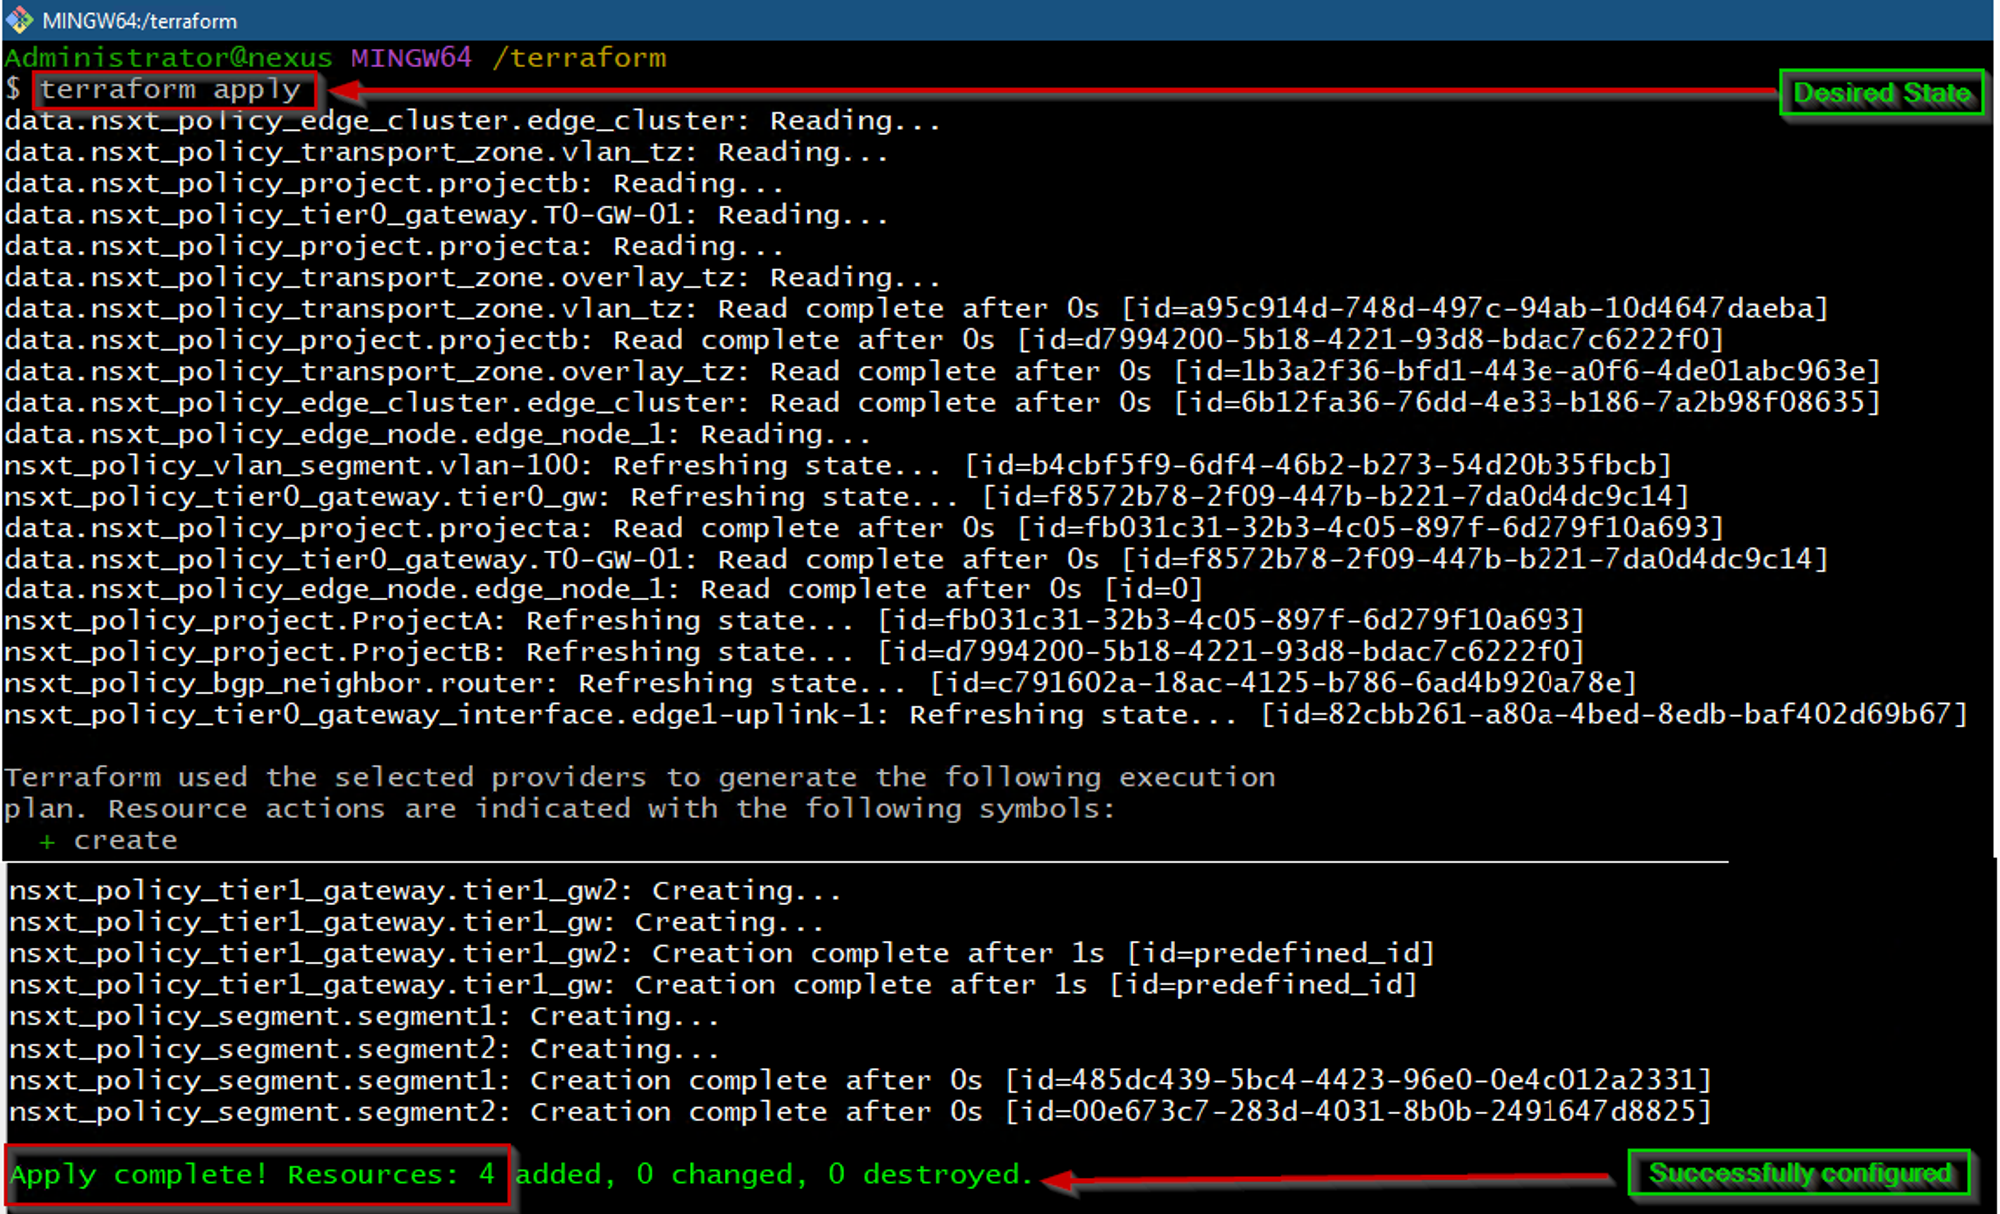
As shown in Capture 7.3, we are trying to reach the desired state of the configuration or we can elaborate like the pre-determined set of actions generated by a terraform plan & execution plan.
Capture 7.4: –
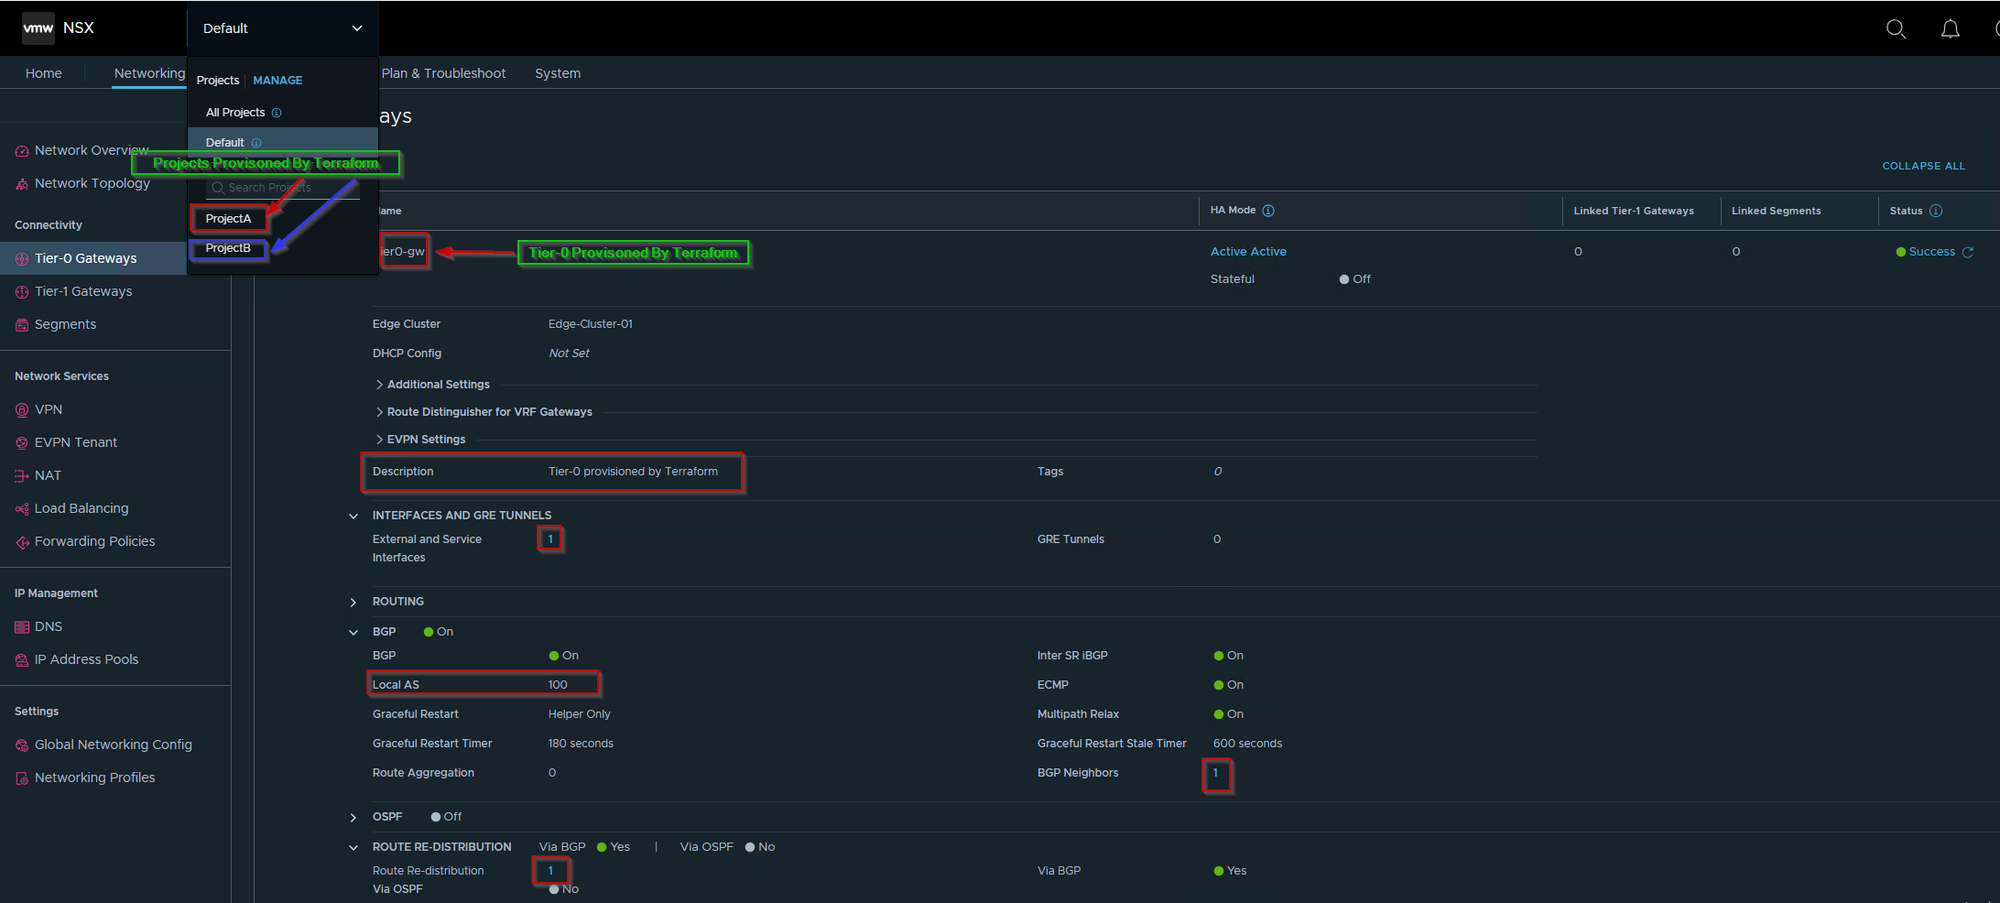
As shown in Capture 7.4, we can see the Tier-0 & projects are executed and configured successfully as required.
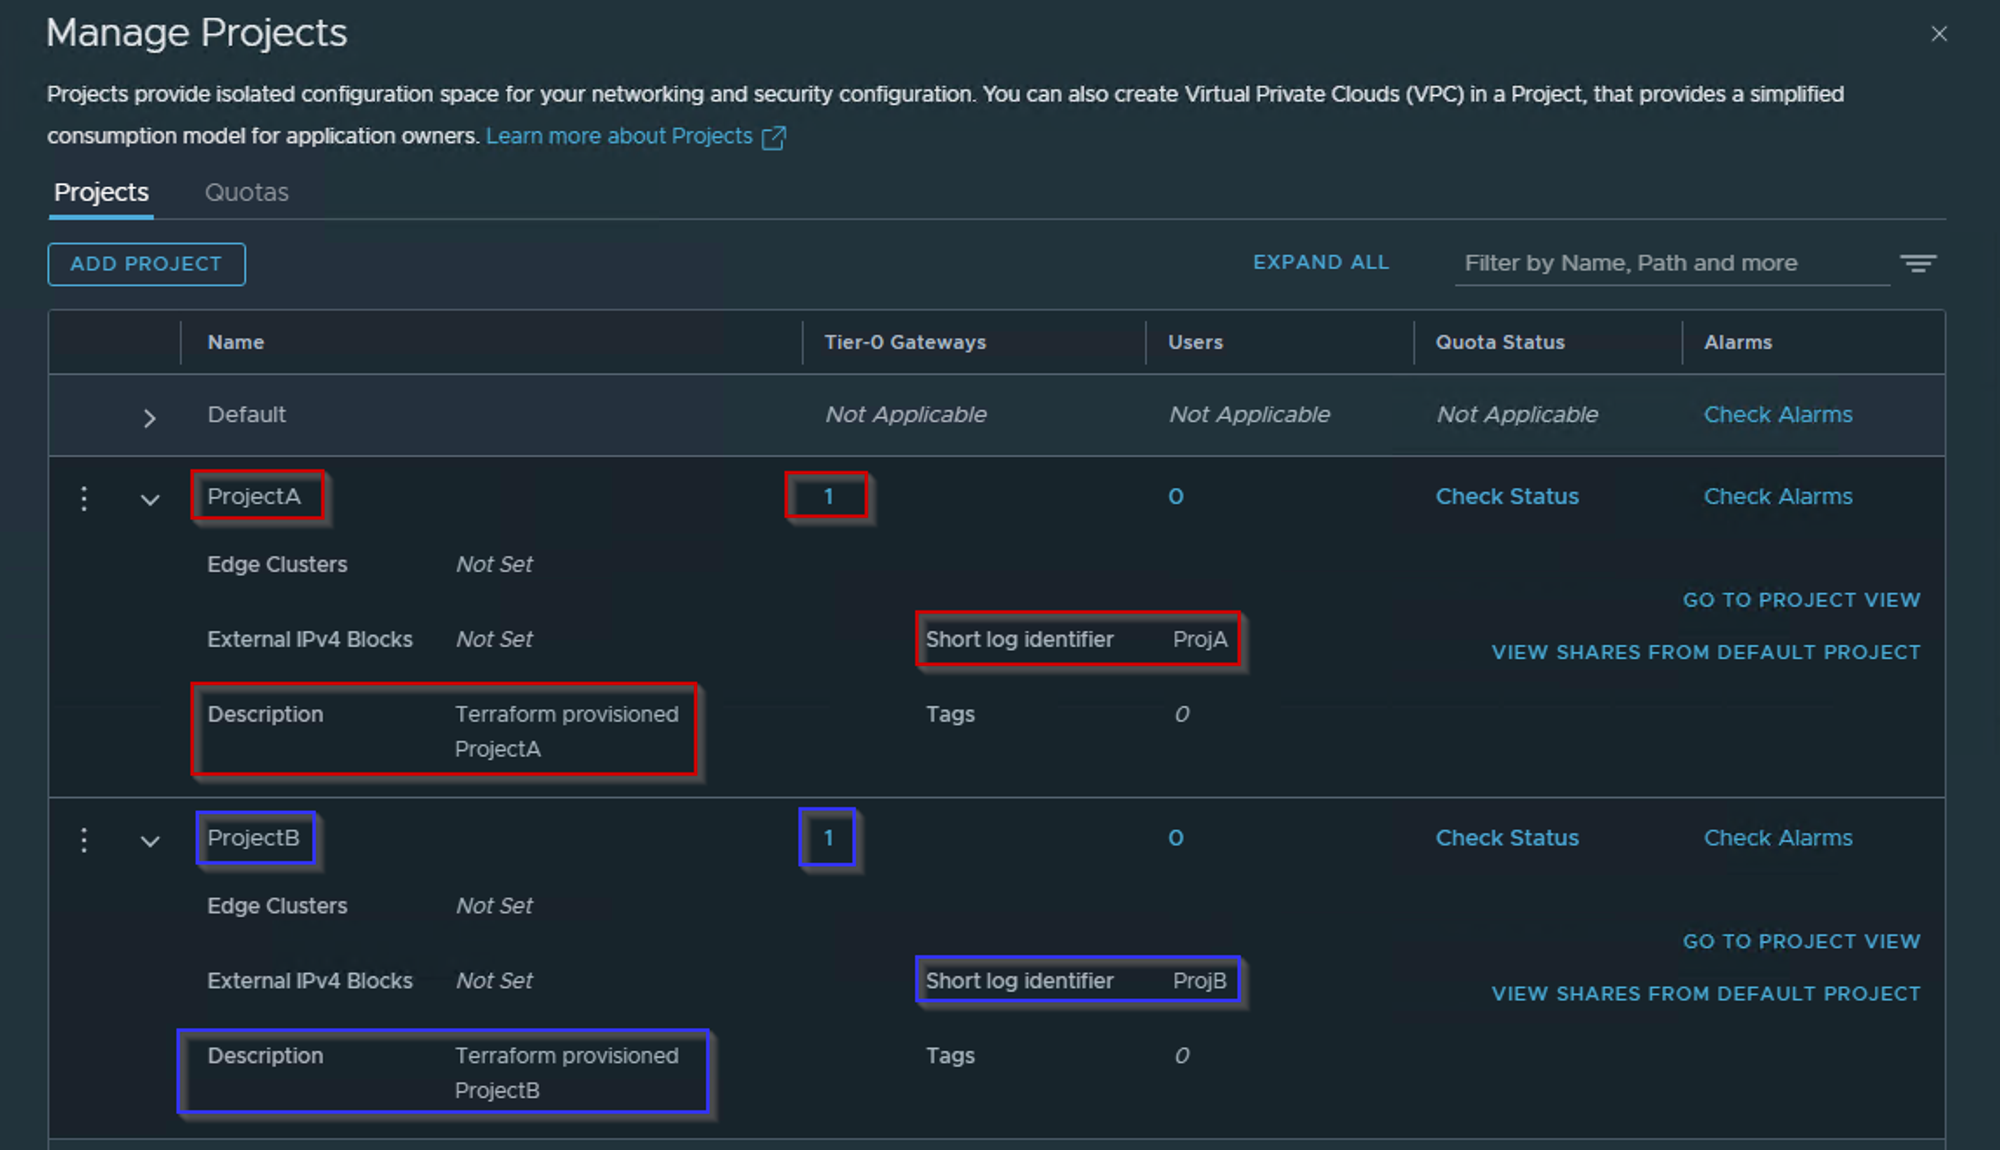
Step 8: – Creating Projects Admins Manually— As per the High-Level Design (HLD) specifications, each project has been allocated a unique set of administrative rights for authorized users. In accordance with this, we shall be manually creating two admin rights users, namely ProjectA@xyz.com for Project-A and ProjectB@xyz.com for Project-B, to perform the requisite tasks specific to each project.
It is worth noting that these designated users will have the responsibility of managing their respective projects and ensuring that the assigned administrative rights are enforced. We will ensure that this process is carried out with due diligence and in compliance with all relevant regulations and guidelines.
Capture 8: –
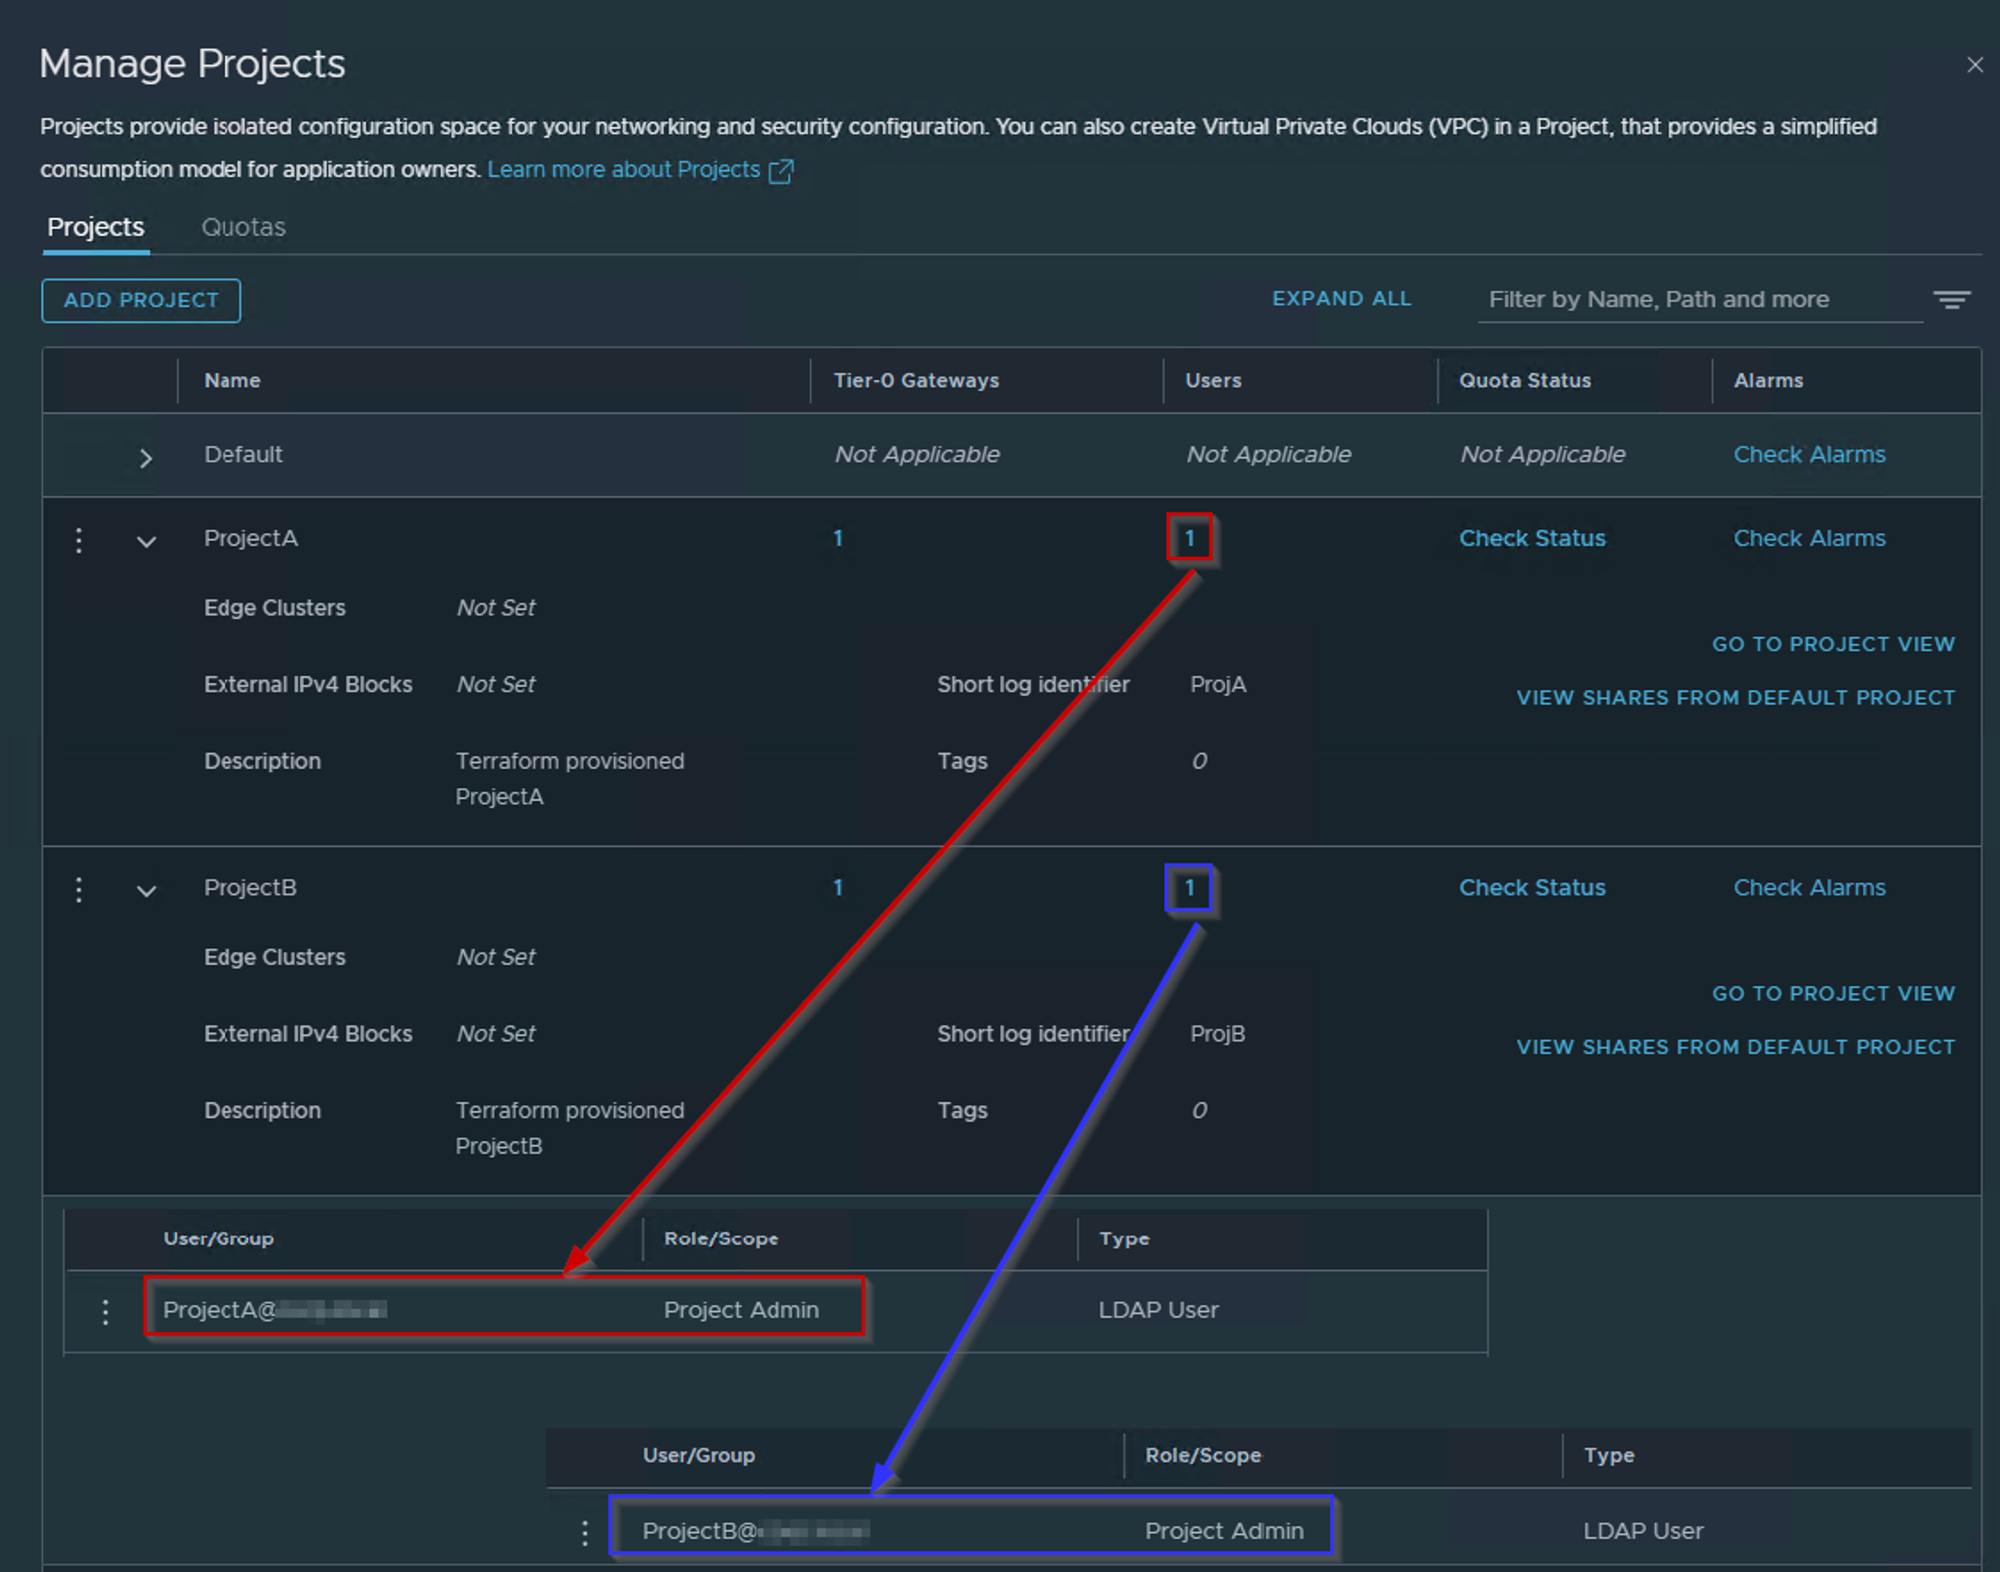
As shown in Capture 8, we can see as below: –
ProjectA@xyz.com has been assigned as the Project Admin for ProjectA. ProjectB@xyz.com has been assigned as the Project Admin for ProjectB.
Step 9: – Creating Projects Segments ,Tier-1s, and connecting with Global Tier-0 Using Terraform— In this stage we are good to go for creating the segments and establishing the Tier-1 gateway with objects under their associated projects.
Capture 9: –

As shown in Capture 9 we can see the script for below details: –
ProjectA—>Segment (ProjA-DEV)< ——-connected to —— >Tier-1 GW(T1-MT-PROJA)
ProjectB—>Segment (ProjB-DEV)< ——-connected to —— >Tier-1 GW(T1-MT-PROJB)
Capture 9.1: –

As shown in Capture 9.1, we are validating and planning for the Tier-1 & segments Scripts.
Capture 9.2: –
As shown in Capture 9.2, we are applying the Tier-1 & segments Scripts on the assigned projects.
Step 10: – Validation— In this stage, we will validate the configuration with aspects.
Capture 10: –
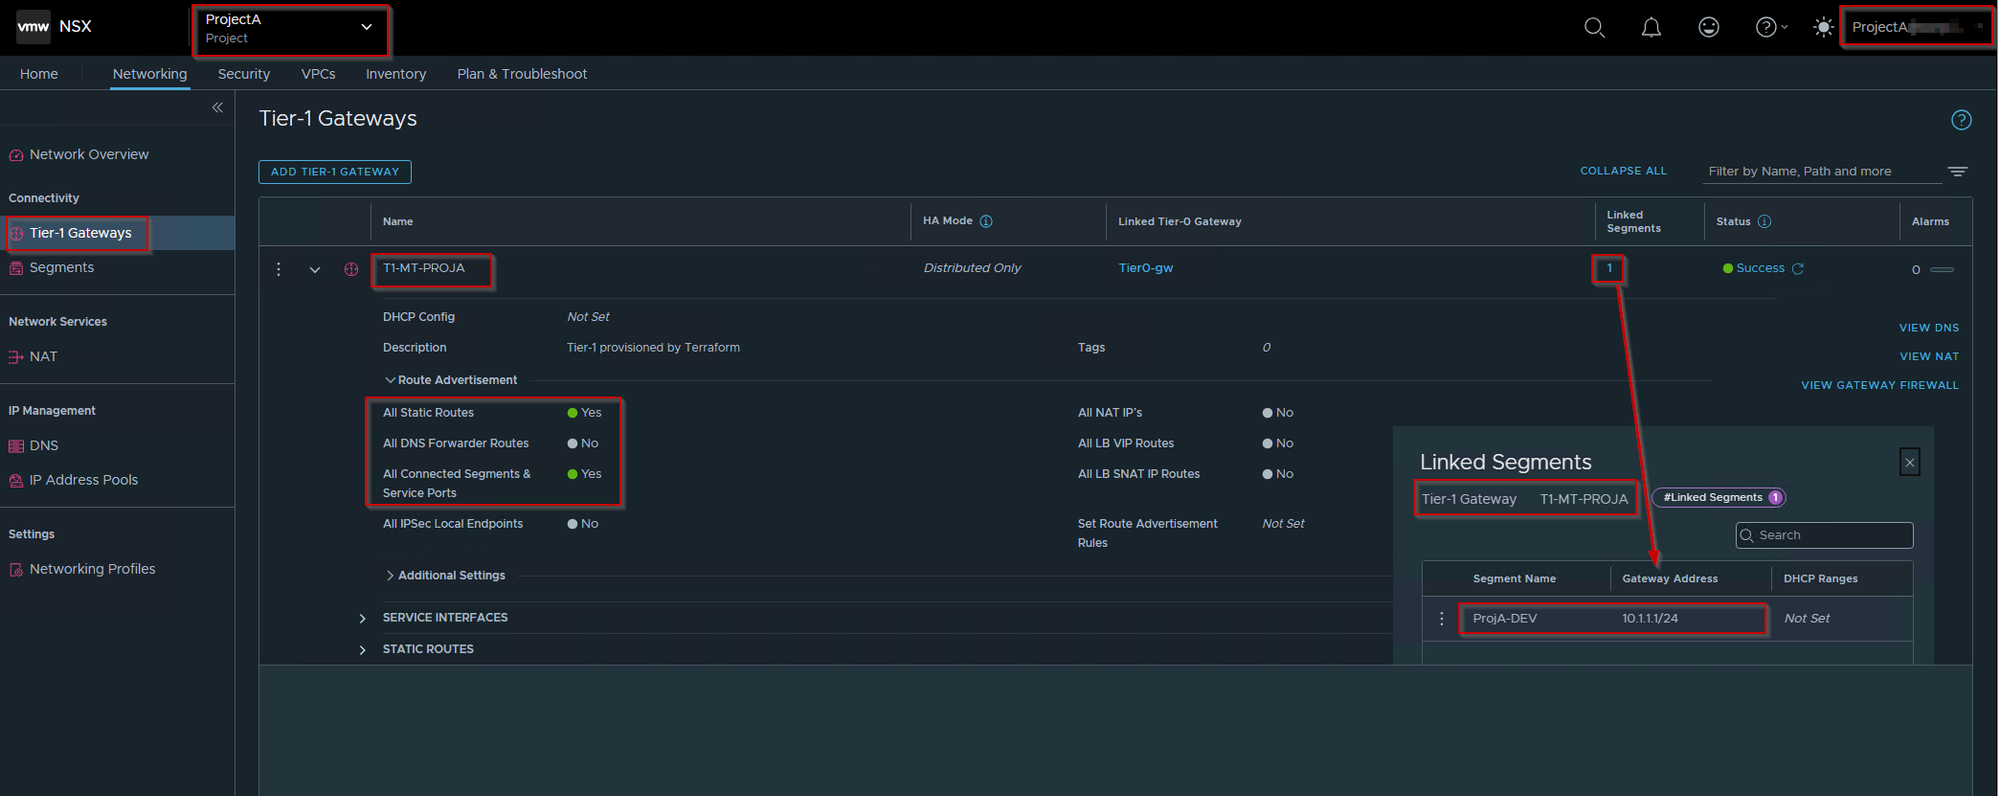
As shown in Capture 10, we have successfully created the below objects: –
Tier-1 GW: – T1-MT-ProjA
Tier-1 GW linked: – Tier0-GW (Global)
Linked Segment with Tier1-GW: – ProjA-DEV
Capture 10.1: –
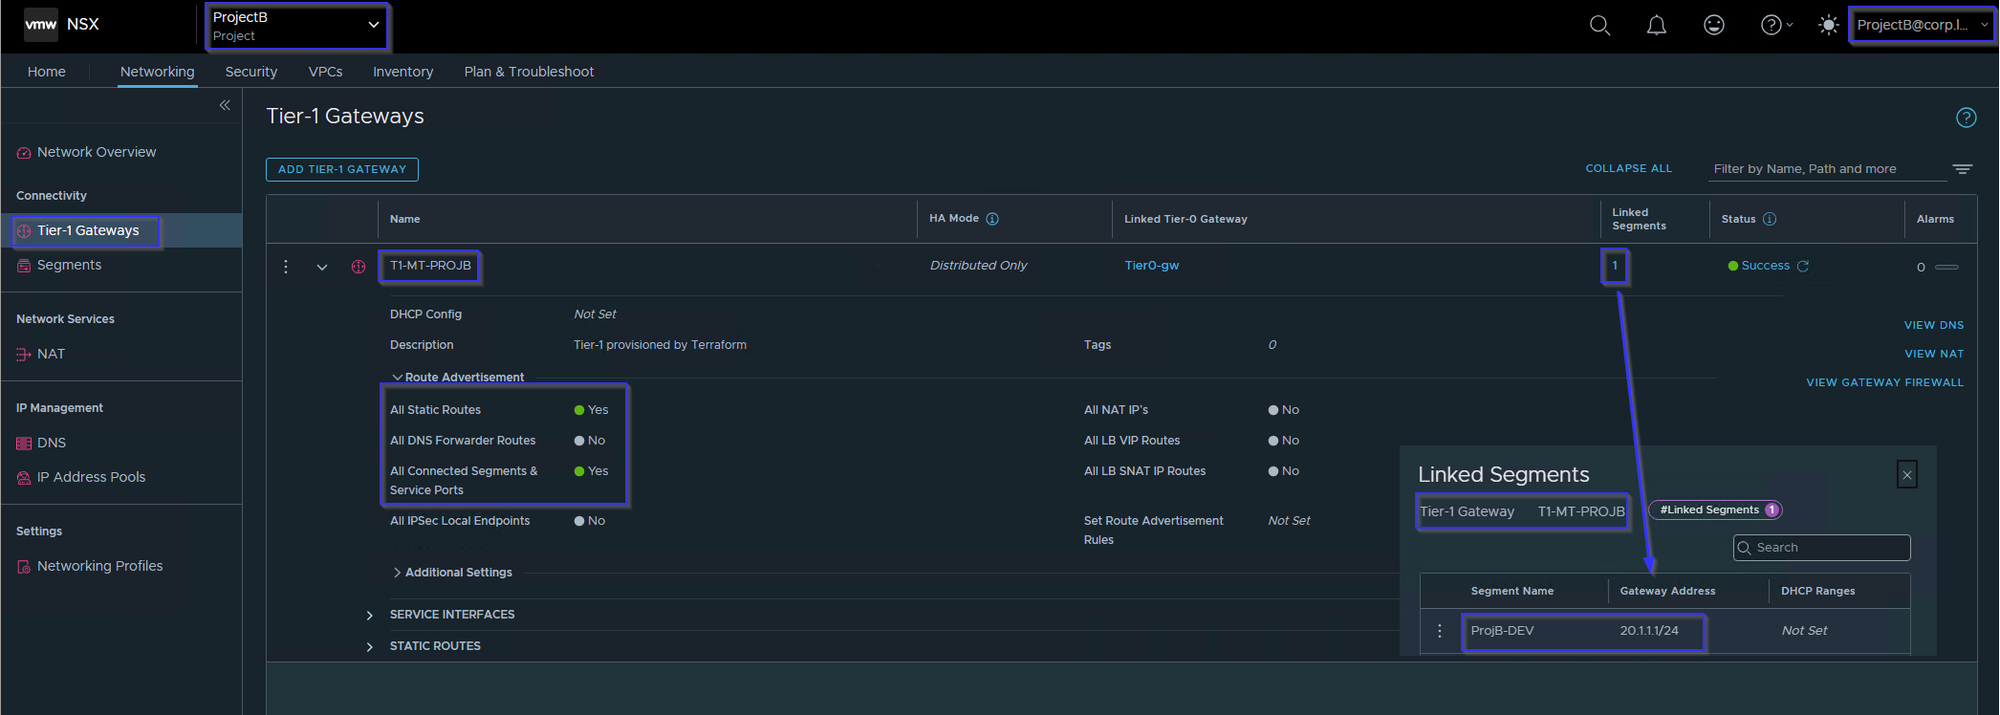
As shown in Capture 10.1, we have successfully created the below objects: –
Tier-1 GW: – T1-MT-ProjB
Tier-1 GW linked: – Tier0-GW (Global)
Linked Segment with Tier1-GW: – ProjB-DEV
Deleting Configuration Objects From Terraform
In order to properly manage Terraform infrastructure, it is essential to have a clear understanding of how to effectively destroy it when necessary. The process for doing so involves the use of the Terraform destroy command, which is specifically designed to eliminate Terraform-managed infrastructure. By executing this command, users can effectively remove all associated resources and mitigate unnecessary costs or security risks. It is important to note that the Terraform destroy command should only be used when it is absolutely necessary, as it will permanently eliminate all targeted resources.
Capture 1: –
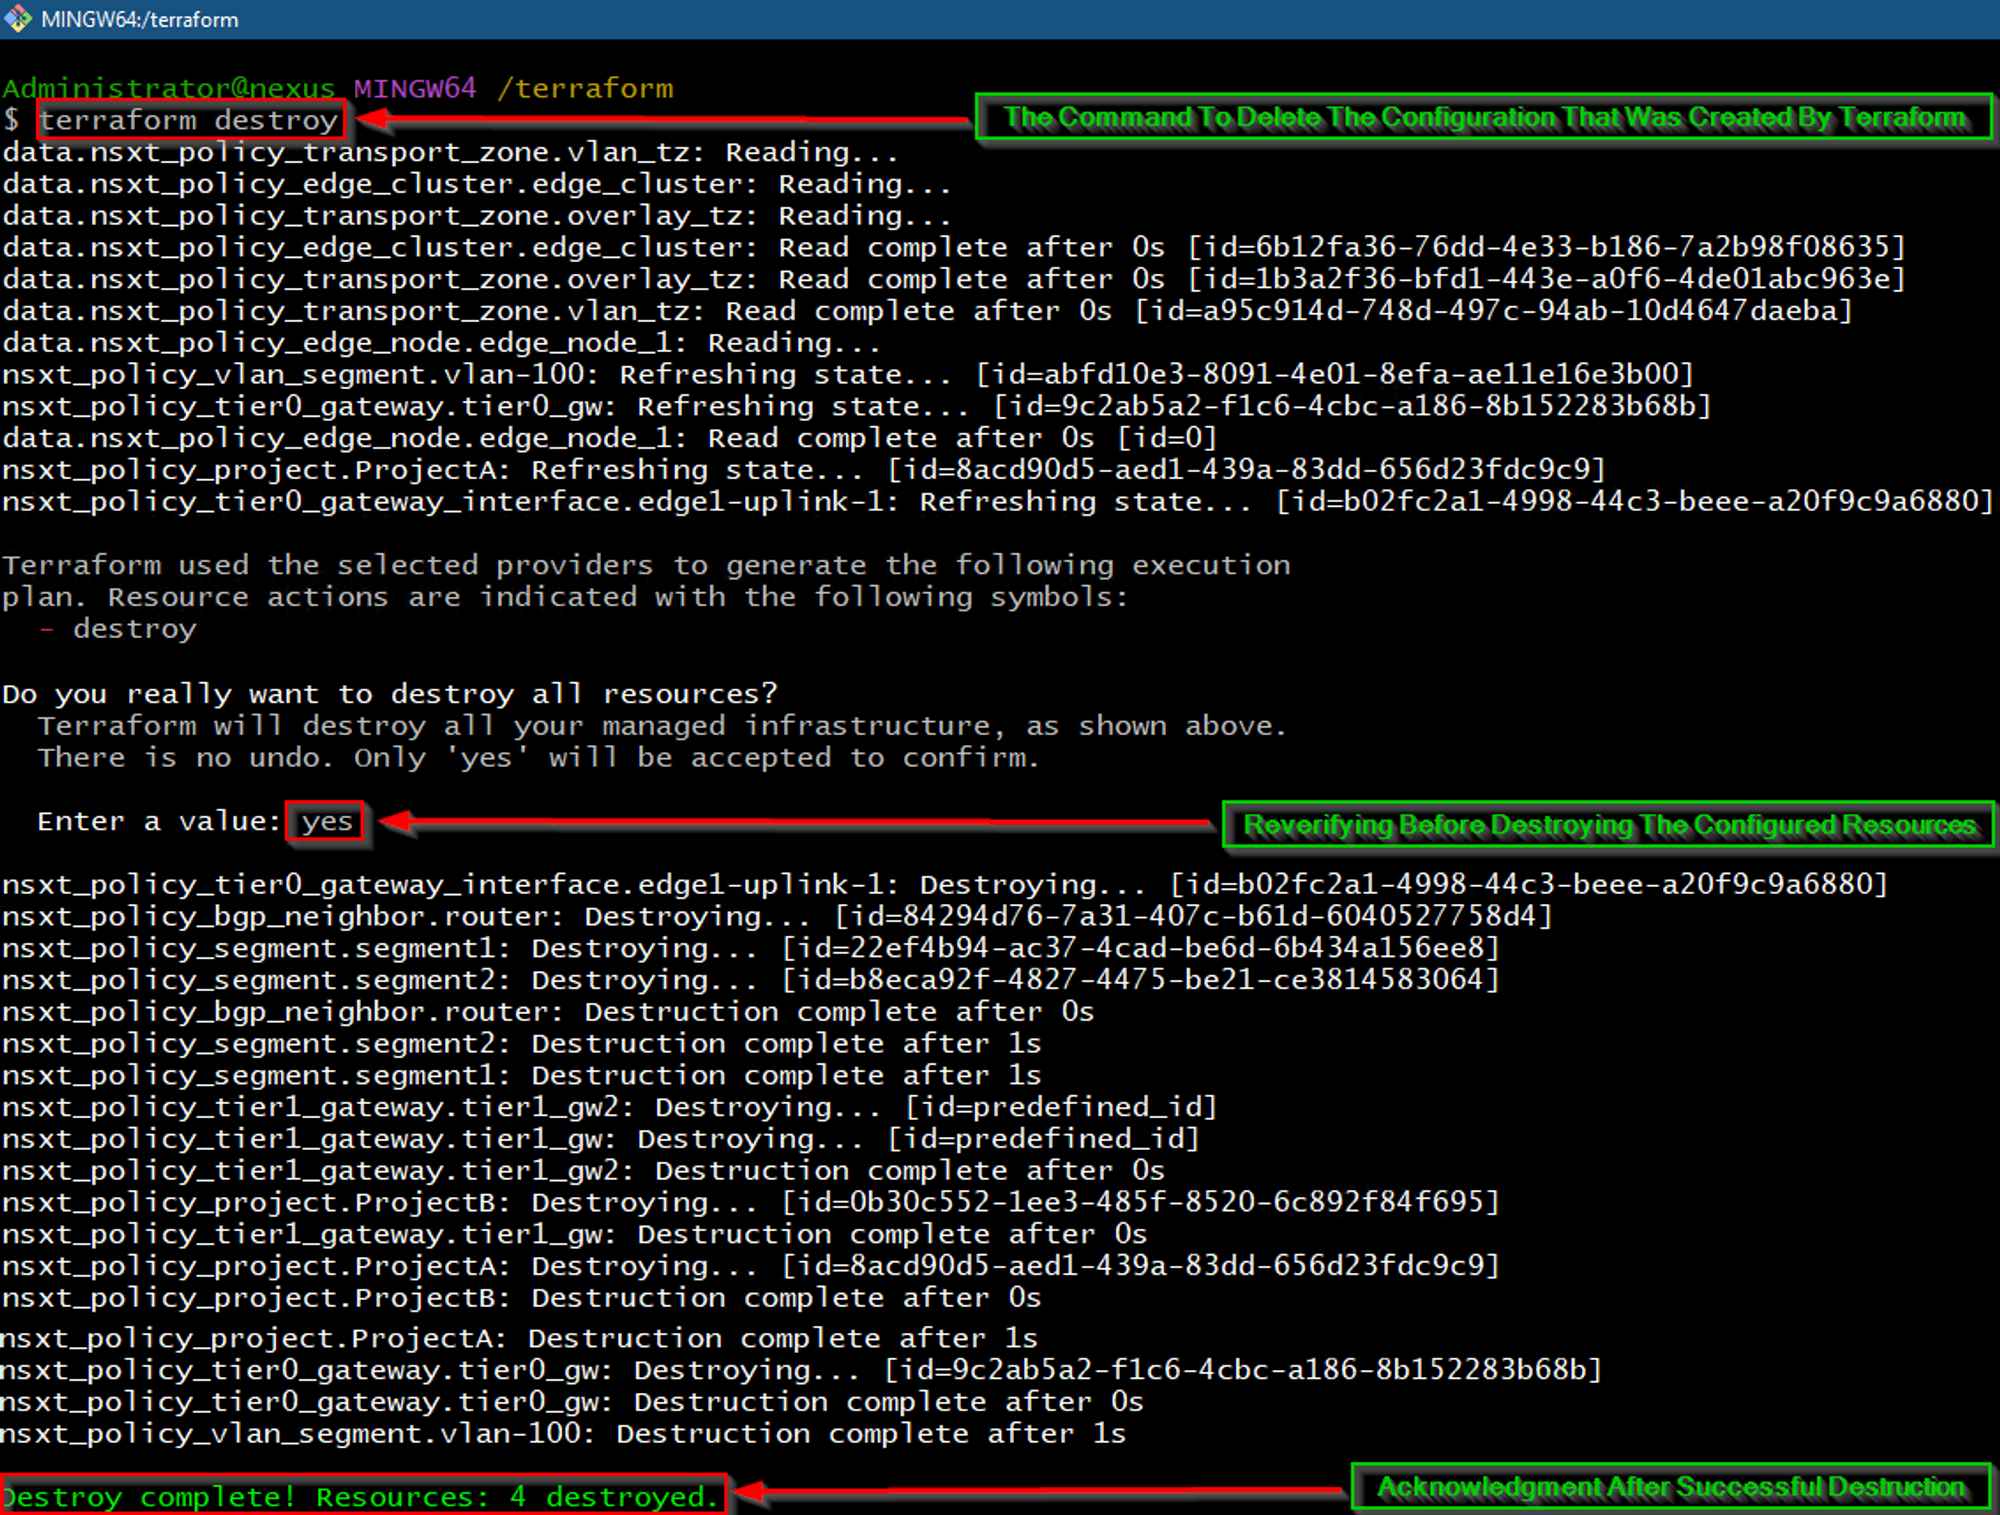
As shown in Capture 1, the “terraform destroy” command is successfully deleting the resources.
Capture 1.1: –

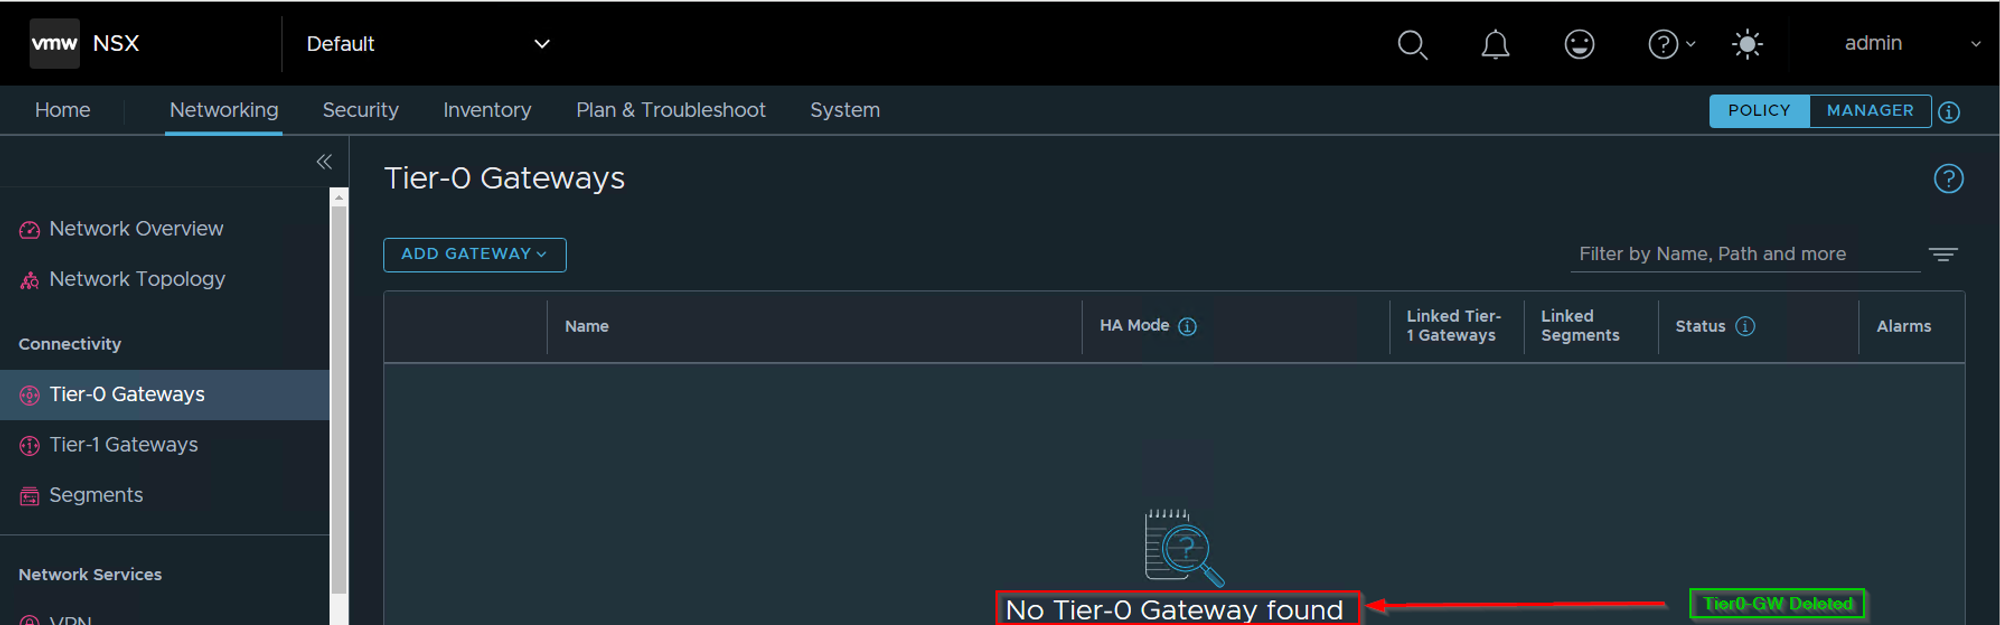
As Shown in Capture 1.1, Projects and Tier-0 have been successfully deleted from the GUI.
Note:- You can get the complete script on the Github- click here
Conclusion
In recent times, I have acquired considerable expertise in the development of multitenancy projects using Terraform, which has been an exceptional learning experience for me. Despite the challenges encountered, the process has been engaging and insightful, particularly with respect to script rewriting. This blog post is aimed at providing some critical insights that are essential for the success of your project, including configuring project networking and effective communication practices within the project. Furthermore, for those interested in delving deeper into multitenancy without utilizing Terraform, there are some useful links provided below.

Leave a reply to schmidlinjana84 Cancel reply