
- Introduction
- NSX on vSphere Lifecycle Manager(vLCM)
- High Level View of vLCM for NSX
- Supported / Unsupported Use Cases
- Conclusion
Introduction
vSphere Lifecycle Manager(vLCM) is a powerful service that is fully integrated within the vCenter Server and relies on its built-in PostgreSQL database. It is noteworthy that no additional installation is required to begin utilizing this feature. Upon deploying the vCenter Server appliance, the vSphere Lifecycle Manager user interface is automatically enabled in the HTML5-based vSphere Client. This feature offers an advanced version of the Update Manager that provides ESXi lifecycle management at a cluster level. The tool comes with new features and options that enhance the functionality of earlier vSphere releases. As such, vSphere Lifecycle Manager is a reliable tool that can help businesses manage their ESXi lifecycle with confidence.
NSX on vSphere Lifecycle Manager(vLCM)
Enabling VMware vSphere Lifecycle Manager (VLCM) on a cluster ensures that all ESXi hosts participating in the cluster are equipped with a single ESXi image and NSX image. This feature helps to minimize errors and reduce cluster and host maintenance cycles.
From vCenter Server 7.0 U1, ESXi 7.0 U1, and NSX 3.1.0 onwards, a vSphere Lifecycle Manager-enabled cluster can manage the installation of ESXi and NSX VIBs.
This blog post was composed using vCenter Server 8.0.2, ESXi 8.0 U2 build 22380479, and NSX 4.1.2.1.0. With vSphere 8.0, VMware under Broadcom, has announced the deprecation of the vSphere Lifecycle Manager Baselines (previously known as vSphere Update Manager VUM). As a result, customers are advised to transition from using vSphere Lifecycle Manager Baselines (VUM) to using vSphere Lifecycle Manager Images (vLCM) for managing the lifecycle of ESXi hosts.
High Level View of vLCM for NSX
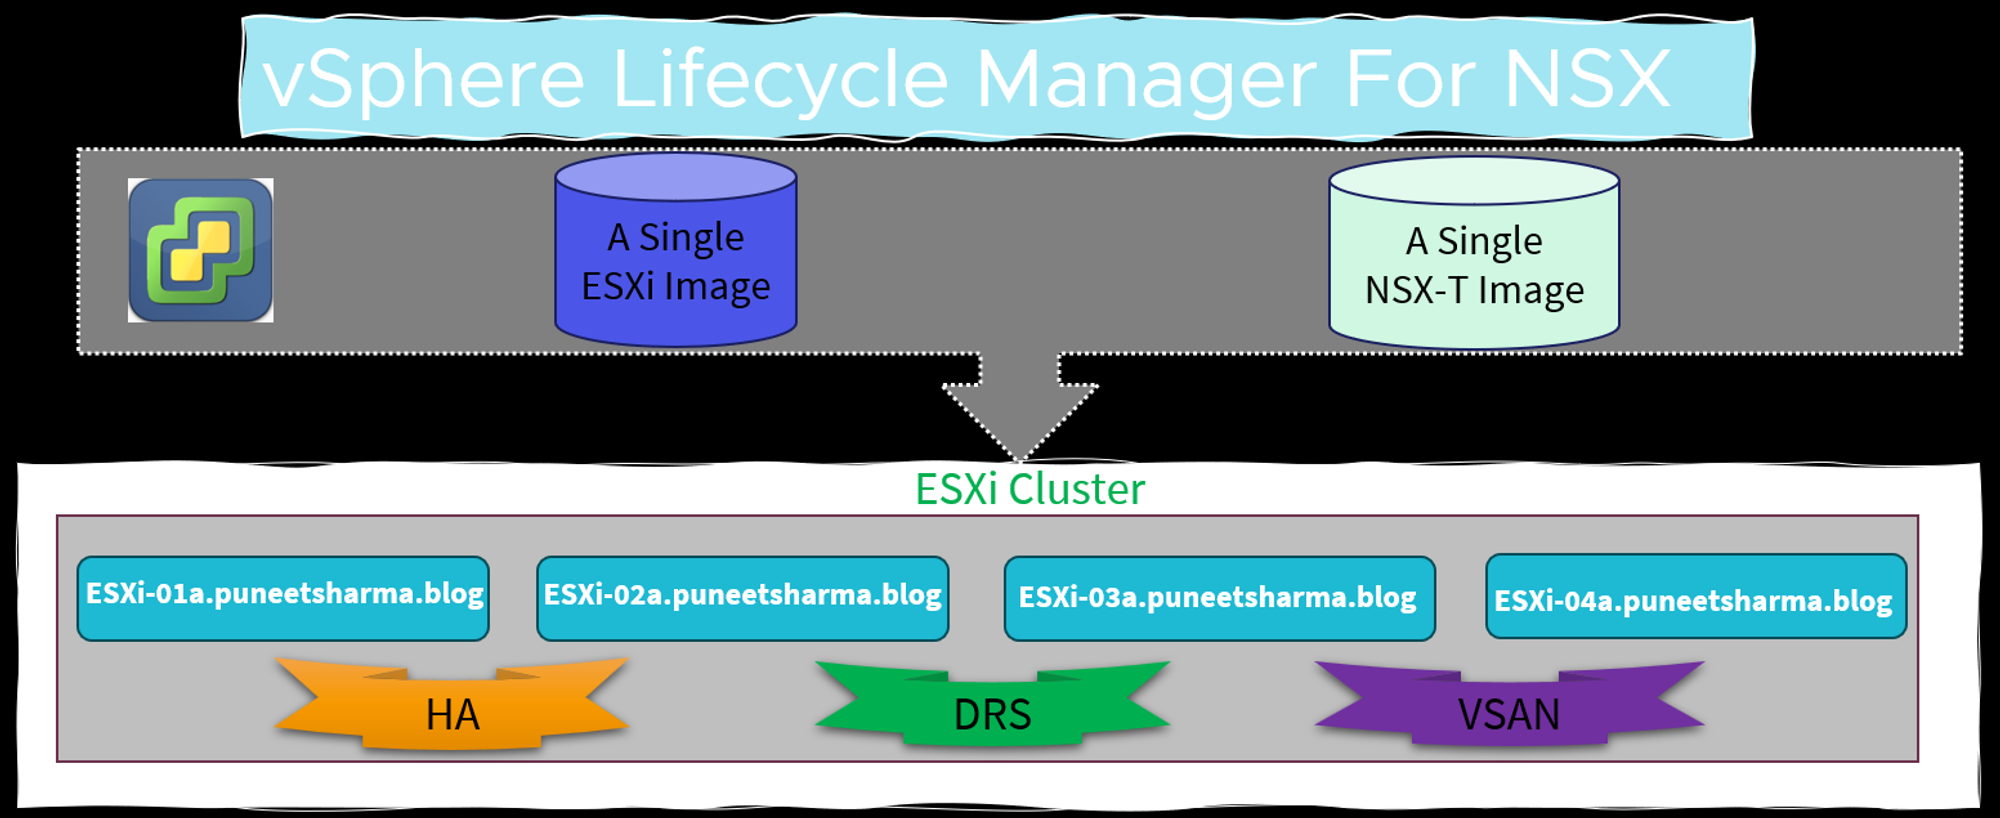
As per the high-level view of vLCM, vSphere Lifecycle Manager requires two distinct images – one for ESXi and another for NSX. The ESXi image can be obtained from the image directory located within VMware vCenter. It is imperative that the ESXi image is uploaded to VMware vCenter or alternatively, the ESXi host image can be manually set.
In contrast, vSphere Lifecycle Manager obtains the NSX image only when a cluster is prepared for NSX networking. This process can be initiated from the NSX Manager user interface. It is worth noting that the NSX image is automatically uploaded to VMware vCenter when the NSX cluster preparation commences.
Supported / Unsupported Use Cases
Supported Use Cases: –
- Use Case-01: -Clusters with ESXi hosts that are prepared for NSX networking using a transport node profile(NSX Networking & Security).
- Use Case-02: –Clusters with ESXi hosts that are not prepared for NSX networking(NSX Security Only).
Unsupported Use Cases: –
- If vSphere Lifecycle Manager is enabled on an ESXi cluster, then you cannot apply an NSX transport node profile to prepare the cluster hosts as transport nodes.
Supported Use Case-01
- Clusters with ESXi hosts that are prepared for NSX networking using a transport node profile(Networking & Security).
let us explore the prerequisites before deep dive the first supported use case.
Prerequisites: –
- Ensure all hosts in a cluster are running at least ESXi 7.0 U1 version or higher.
- Ensure Lockdown mode is not enabled on any of the hosts. vSphere Lifecycle Manager might fail to prepare hosts that are enabled to function in Lockdown mode.
- Ensure there is no drift in images between hosts and cluster. Otherwise, you cannot enable vSphere Lifecycle Manager on the cluster. Remediate hosts in VMware vCenter to ensure base image matches on host and clusters.
- Register Compute Manager with the following settings:
- Enable Trust and set the access level to vSphere Lifecycle Manager. Trust is mandatory to establish communication between NSX and the vSphere Lifecycle Manager.
- Enable Create Service Account.
- Create a transport node profile using a vSphere Distributed Switch host switch. N-VDS switch is not supported on a vSphere Lifecycle Manager-enabled.
- If you configure a Web Proxy on a VMware vCenter Appliance, add all NSX Manager IP addresses to the NO_PROXY list, otherwise, vLCM cannot connect to NSX Managers.
- Ensure vSphere Lifecycle Manager is enabled on the cluster.
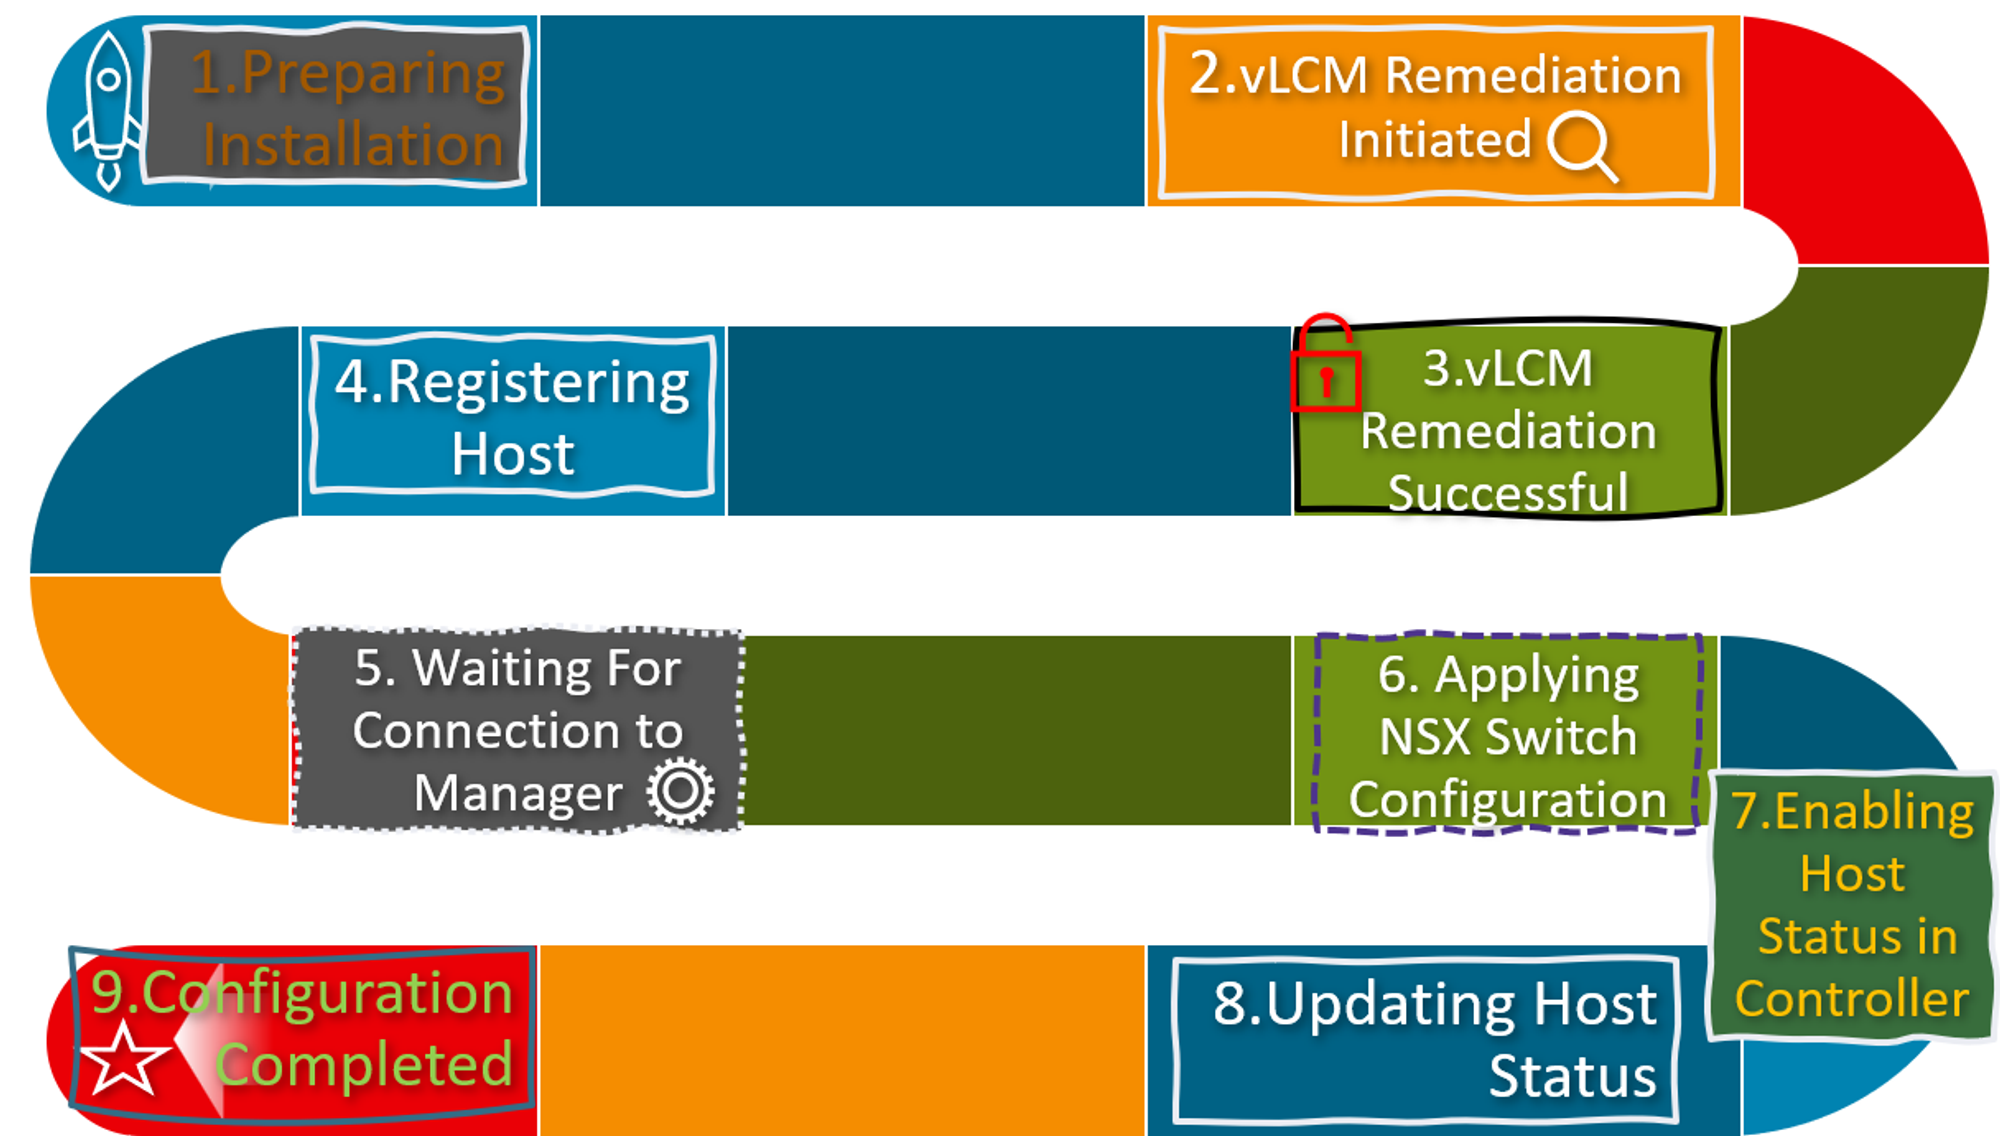
vLCM Install Workflow integrated with NSX
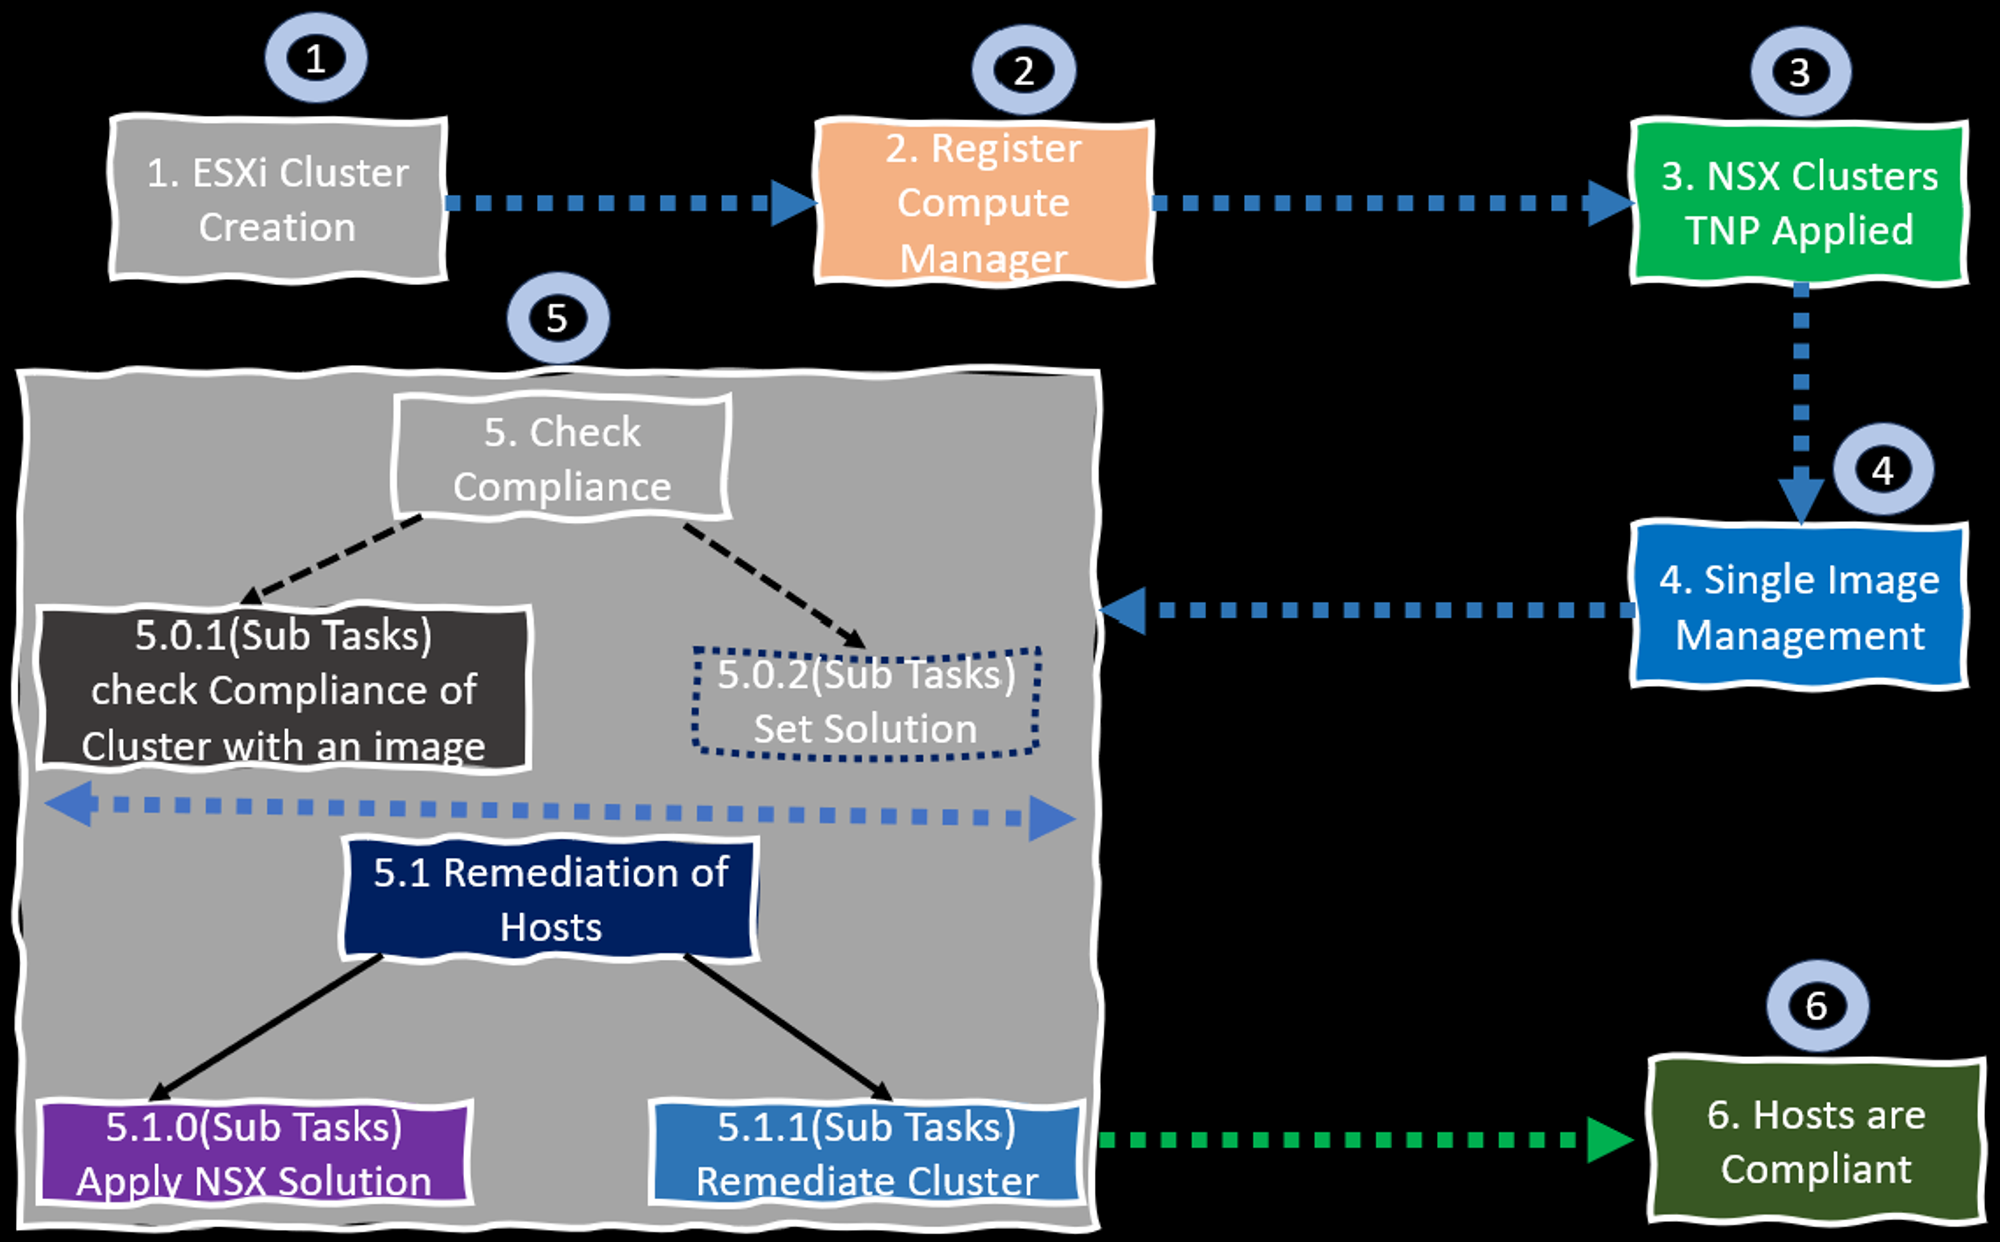
Please find below the series of steps that are being executed in the ongoing workflow:
1.ESXi Cluster Creation.
2. Register Compute Manager.
3.NSX Clusters TNP Applied.
4. Single Image Management
5. Check Image Compliance- check Compliance of Cluster with image, Set Solution.
5.1. Remediation of Hosts- Apply NSX Solution , Remediate Cluster.
6.Hosts Are Compliant .
It is important to adhere to these steps in order to ensure the successful completion of the workflow.
ESXi Cluster Creation : –
Capture 1: –
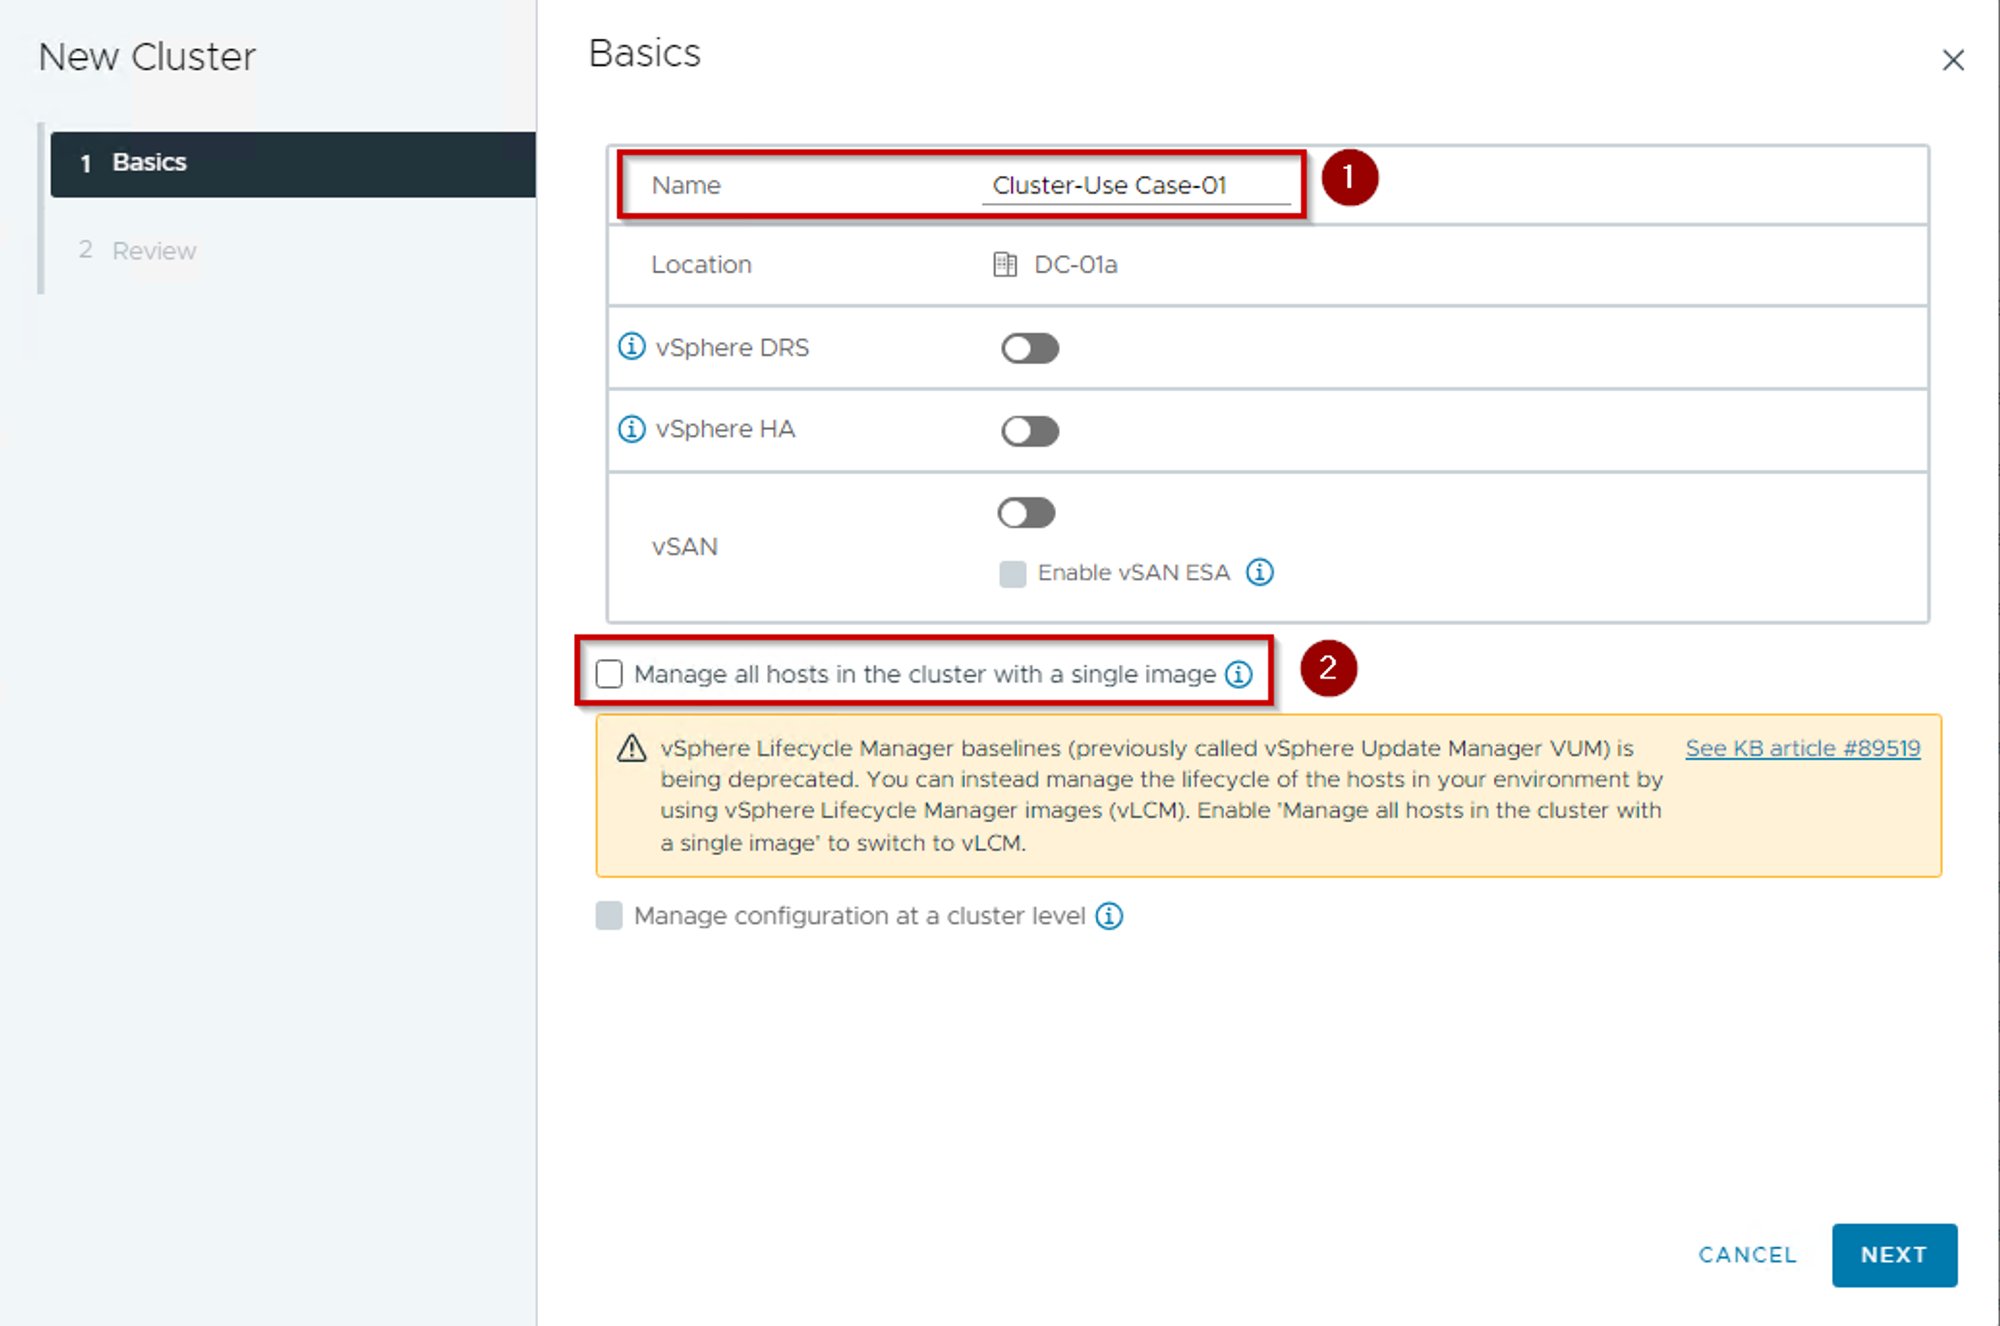
Step 1:- We are creating the cluster “Cluster-Use Case-01” without vSphere DRS, vSphere HA & vSAN feature enabled. We can configure manually while adding the host in the cluster.
Step 2:- Uncheck the Radio Button in front of the Manage all hosts in the cluster with a single image.
Note:- In this blog, we are using the below components Build & versions.
04 numbers of ESXi host with version 8.0.2 Build 22380479
vSphere Version 8.0.2
NSX -4.1.2.1.x Build 22667789
Register Compute Manager: –
Capture 2: –
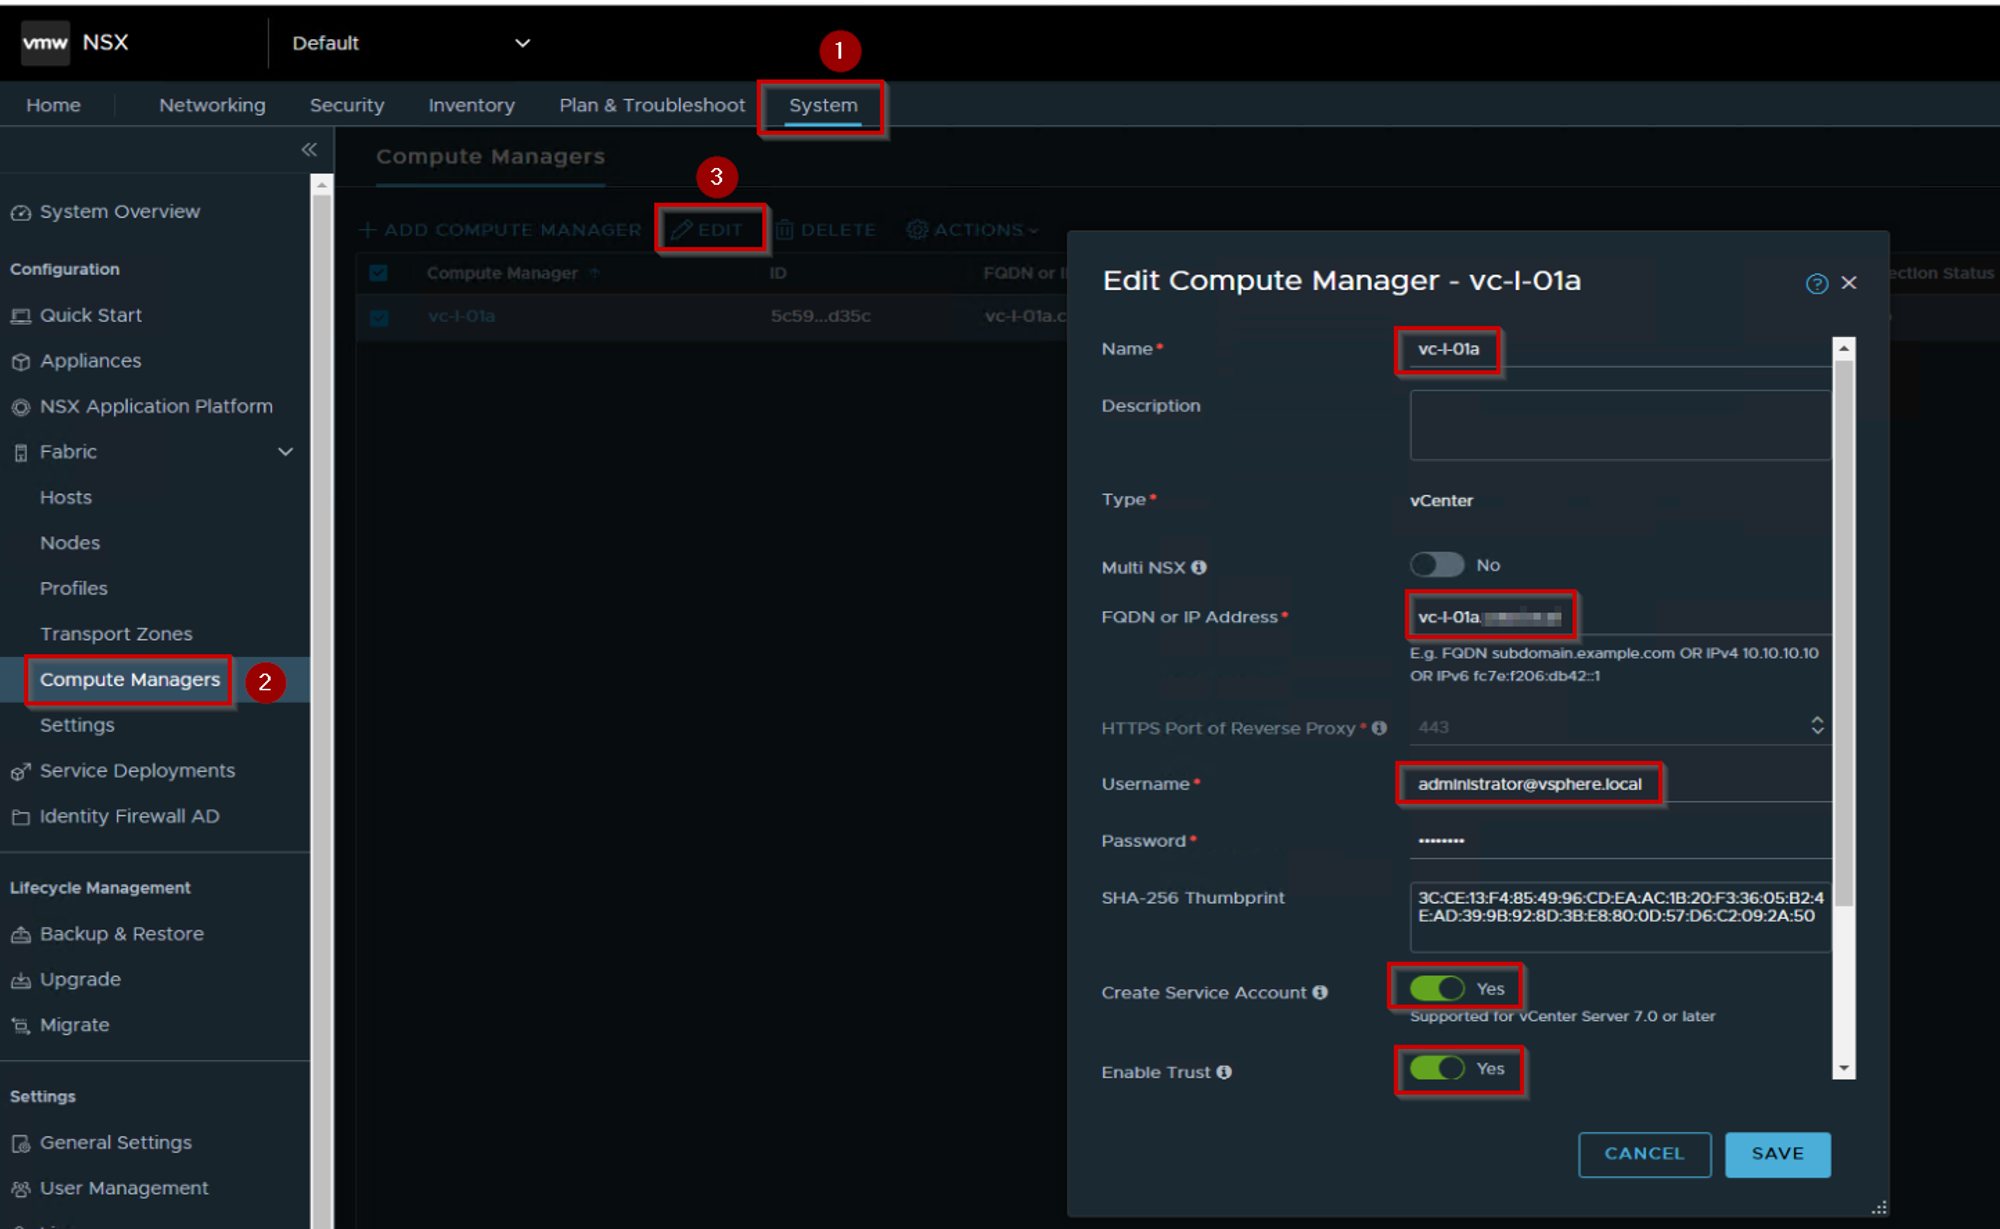
As Shown in Capture 2, we are registering the Compute Manager.
Step 1. Click on System
Step 2. Click on Compute Manager under Fabric
Step 3. Click on edit and fill in the required details:

Capture 2.1

As Shown in Capture 2.1, we are Successfully registered the Compute Manager.
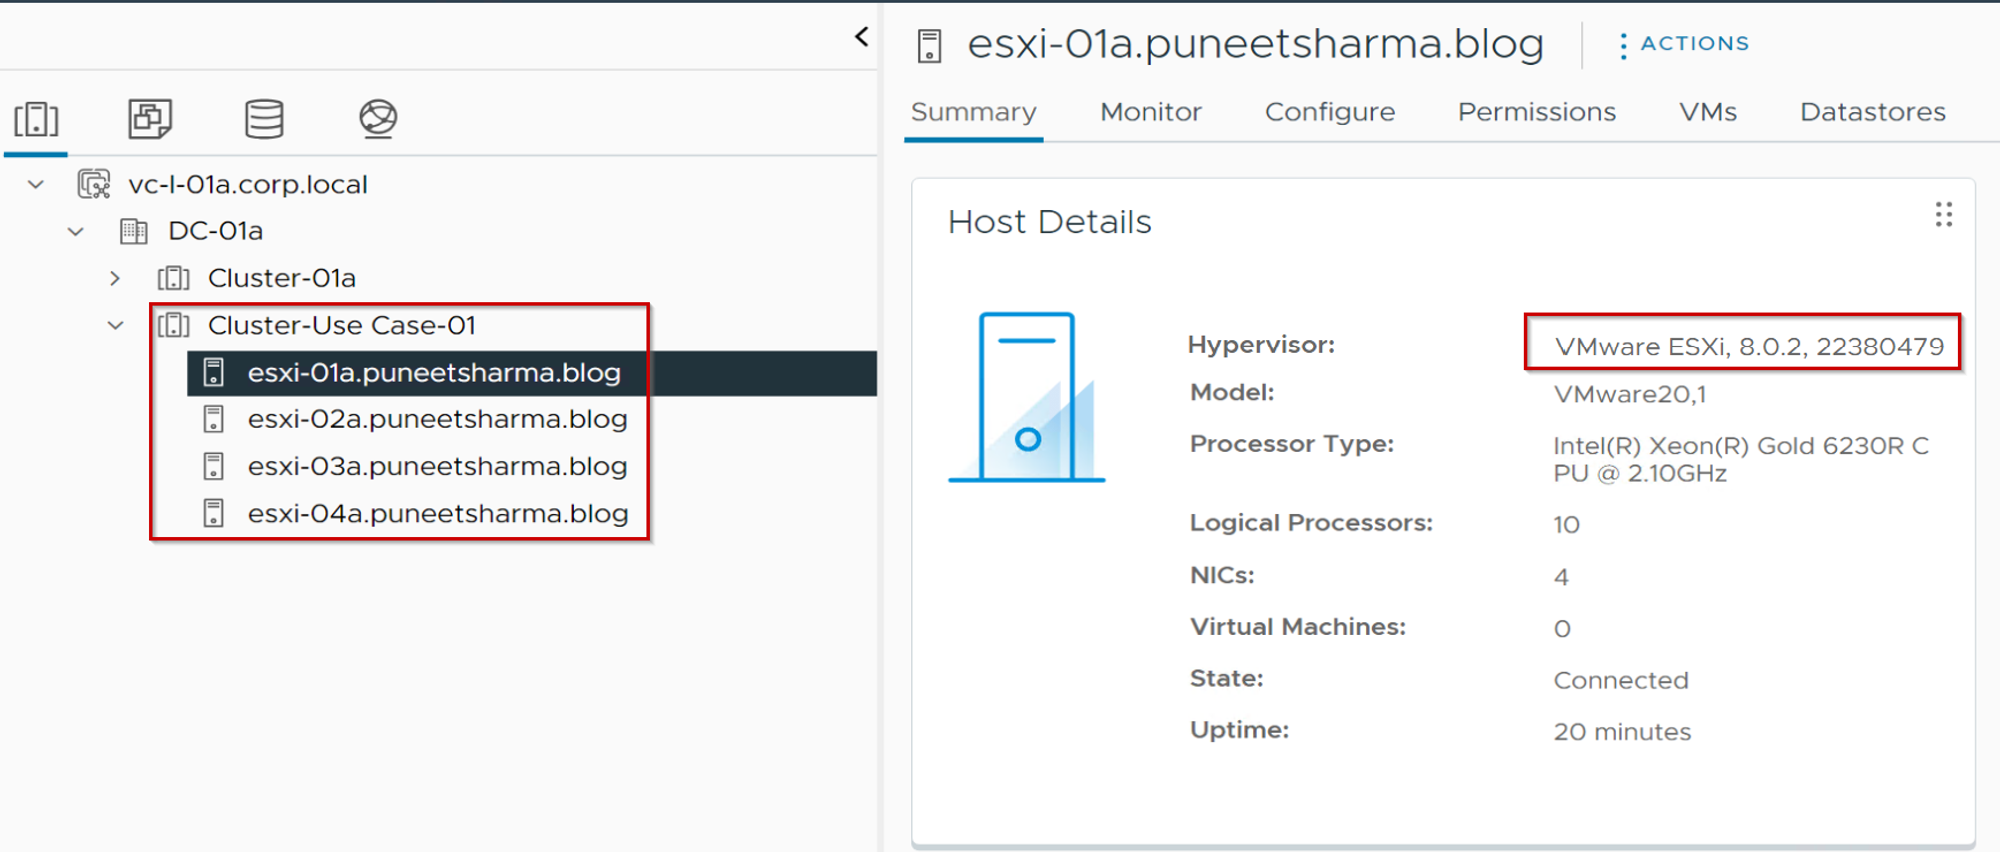
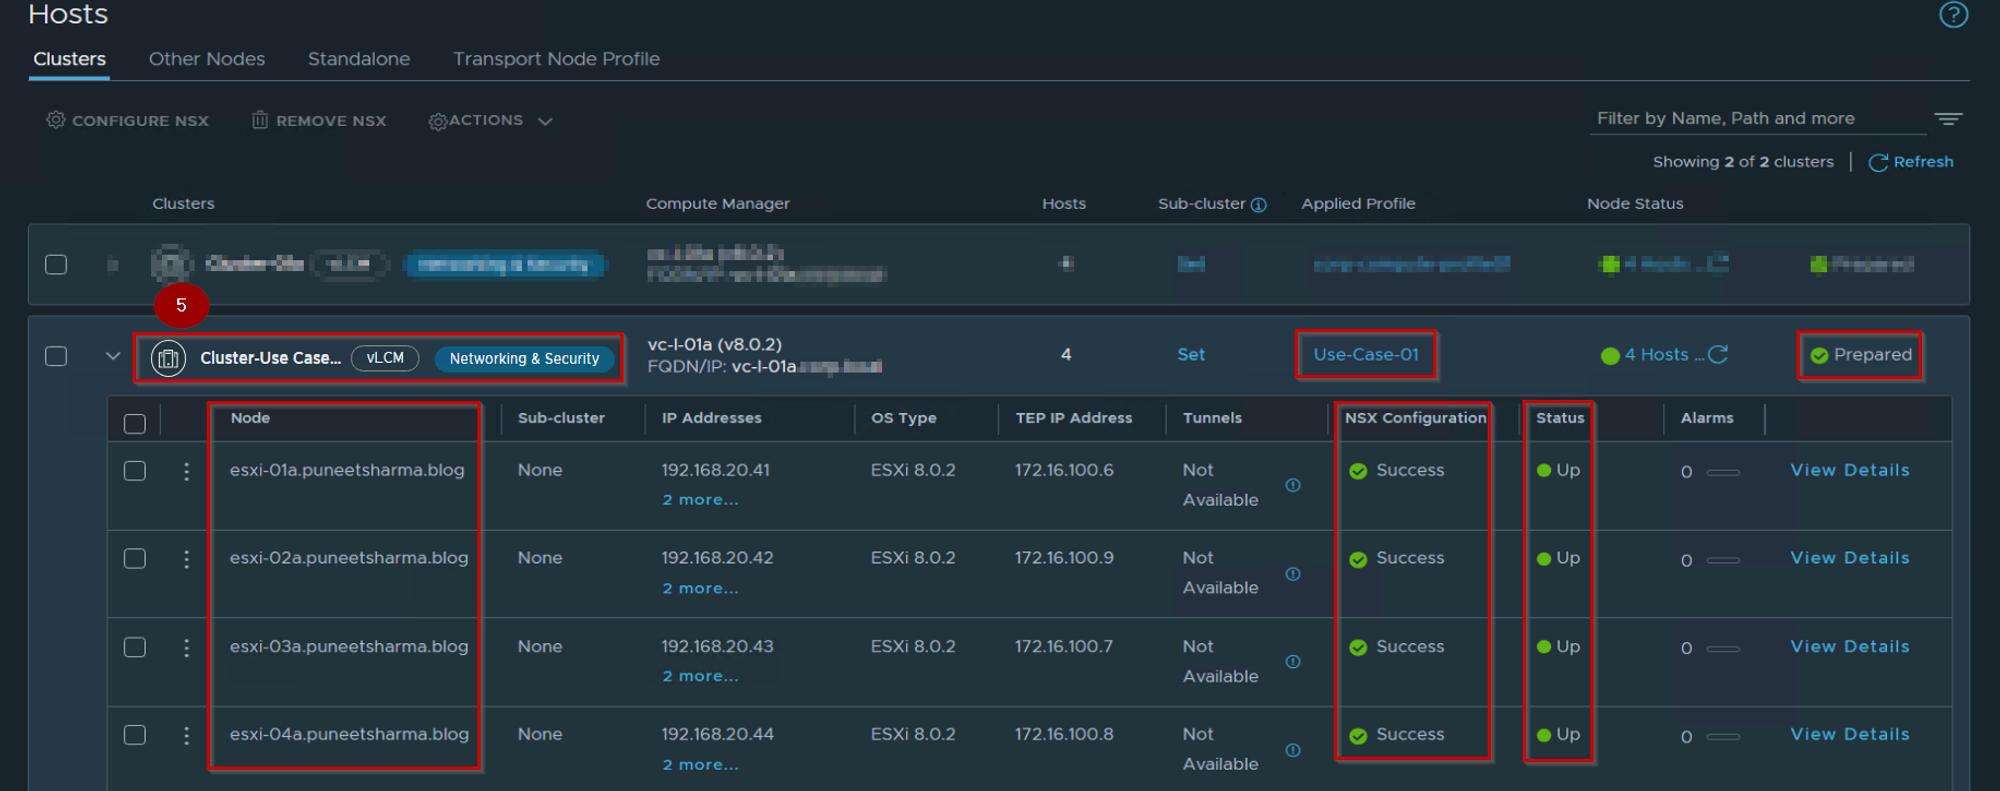
NSX Clusters TNP Applied: –
Capture 3:-
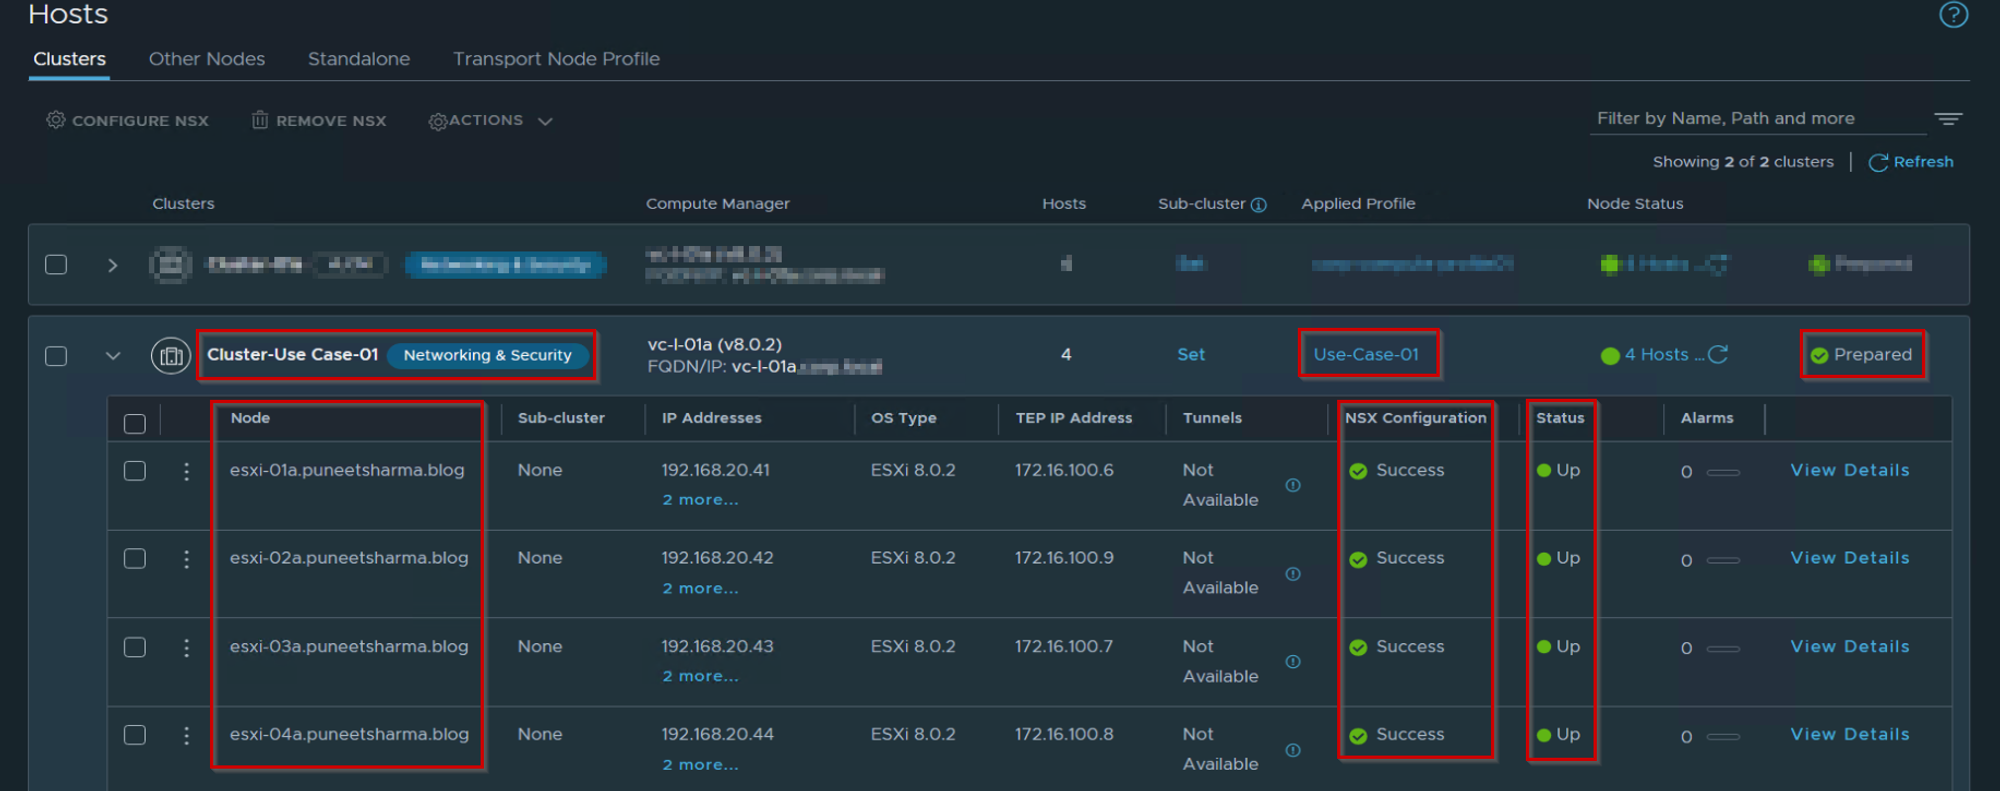
As Shown in Capture 3, We can see the below details:
Cluster ——> Cluster-Use case-01 successfully prepared for Network & Security.
Hosts — > All hosts are successfully prepared for Network & Security
TNP—> Use-Case-01 (TNP) is successfully applied on the Cluster.
NSX Configuration—> Success.
Status— > UP.
Note:- At present, the vSphere Lifecycle Manager (vLCM) has yet to be applied to the cluster, which is why it does not appear after the cluster name. Installing NSX on a vSphere Lifecycle Manager-enabled cluster may require additional time compared to installing it on a non-vSphere Lifecycle Manager-enabled cluster. This slight difference in installation time is due to the extra health checks that are bundled with this combination of products. It is worth noting that the implementation of vLCM on the cluster is necessary to enable its display after the cluster name.
Single Image Management: –
Capture 4: –
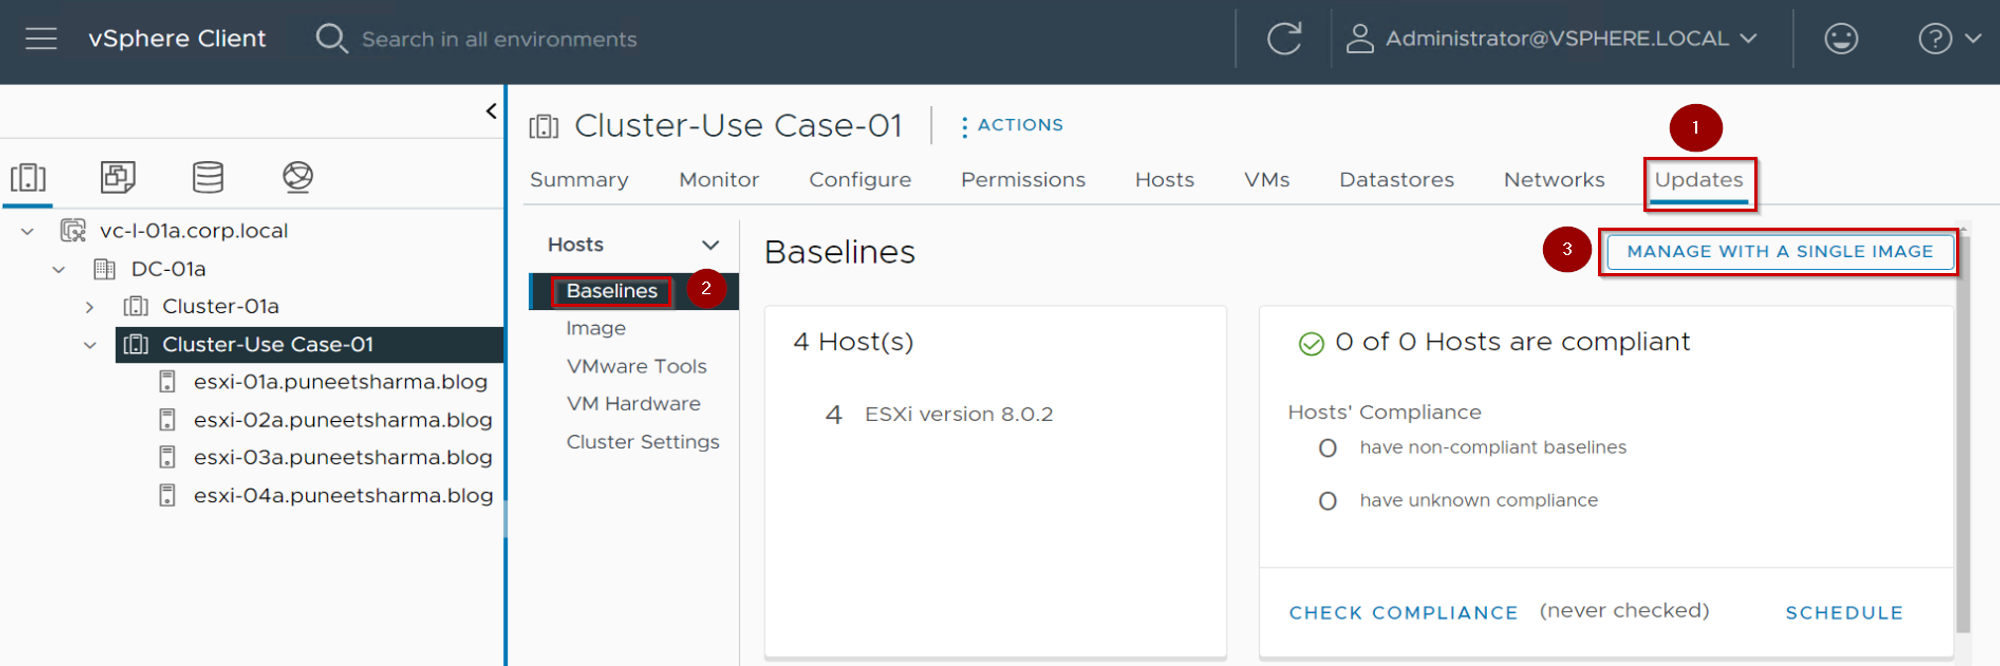
As Shown in Capture 4, We can see the below details:
Step 1. Under Cluster click on Updates.
Step 2. Click on Baselines
Step 3. Click on MANAGE WITH A SINGLE IMAGE.
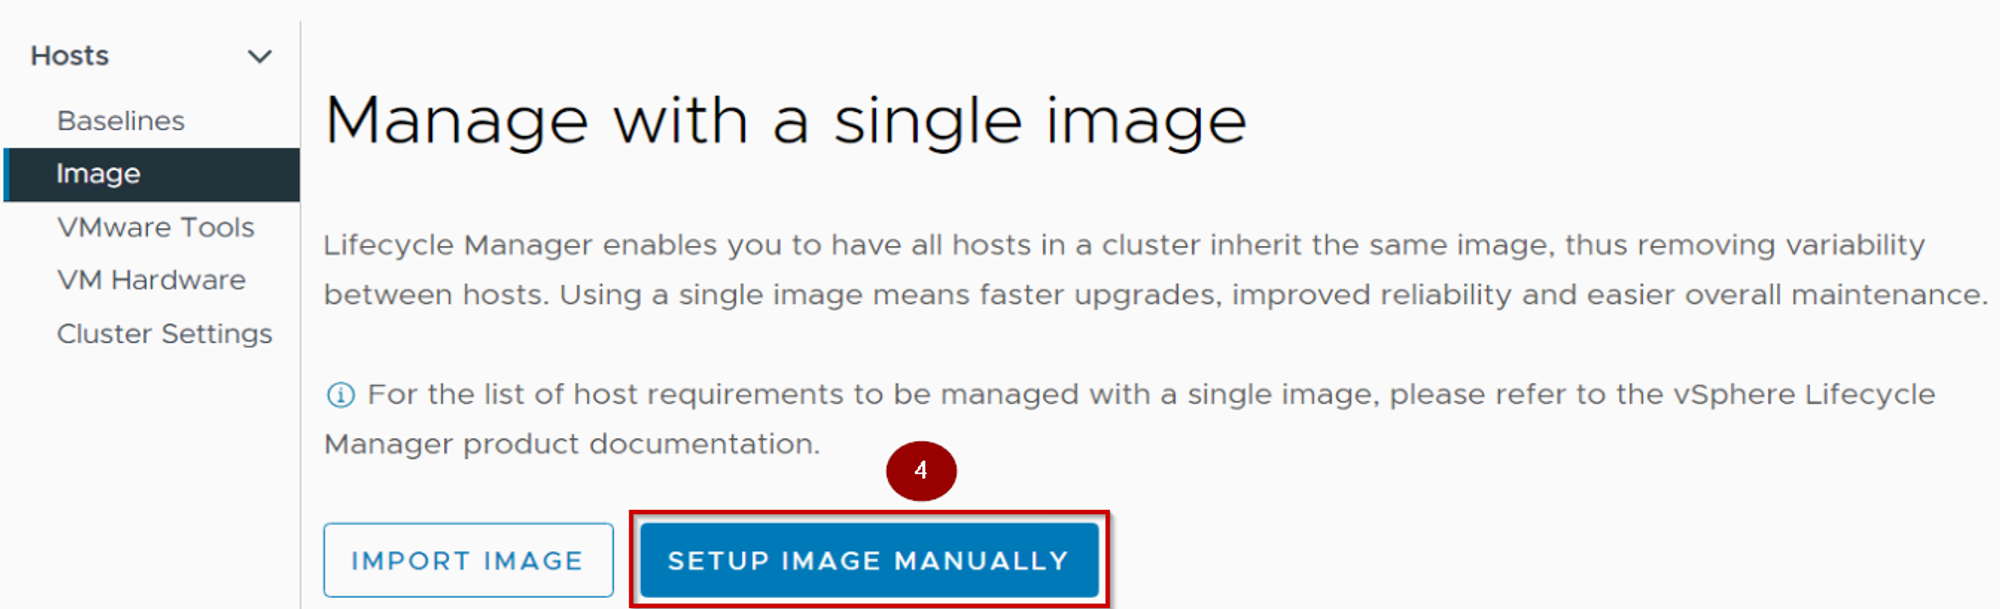
Step 4. It will auto redirect to Image and click on Setup Image Manually.
Note:- We can also use the import image if you have the JSON file or enter the URL of the image.
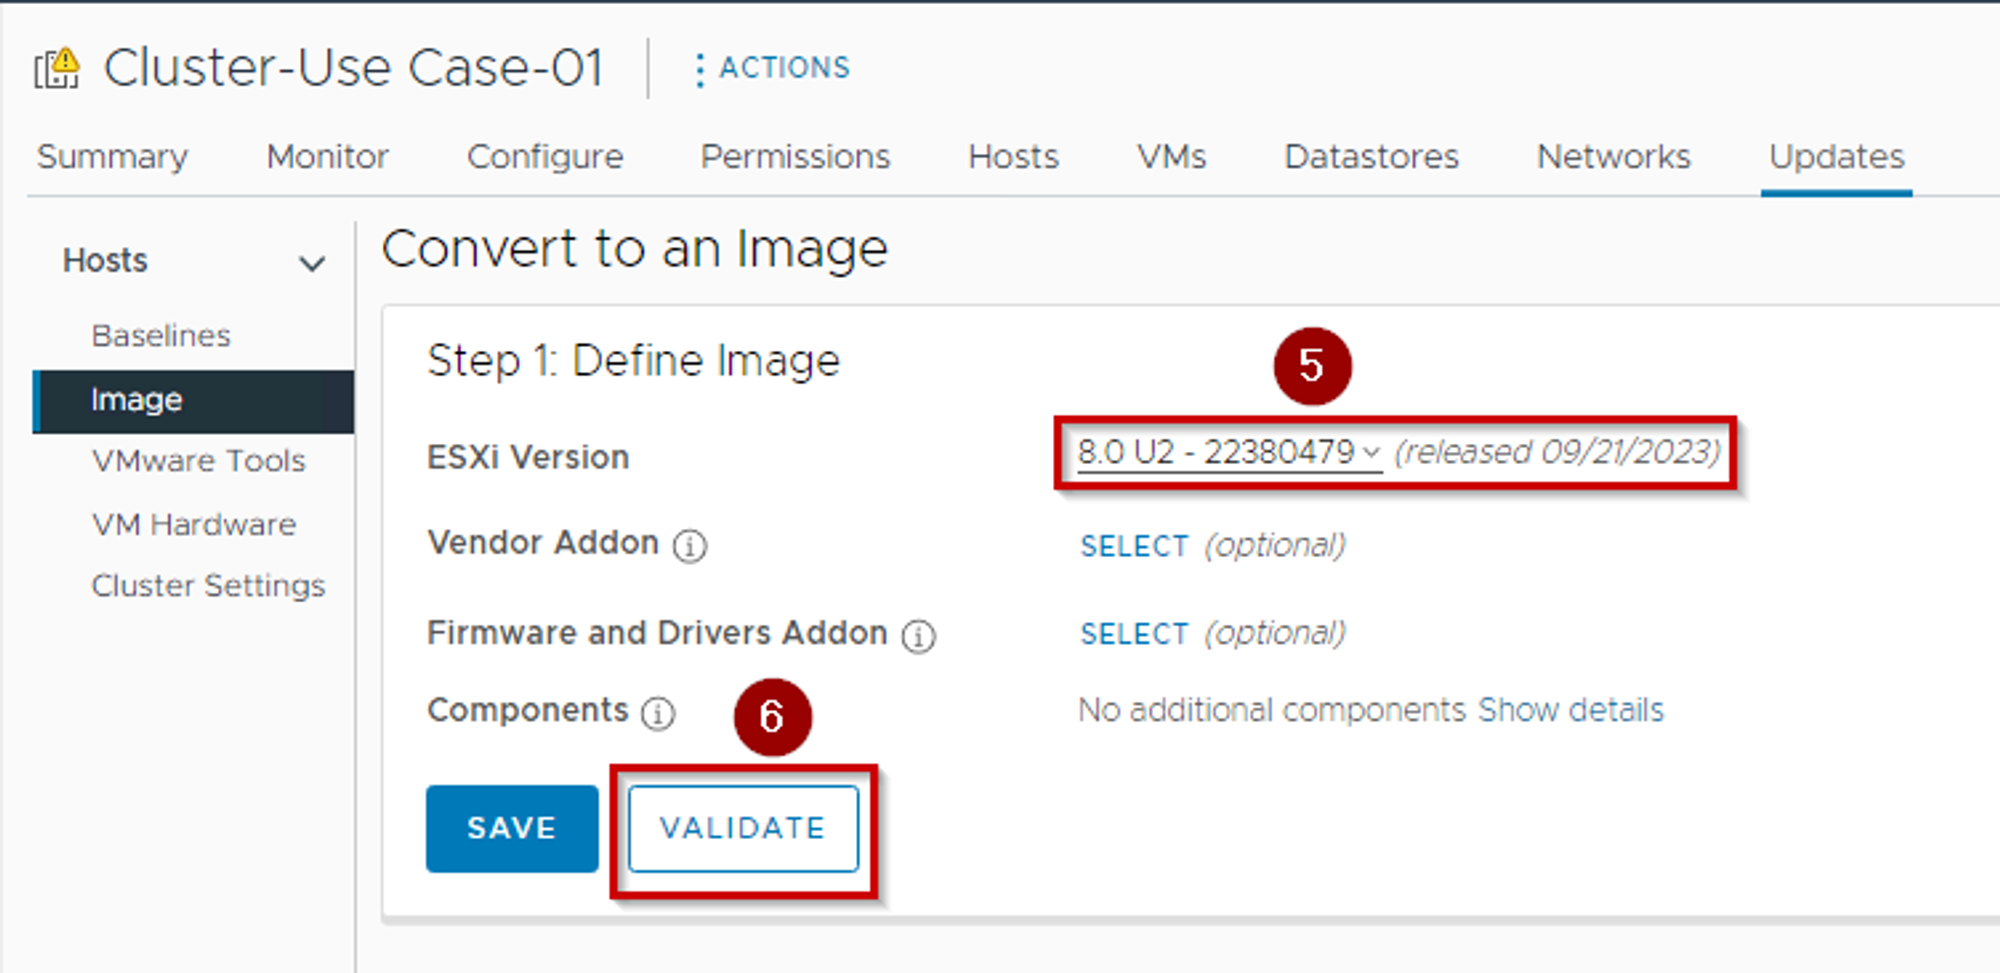
Step 5. Select the stable ESXi version. As per capture, we are using ESXi version 8.0.U2b 23380479.
Step 6. Click on Validate.
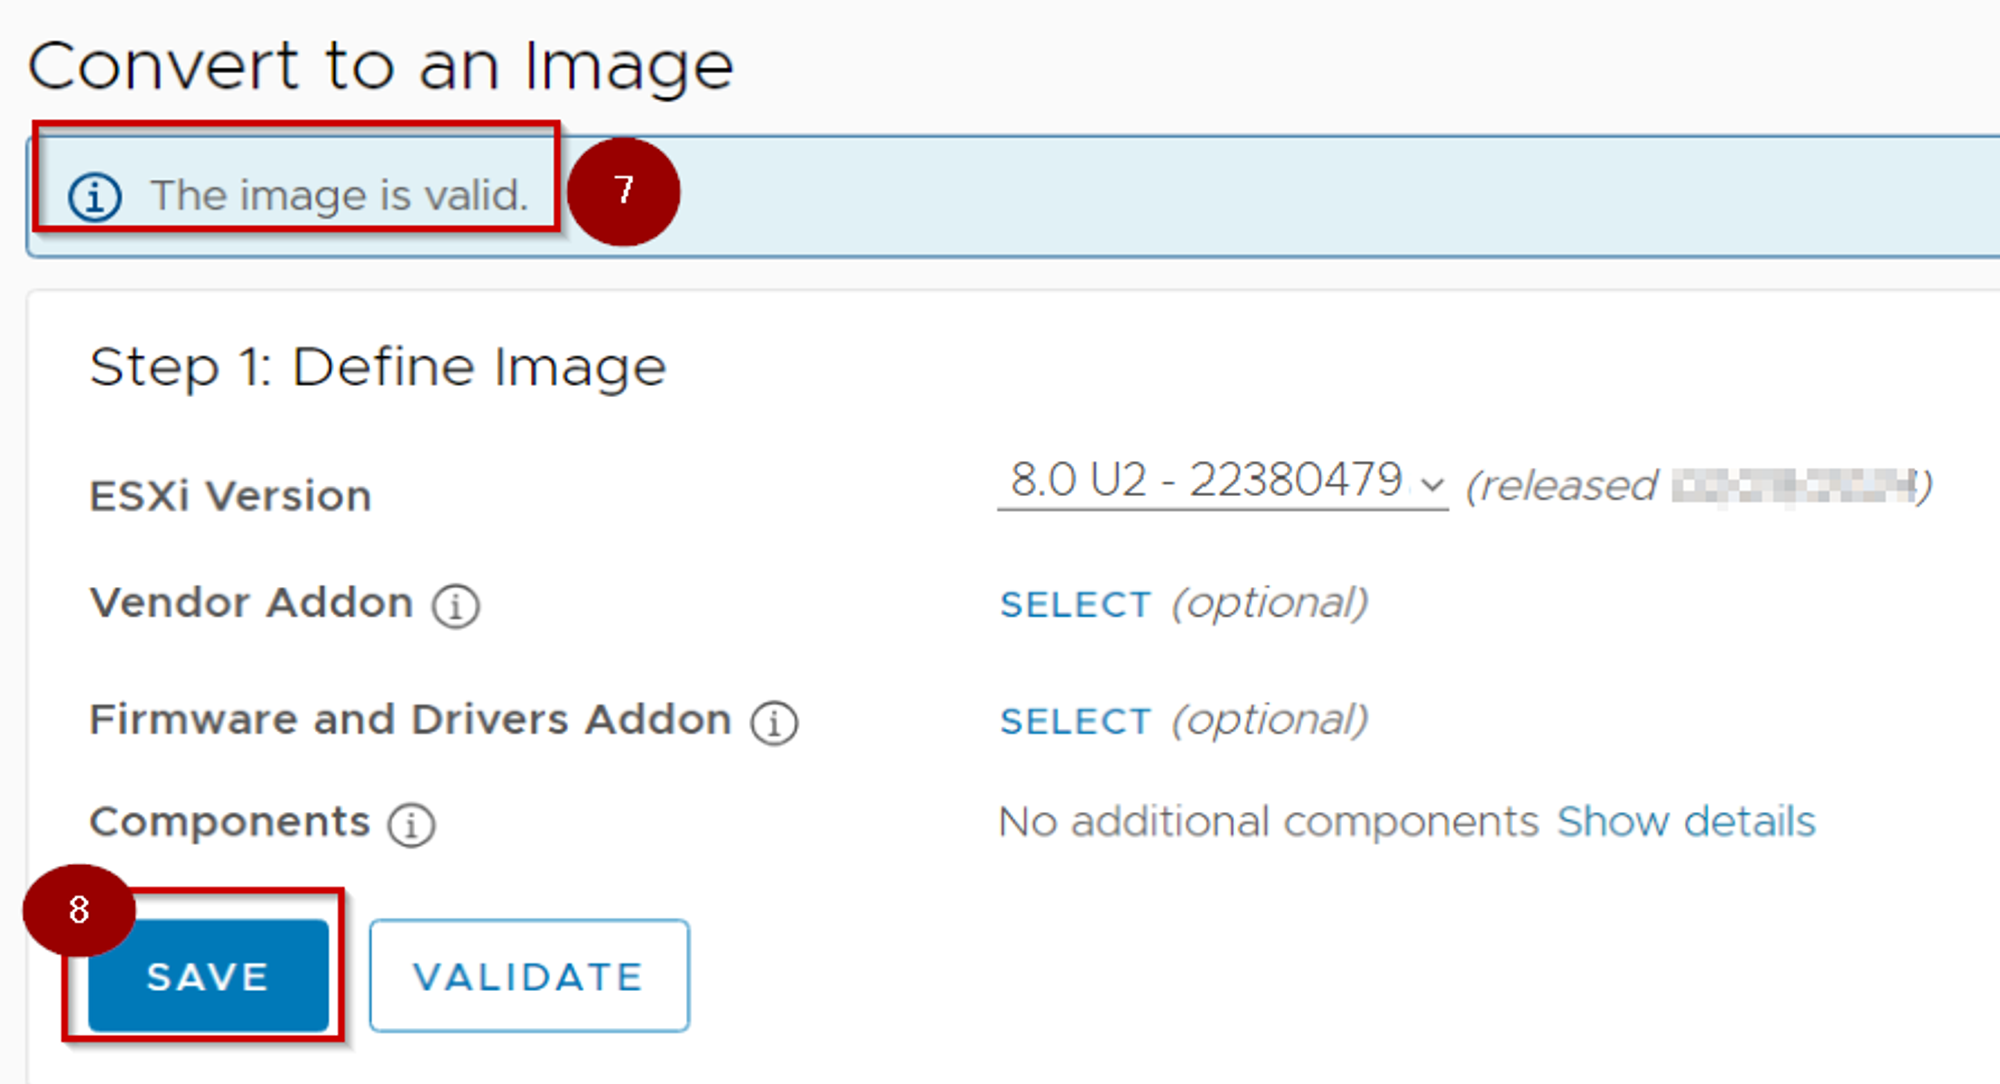
Step 7. As we can see the “Image is Valid”.
Step 8. Click on Save, so ESXi can draft the image if any changes in the future.
Note: – After clicking on save we can see in the tasks under monitor about “Save image in the cluster”.
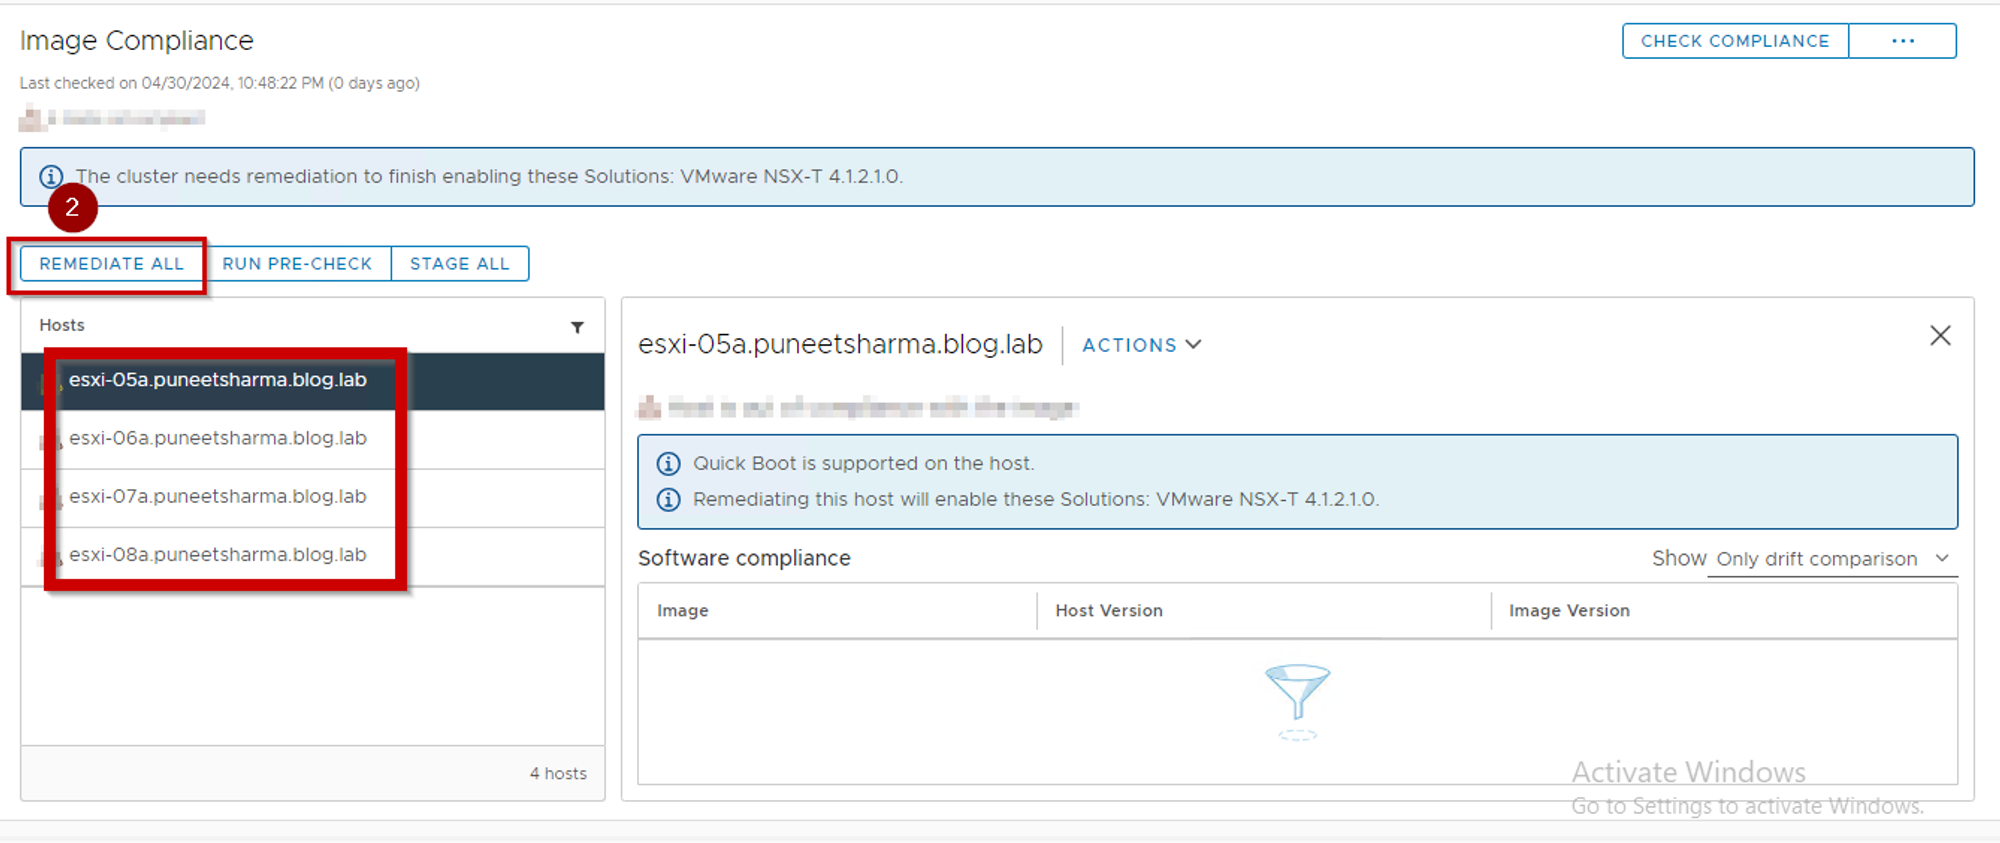
Check Compliance: –
Capture 4.1: –
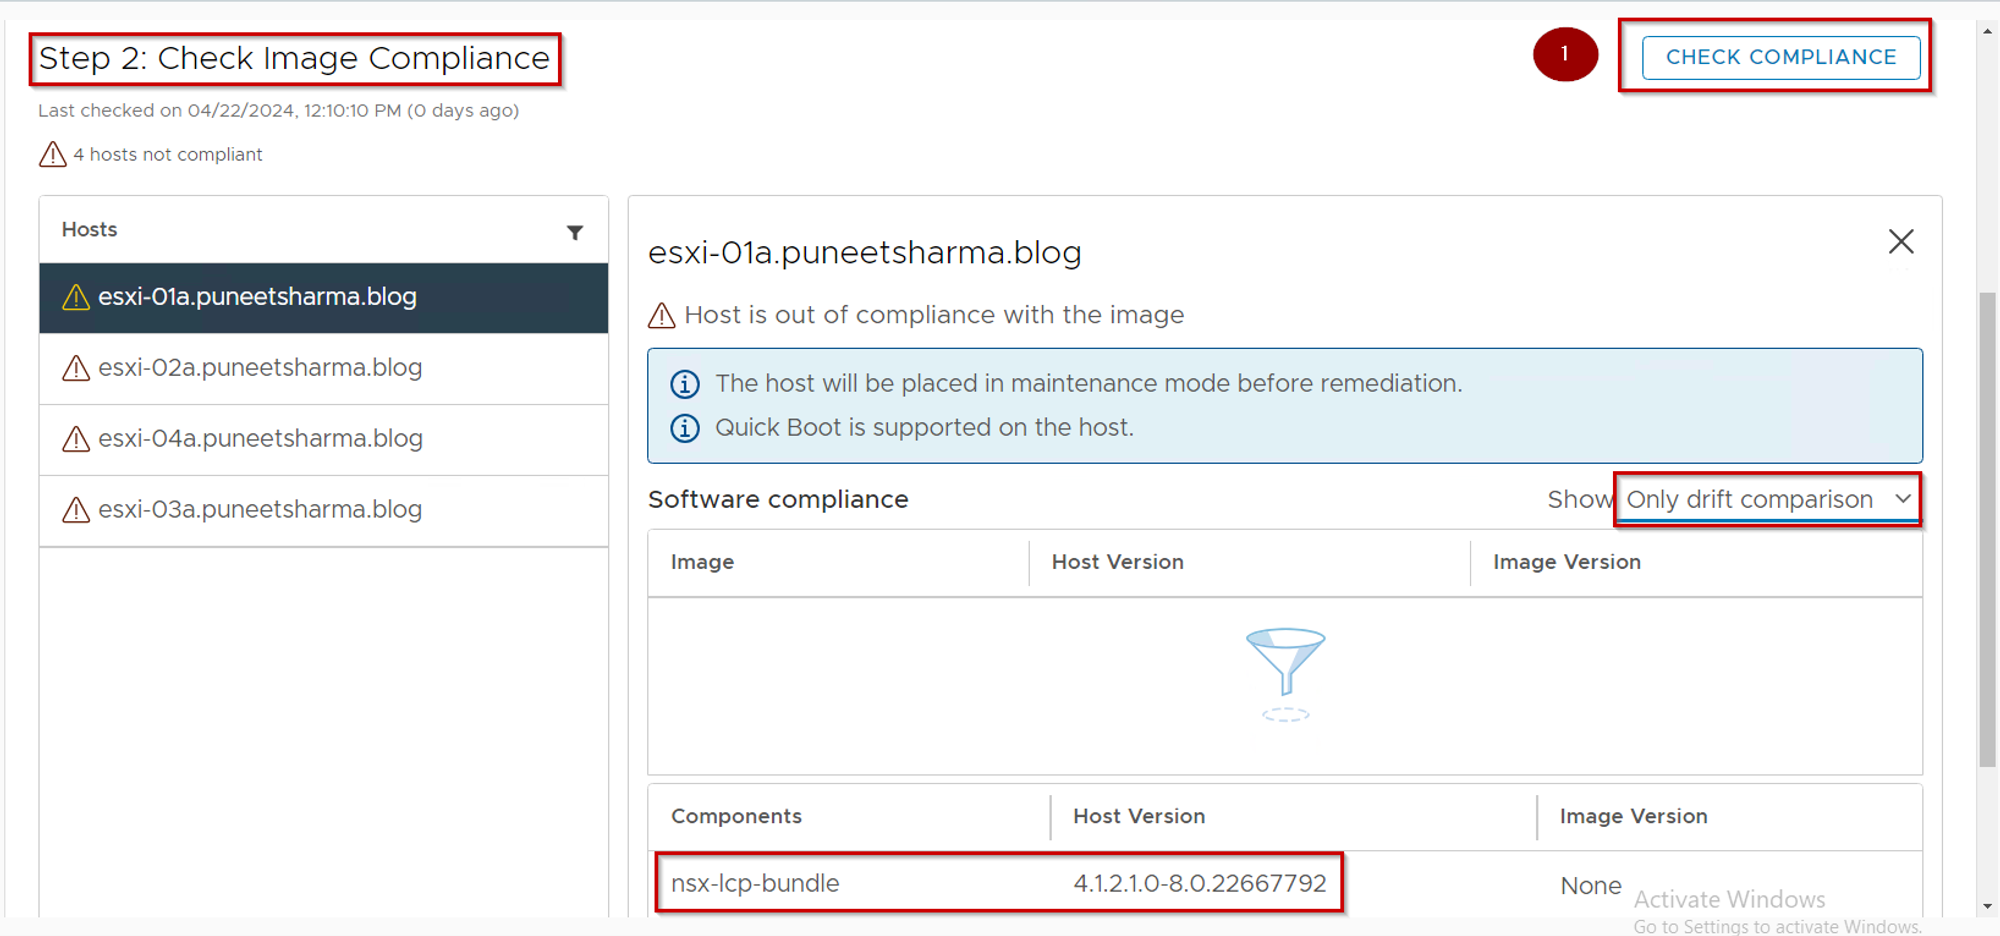
As Shown in Capture 4.1, We can see the below details: –
Step 1. click on Check Compliance.
Note: – Under Software Compliance, I select the “Only drift comparison” because drift will show us if any difference in the images. We can also select the “full image comparison” if we want to know the host version & image version comparison.
We can see NSX-LCP-bundle bundle 4.1.2.1.0-8.0.22667792(4.1.2.1.0 is the NSX Version,8.0 is the vcenter version and 22667792 is the build version of vCenter).

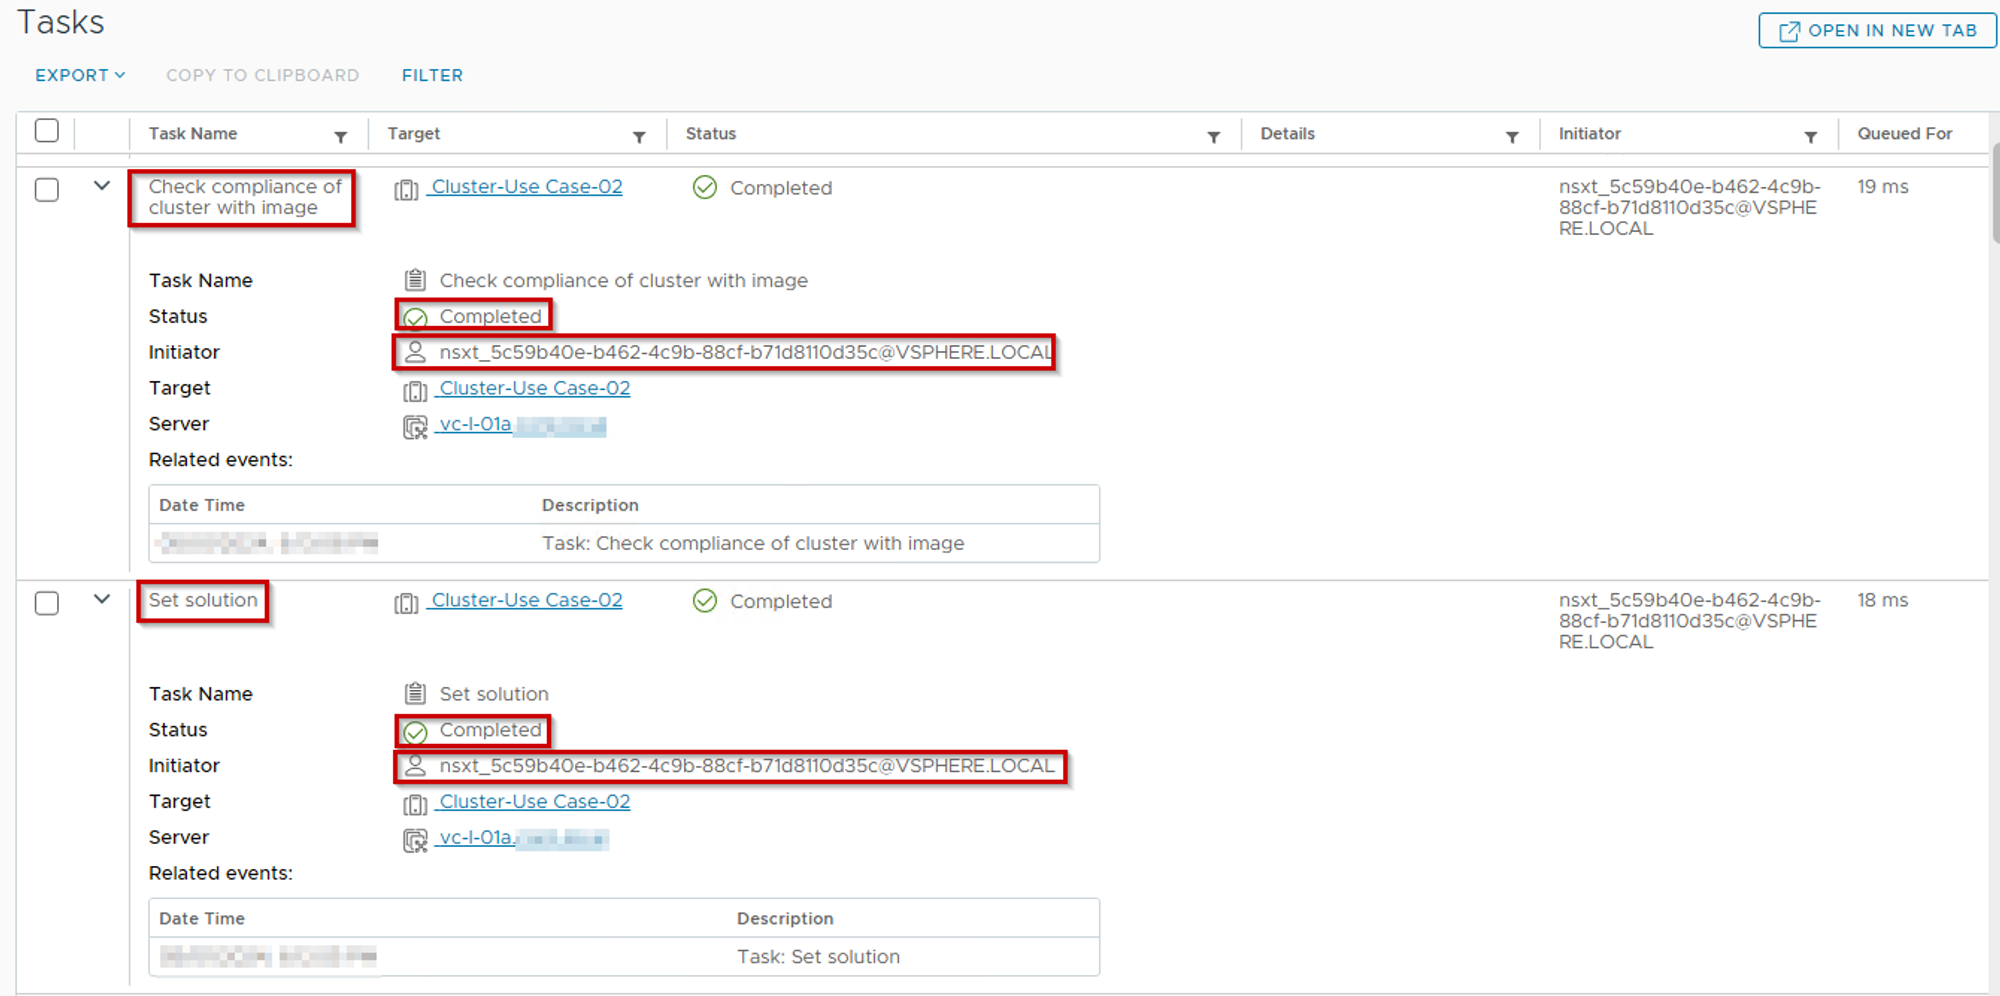
In the background to comply with the “Check Compliance” the “Set Solution” and “Check compliance of Cluster with image” tasks should be completed successfully then it is allowed to proceed with the remediation step.
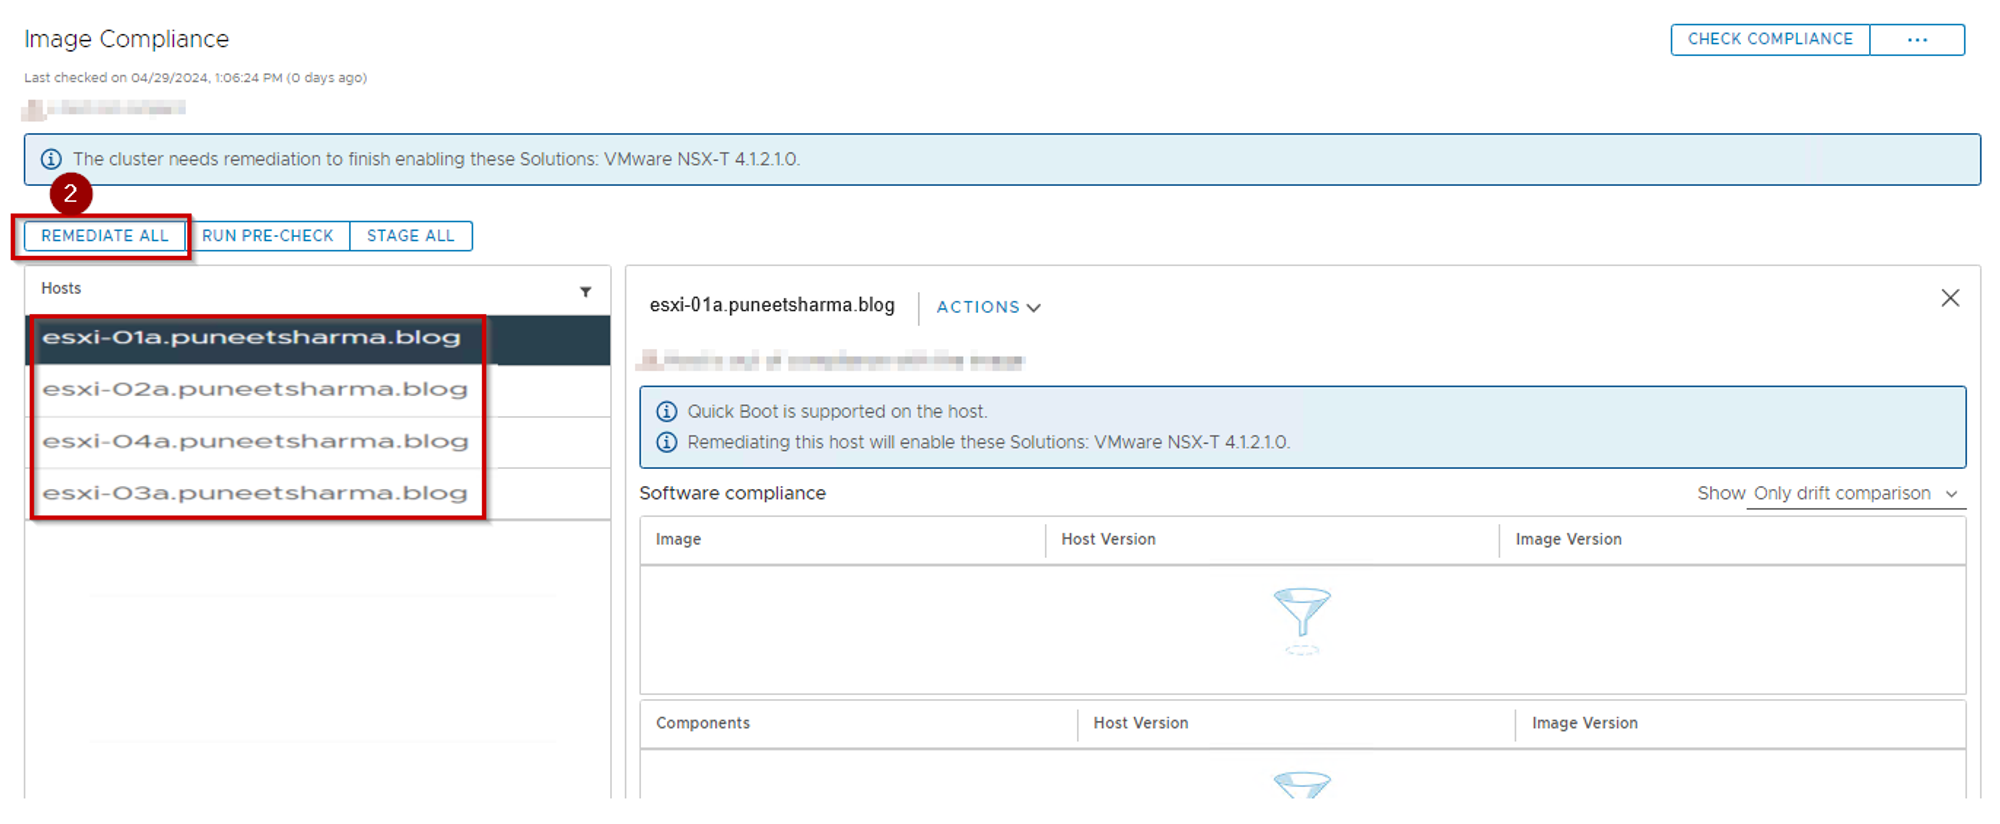
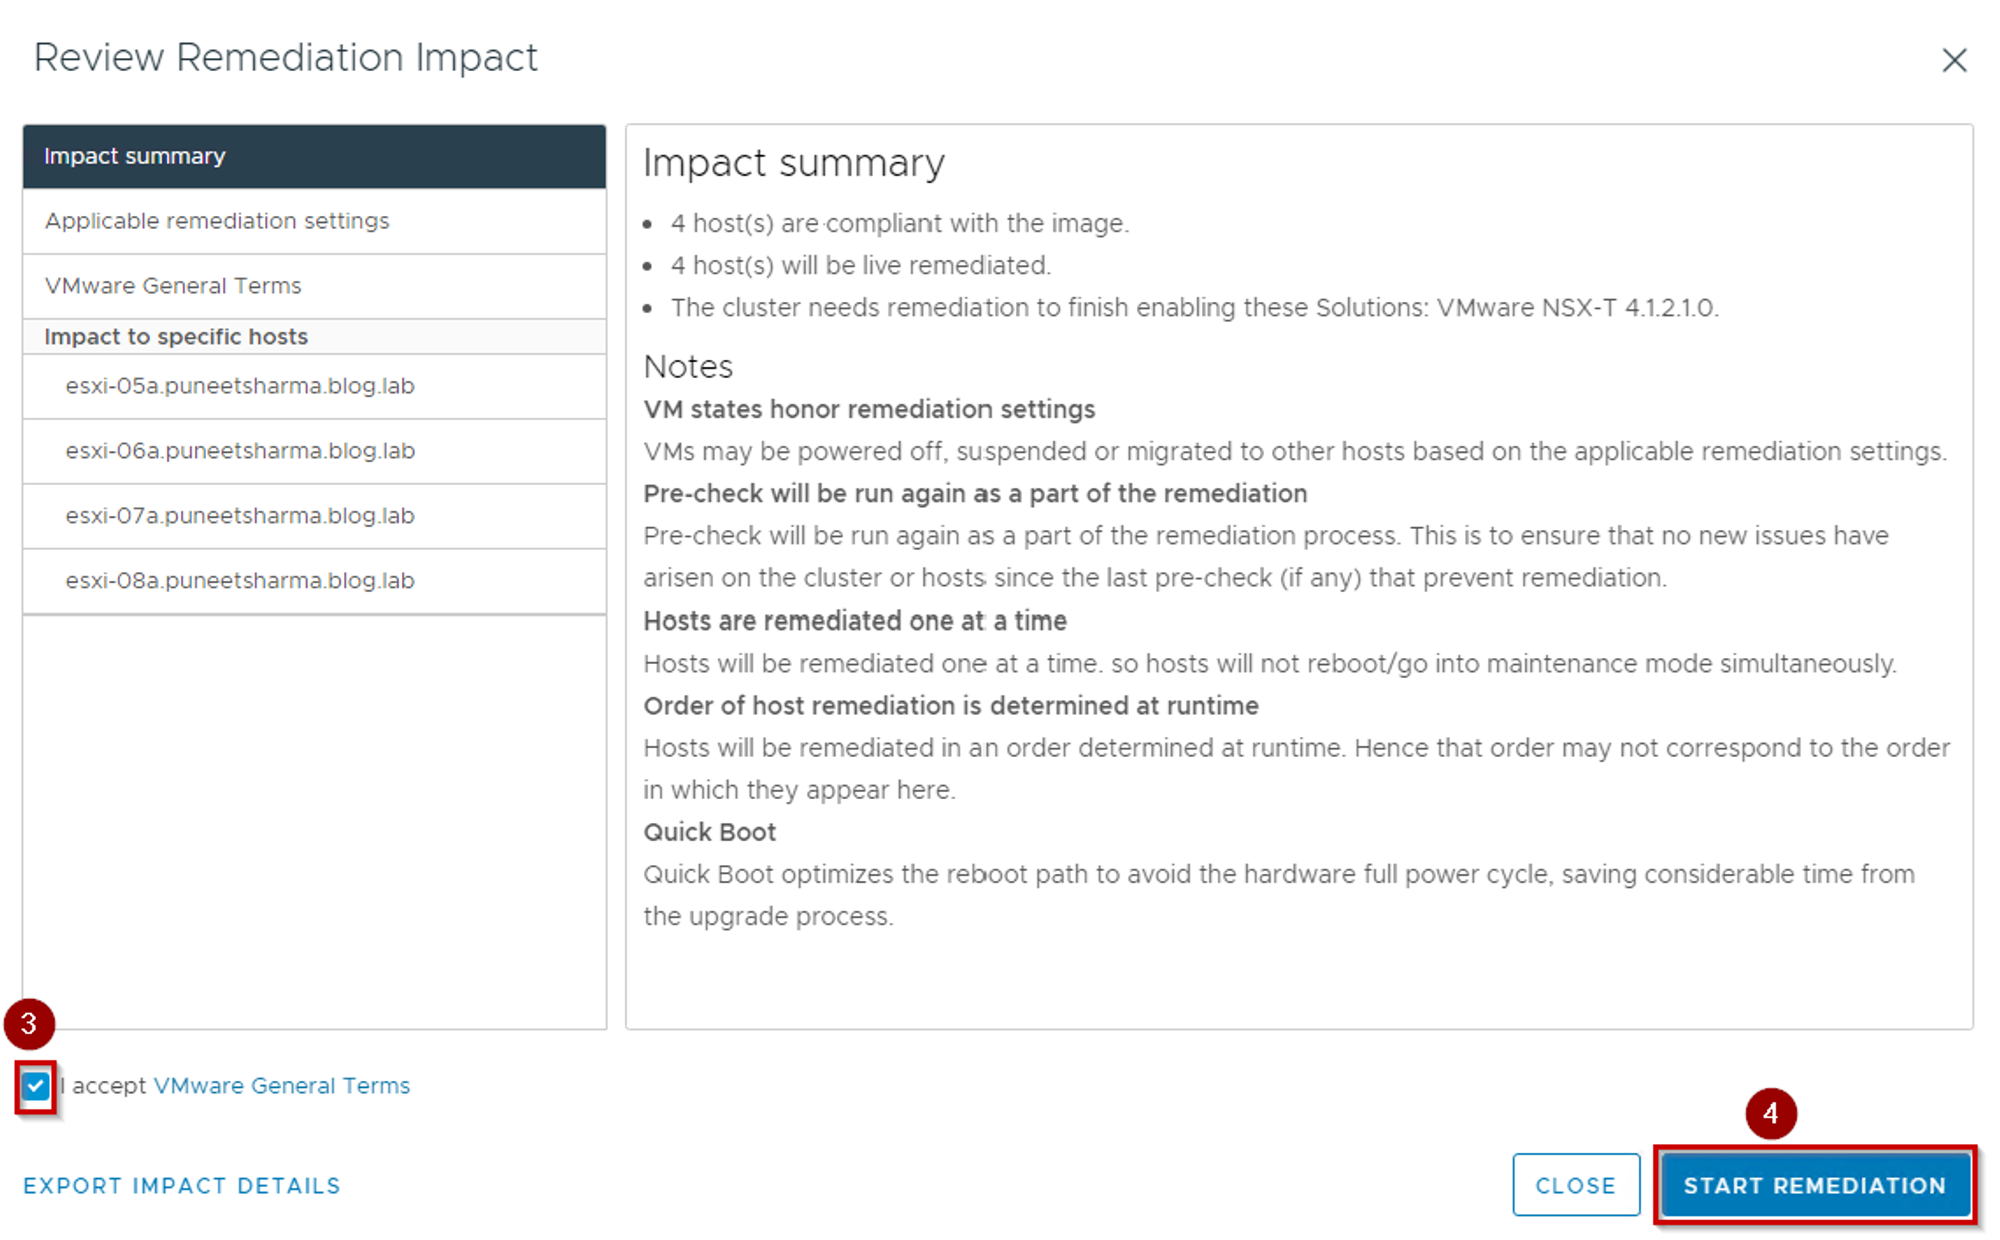
Step 2. Click on Remediate All.
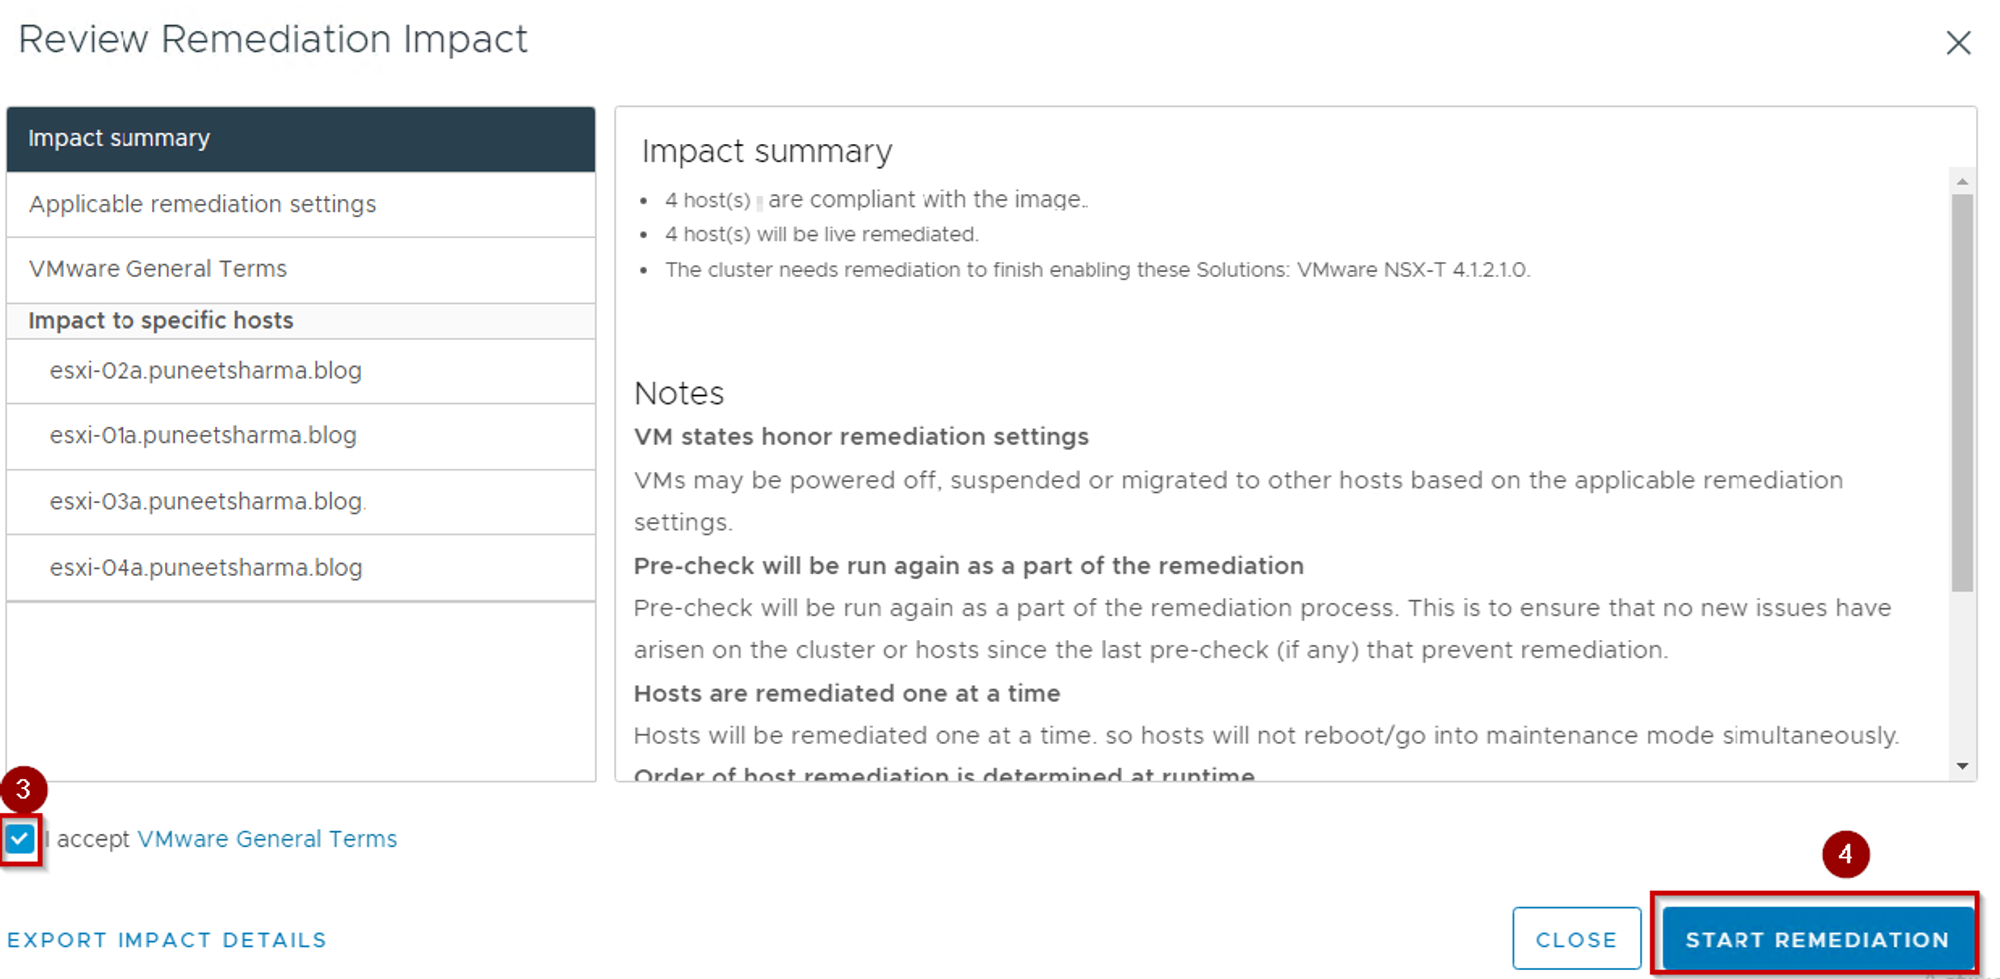
Step 3. Tik on the Radio button to accept the VMware General Term.
Step 4. Click on Start Remediation.

Note: – Apply NSX Solution & Remediate Cluster are time-consuming tasks.
Apply NSX Solution: – In this task, the NSX initiator is responsible for binding the NSX LCP Bundle with the cluster image. As illustrated in the “Capture 5.1” screenshot, the NSX LCP bundle is initiated under the components of the image.
Remediate Cluster: – This task involves conducting three vital checks: “Check cluster health,” “Check Compliance of Cluster with image,” and “Check Compliance of host with image.” The objective is to ensure that the cluster is compliant with the image and that the host is compliant with the cluster.
Hosts are Compliant: –
Capture 5.1: –
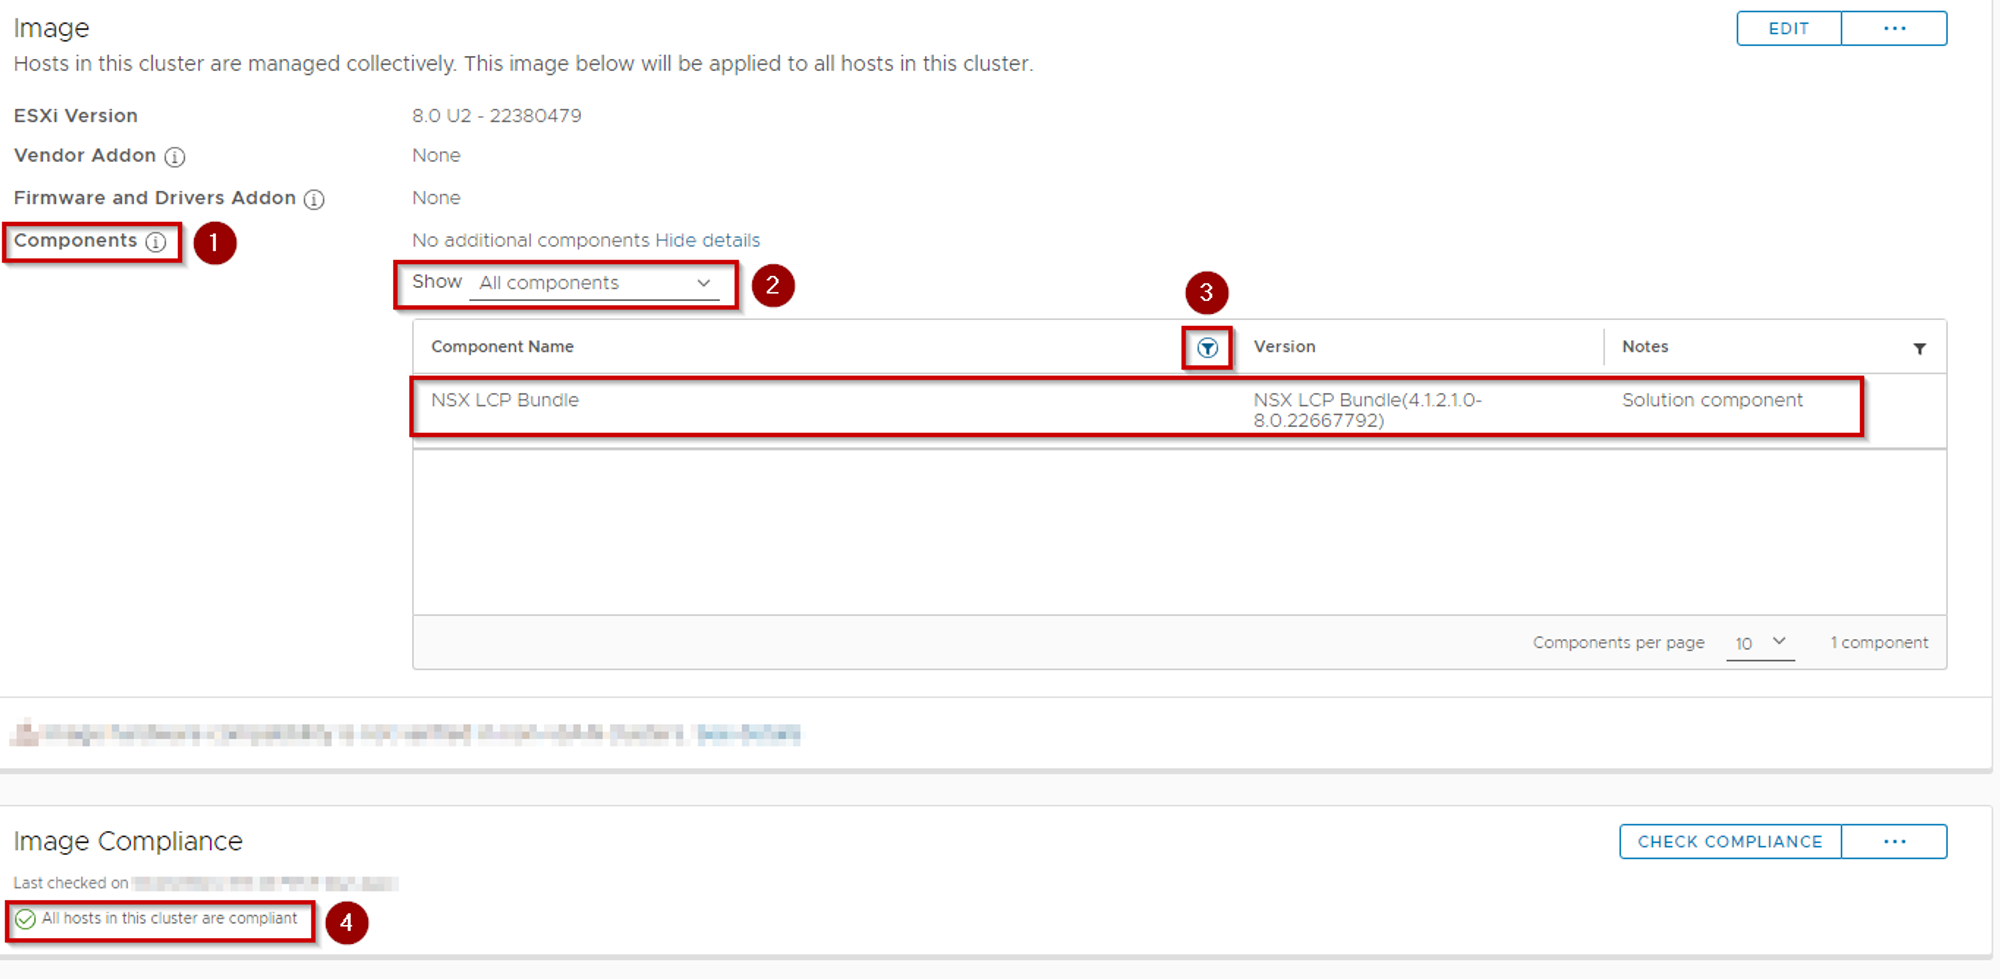
As Shown in capture 5.1, We can see the below details:
Step 1. Click on Components under the Image.
Step 2. Select the All Components under the Show.
Step 3. Click on the filter and write down the NSX under the Component Name.
Note: – Now we can see successfully added the NSX LCP Bundle(4.1.2.1.0-8.0.22667792) as a Solution Component.
Step 4. We can see under the Image Compliance ”All hosts in the Cluster are complaint🙂”.
Step 5. Under the NSX we can see the Cluster “Cluster-Use Case-01” is highlighted as a vLCM-enabled cluster.
Supported Use Case-02
Use Case-02: –Clusters with ESXi hosts that are not prepared for NSX networking(NSX Security Only).
let us explore the prerequisites before deep dive the first supported use case.
Prerequisites: –
- Ensure all hosts in a cluster are running at least ESXi 7.0 U1 version or higher.
- Ensure Lockdown mode is not enabled on any of the hosts. vSphere Lifecycle Manager might fail to prepare hosts that are enabled to function in Lockdown mode.
- Ensure there is no drift in images between hosts and cluster. Otherwise, you cannot enable vSphere Lifecycle Manager on the cluster. Remediate hosts in VMware vCenter to ensure base image matches on host and clusters.
- Register Compute Manager with the following settings:
- Enable Trust and set the access level to vSphere Lifecycle Manager. Trust is mandatory to establish communication between NSX and the vSphere Lifecycle Manager.
- Enable Create Service Account.
- Create a transport node profile using a vSphere Distributed Switch host switch. N-VDS switch is not supported on a vSphere Lifecycle Manager-enabled.
- If you configure a Web Proxy on a VMware vCenter Appliance, add all NSX Manager IP addresses to the NO_PROXY list, otherwise, vLCM cannot connect to NSX Managers.
- Ensure vSphere Lifecycle Manager is enabled on the cluster.
vLCM Install Workflow integrated with NSX
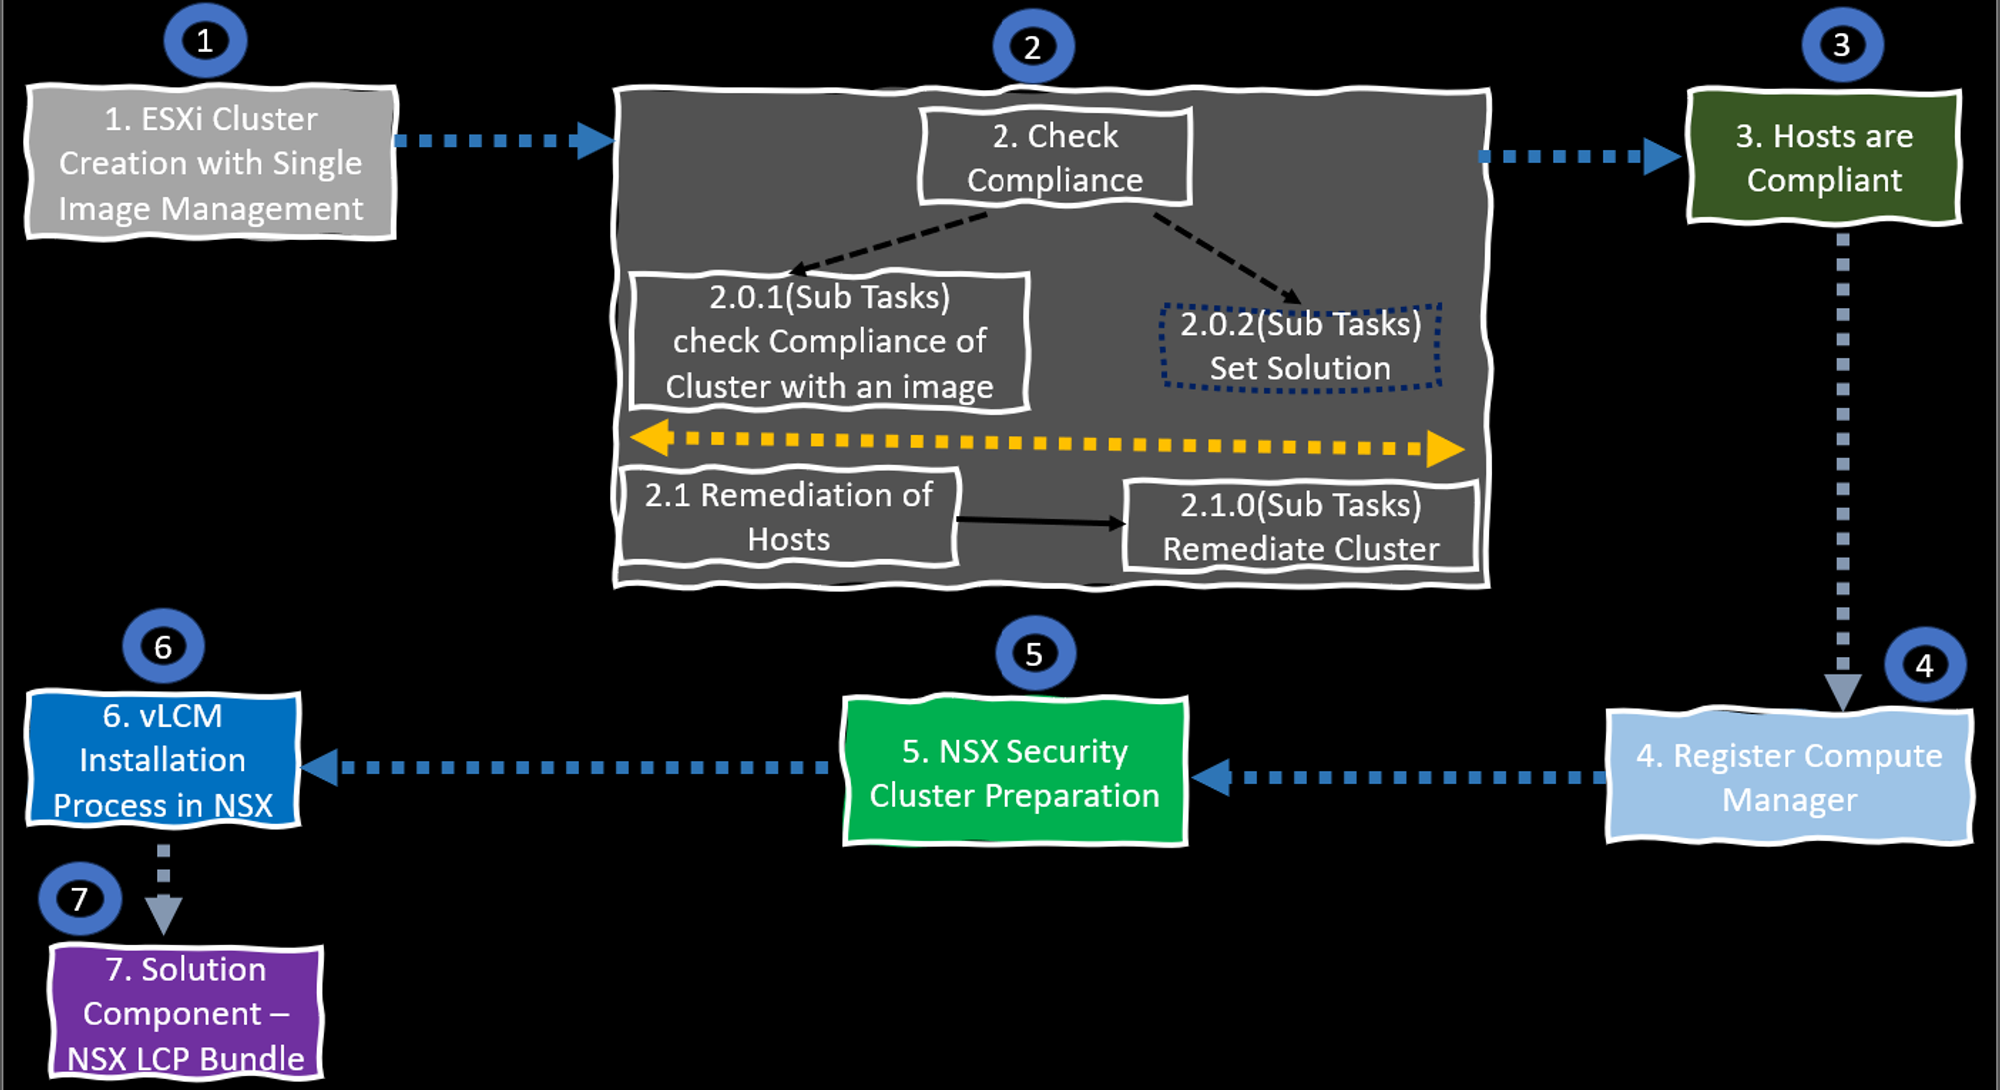
Please find below the series of steps that are being executed in the ongoing workflow:
1.ESXi Cluster Creation with Single Image Management
2. Check Image Compliance- Check compliance of Cluster with image, Set Solution.
2.1.Remediate of hosts, Remediate Cluster.
3. hosts are Compliant.
4. Register Compute Manager.
5. NSX Security Clusters.
6.vLCM Installation Process in NSX.
7. Solution Component – NSX LCP Bundle.
It is important to adhere to these steps in order to ensure the successful completion of the workflow.
ESXi Cluster Creation with Single Image Management: –
Capture 1: –
As Shown in Capture 1, We can see the below details:-
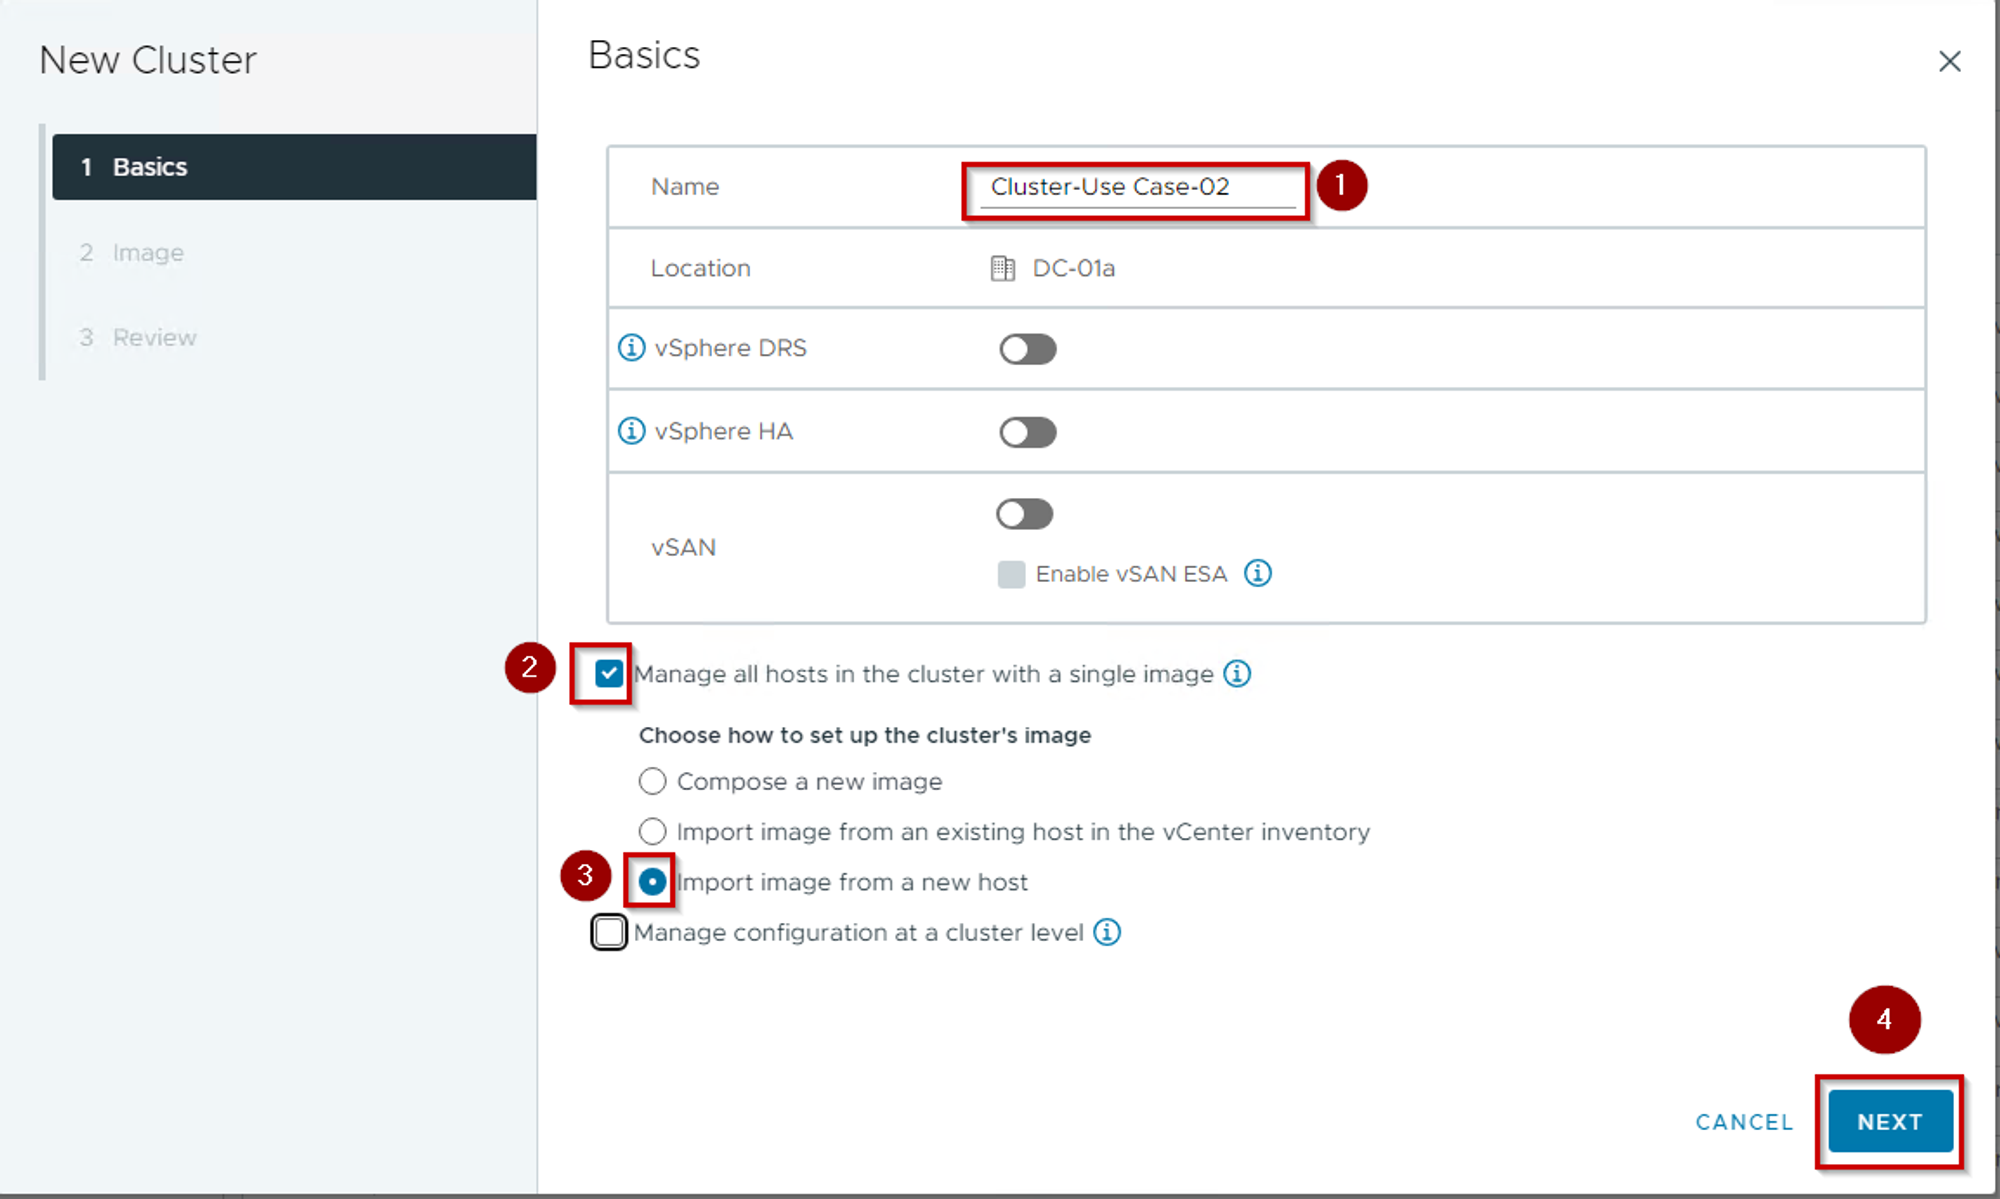
Step 1. Gives the name of the Cluster. During writing this blog am using the Cluster name”Cluster-Use-case-02″.
Step 2. Select the Radio button in front of the Manage all hosts in the cluster with a single image.
Step 3. Select the Radio button in front of the Import image from a new host.
Step 4. Click on Next.

Step 5. Verify the host you have selected.
Step 6. Select the Radio button in front of the Also move selected host to cluster.
Step 7. Click on Next.
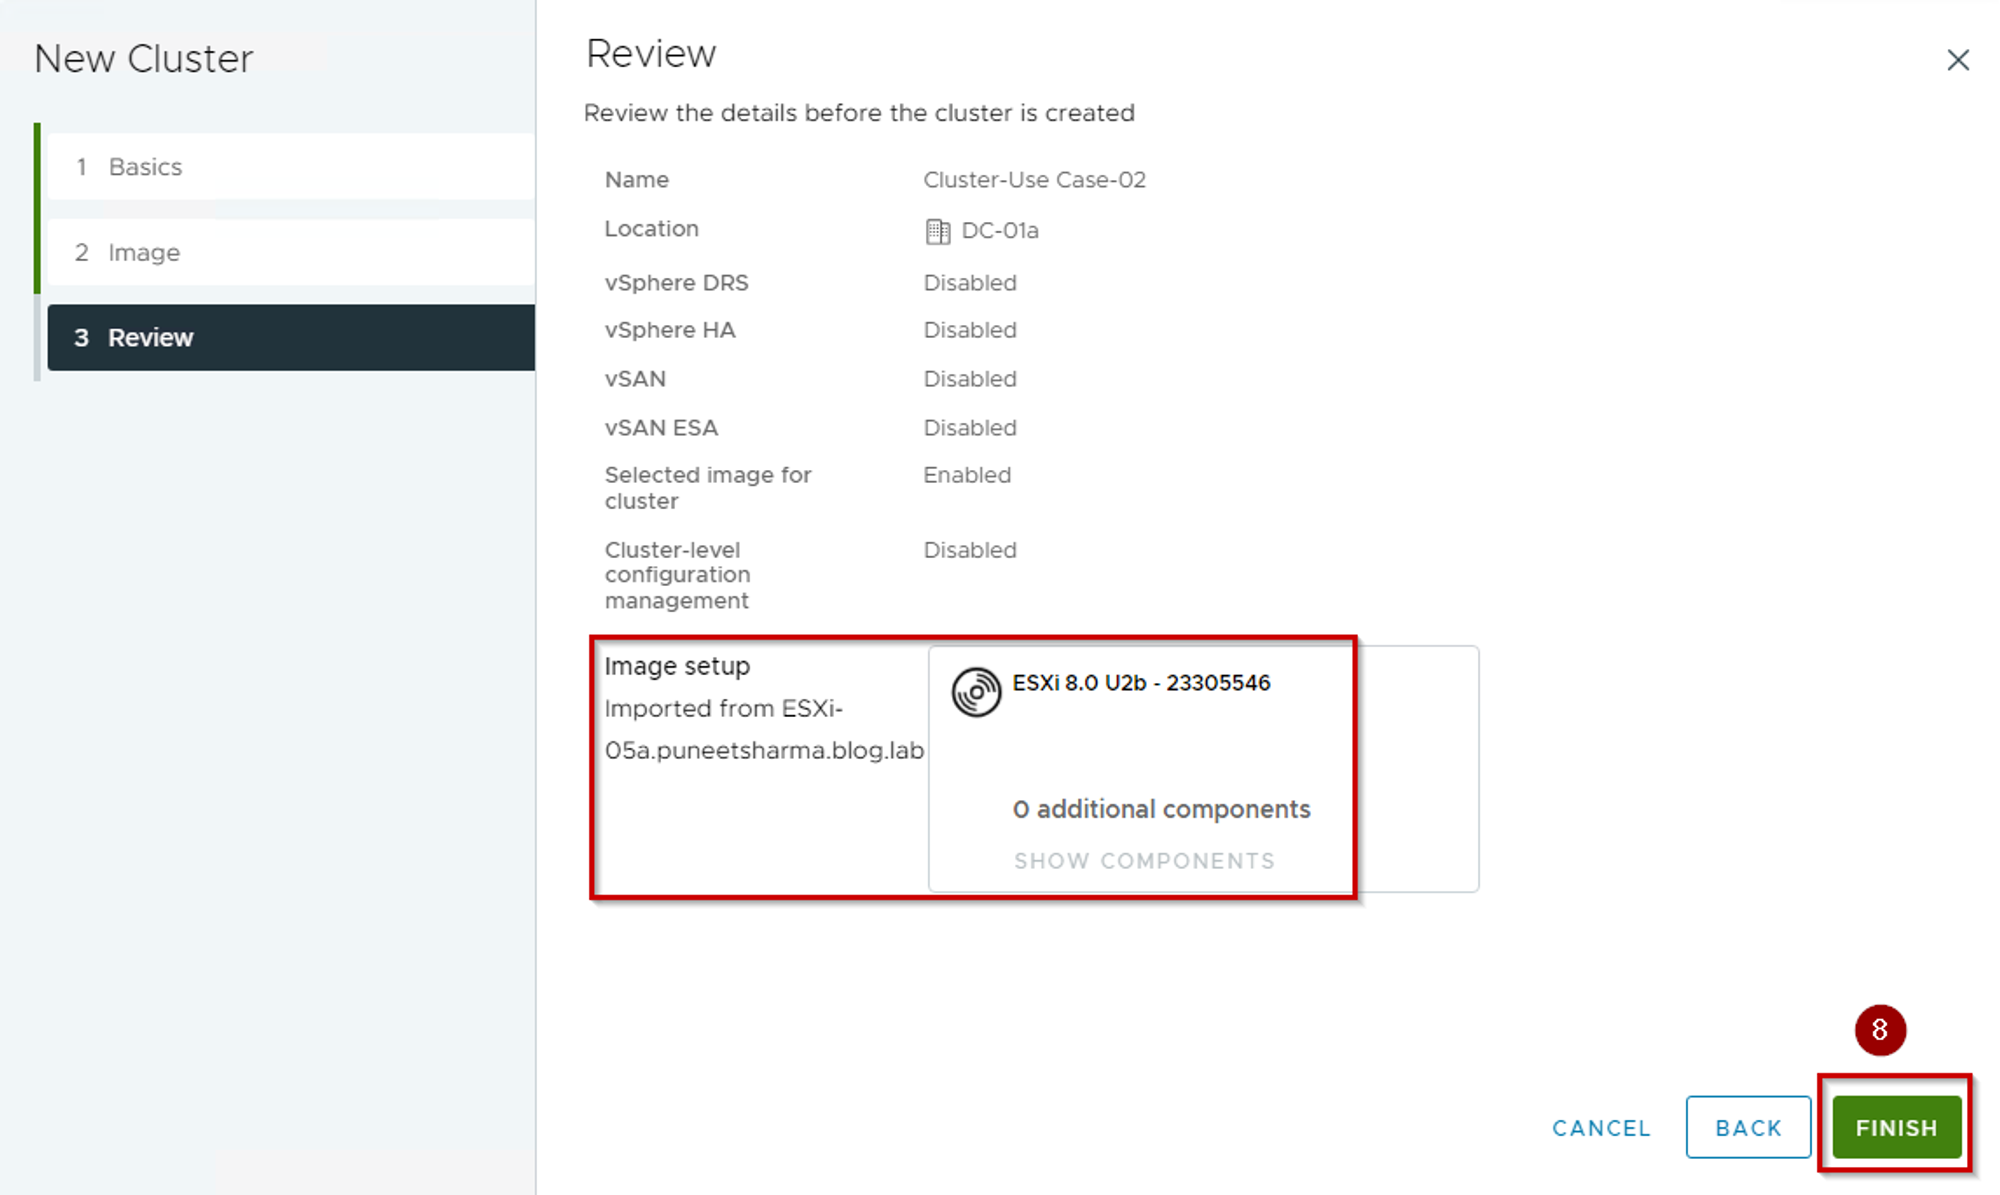
Step 8. Click on Finish.
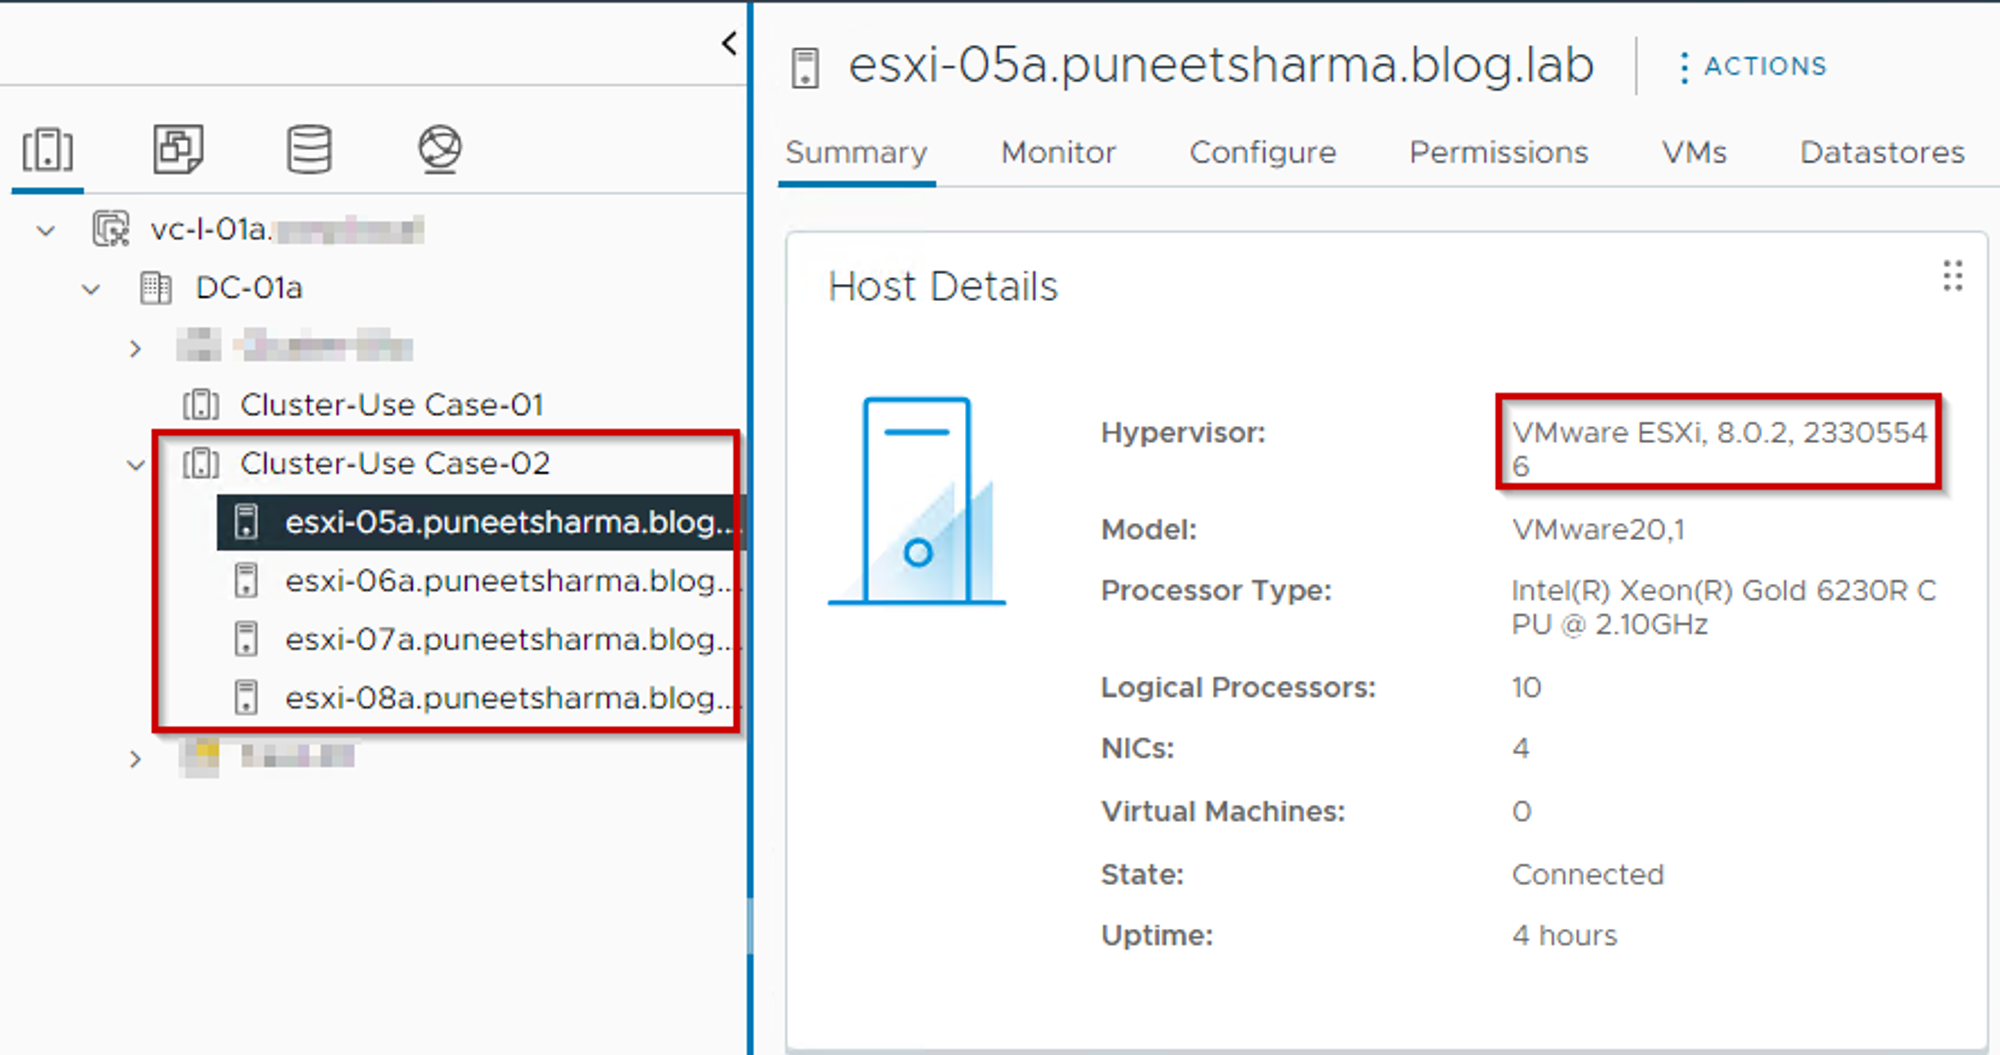
As we can see the 04 no’s of hosts are successfully added under the Cluster -Use Case-02 with same host image & build Version.
Check Compliance:-
Capture 2:-
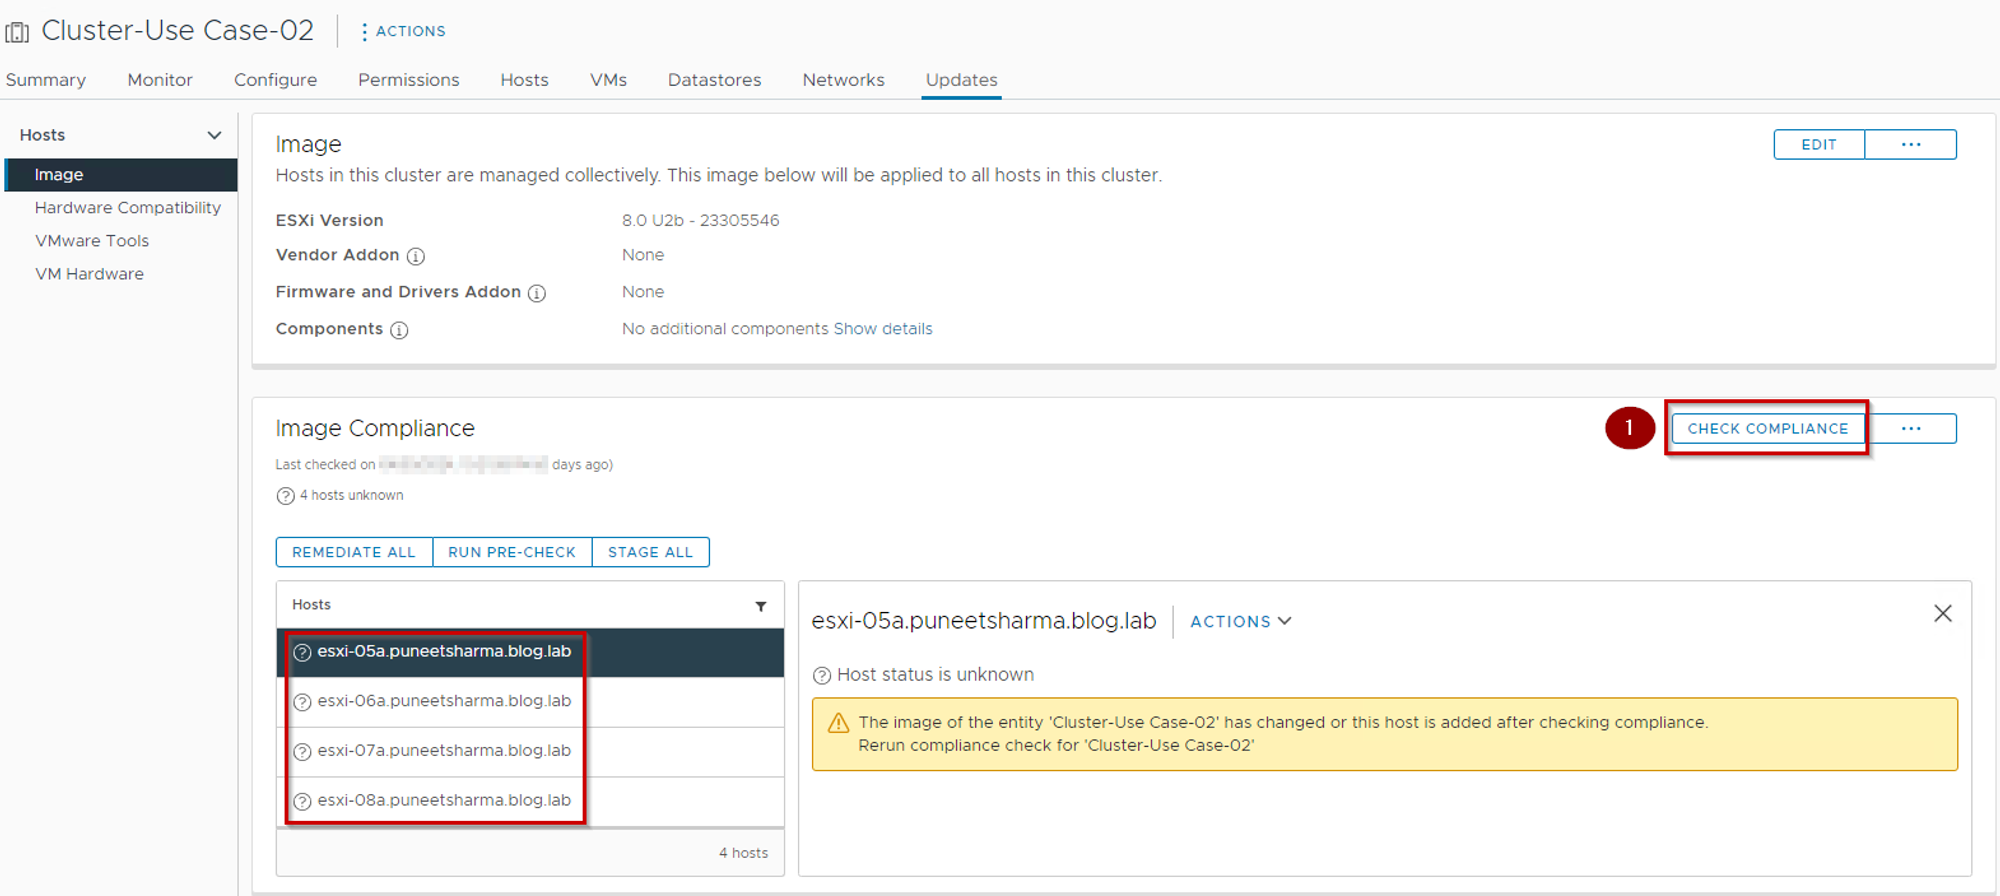
As Shown in Capture 2, We can see the below details:-
Step 1. Click on “Check Compliance”.
Note:- In the background to comply with the “Check Compliance” the “Set Solution” and “Check compliance of Cluster with image” tasks should be completed successfully then it is allowed to proceed with the remediation step.
Step 2. Click on Remediate All.
Step 3. Click on Radio Button in front of the “I Accept VMware General Terms” .
Step 4. Click on Start Remediation.
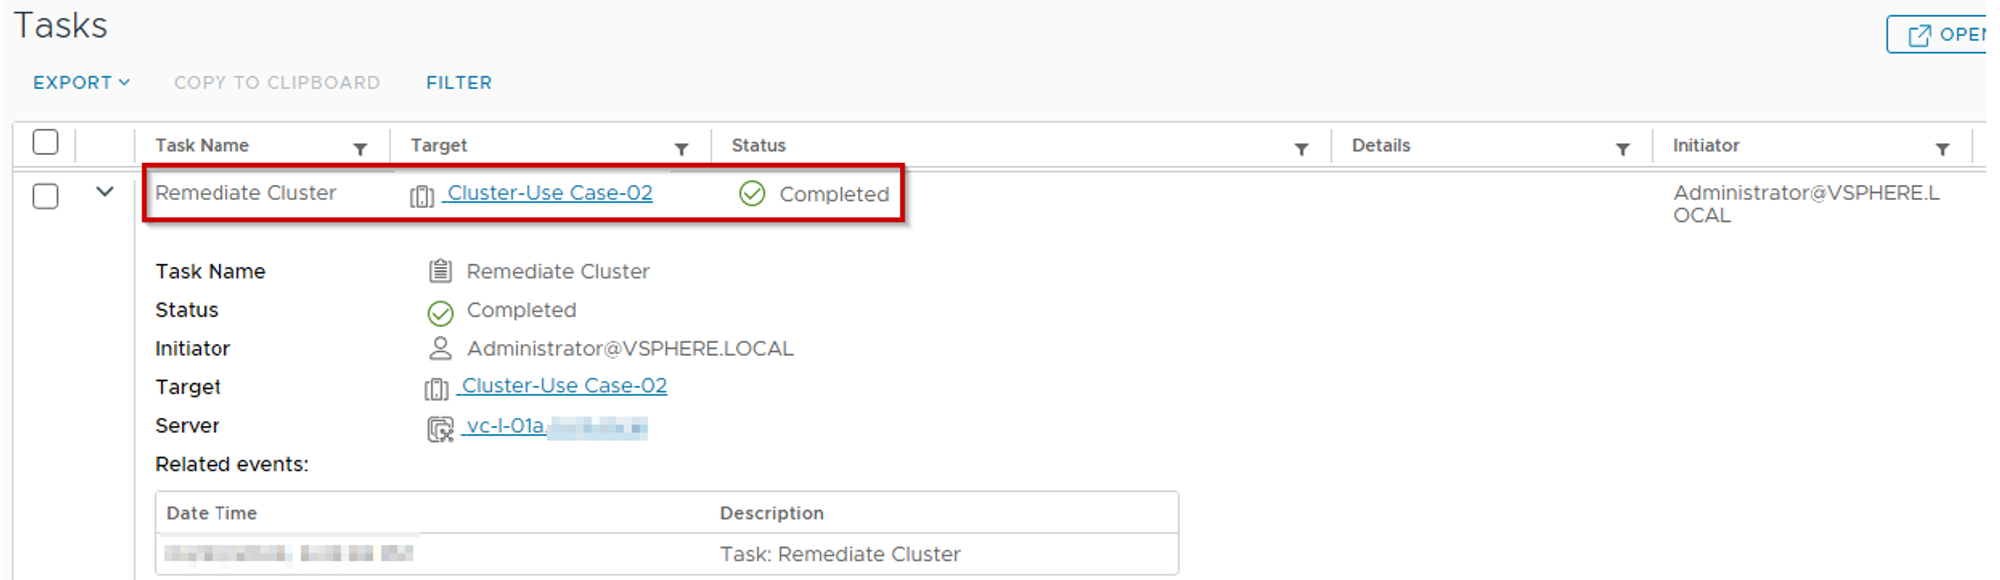
Note: – This task involves conducting three vital checks: “Check cluster health,” “Check Compliance of Cluster with image,” and “Check Compliance of host with image.” The objective is to ensure that the cluster is compliant with the image and that the host is compliant with the cluster.
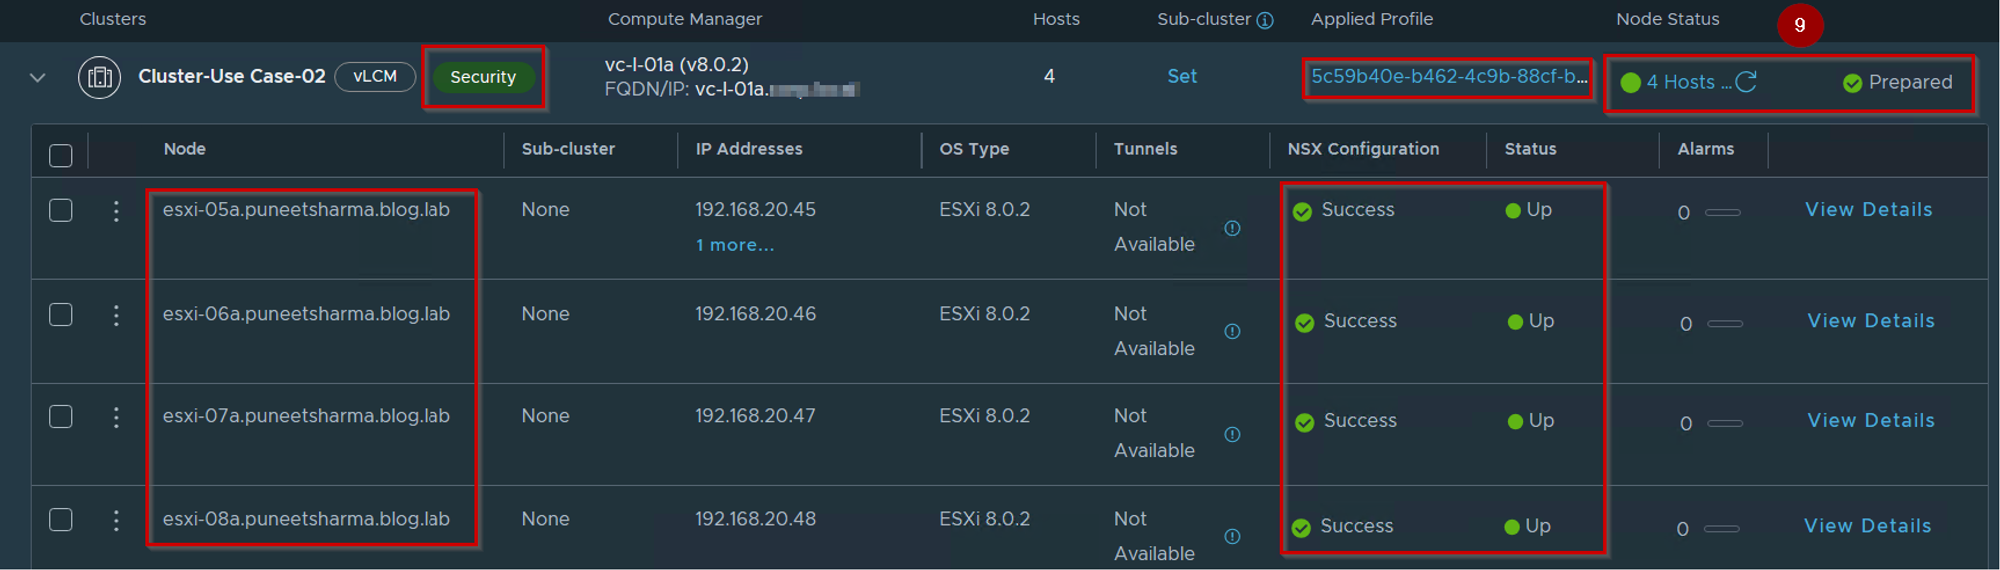
Hosts are Compliant: –
Capture 2.1: –

As Shown in Capture 2.1, We can see the below details:-
Step 5. All hosts in the cluster are complaint.
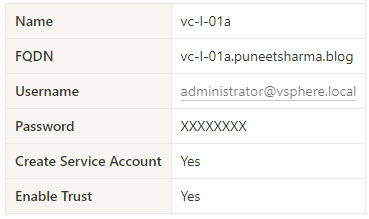
Register Compute Manager: –
Capture 3: –

As Shown in Capture 3, we are registering the Compute Manager.
Step 1. Click on System
Step 2. Click on Compute Manager under Fabric
Step 3. Click on edit and fill in the required details: –
Capture 3.1: –

As Shown in Capture 3.1, we are Successfully registered the Compute Manager.
NSX Security Cluster Preparation: –
Capture 4:-
As shown in capture 4, we can see the below details:
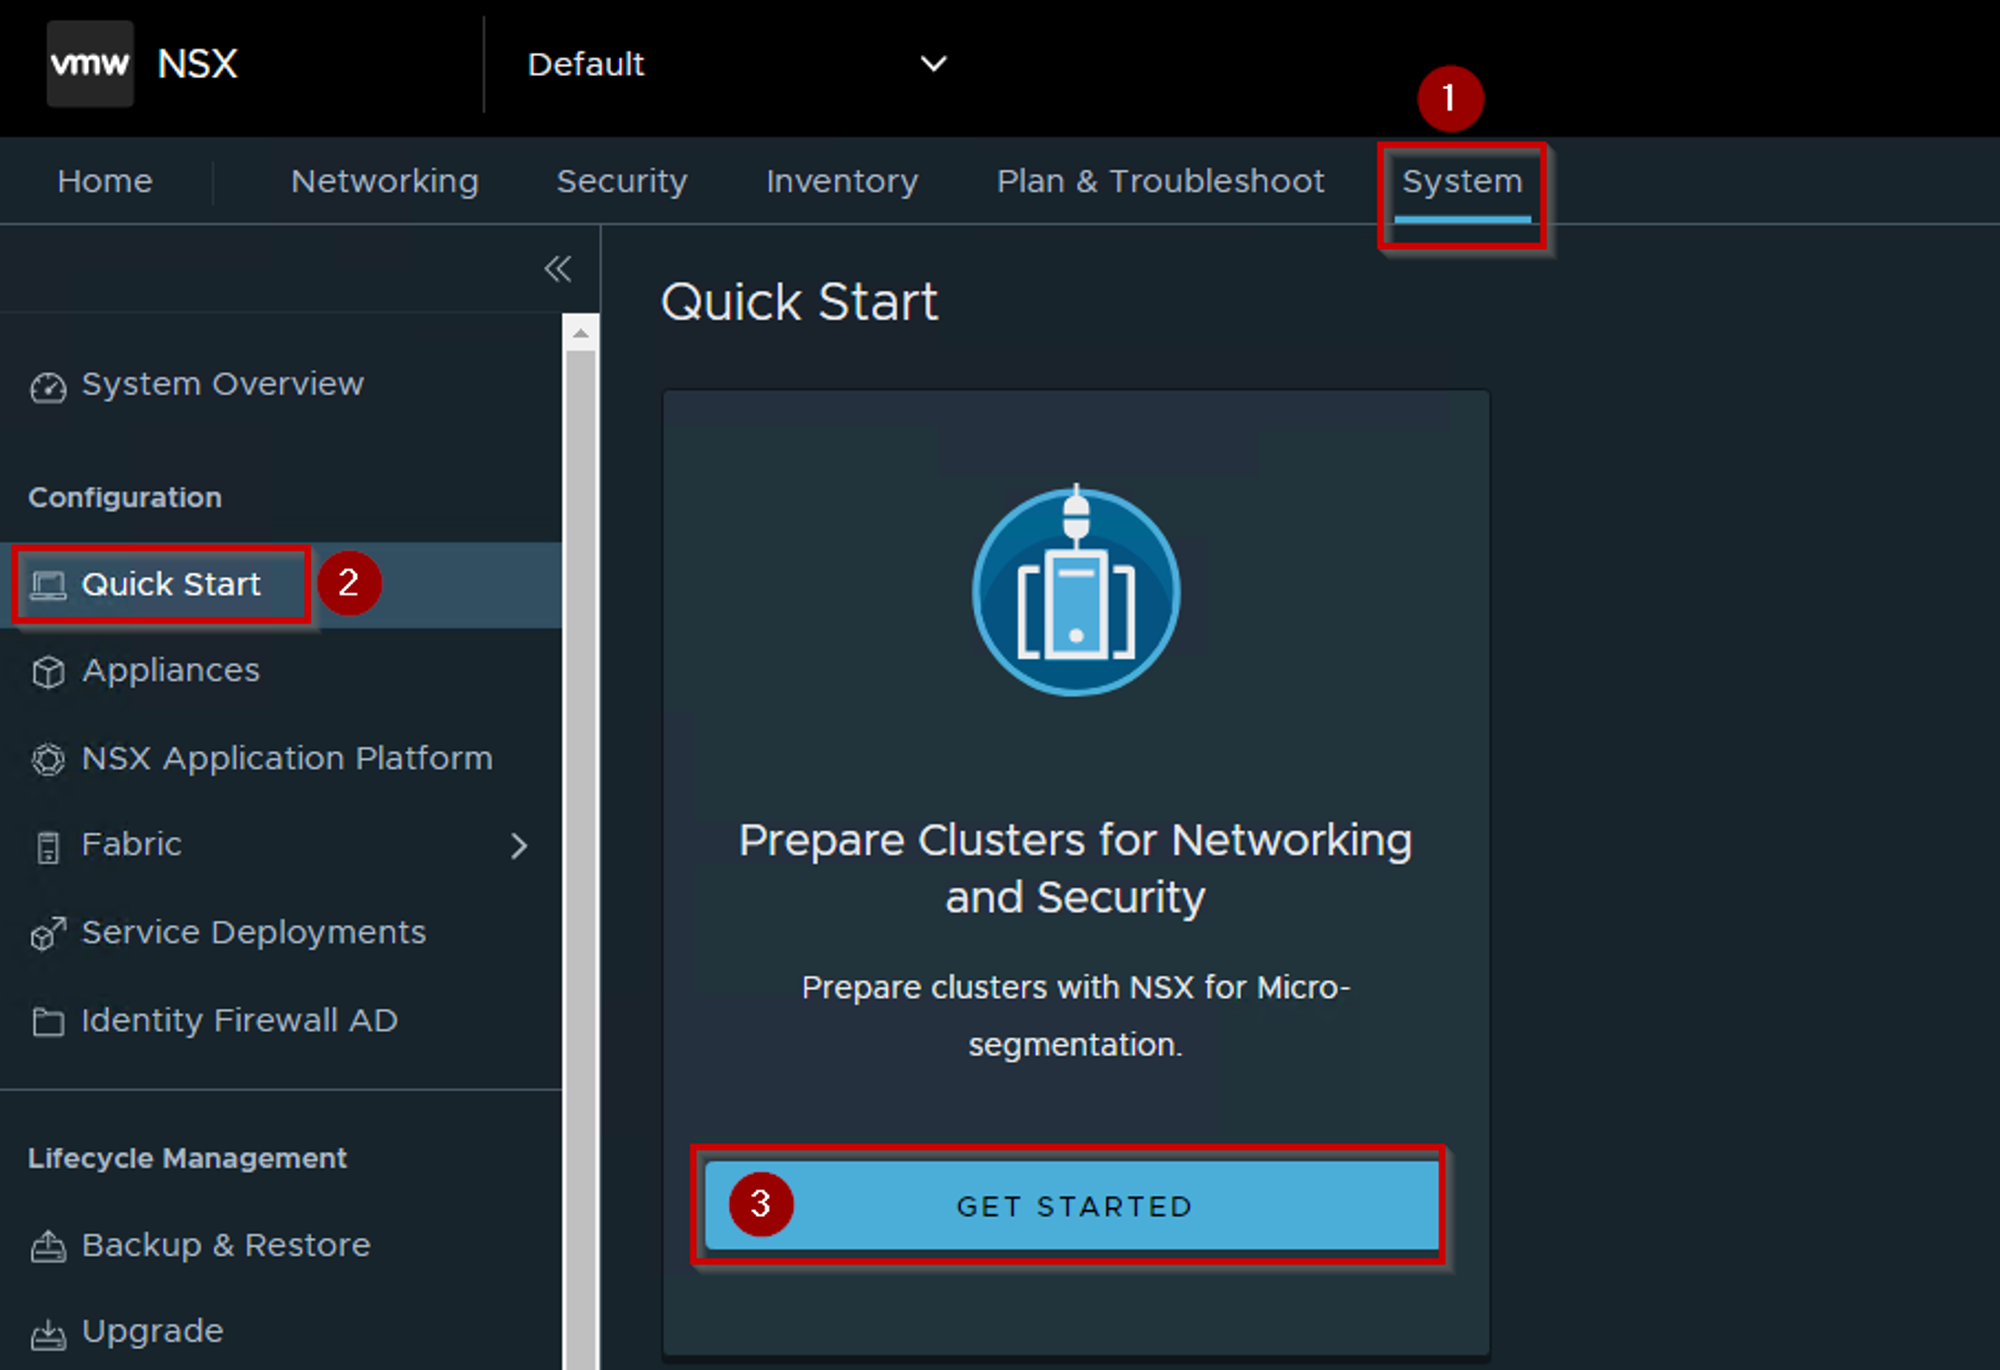
Step 1. Click on System .
Step 2. Click on Quick Start
Step 3. Click on Get Started.
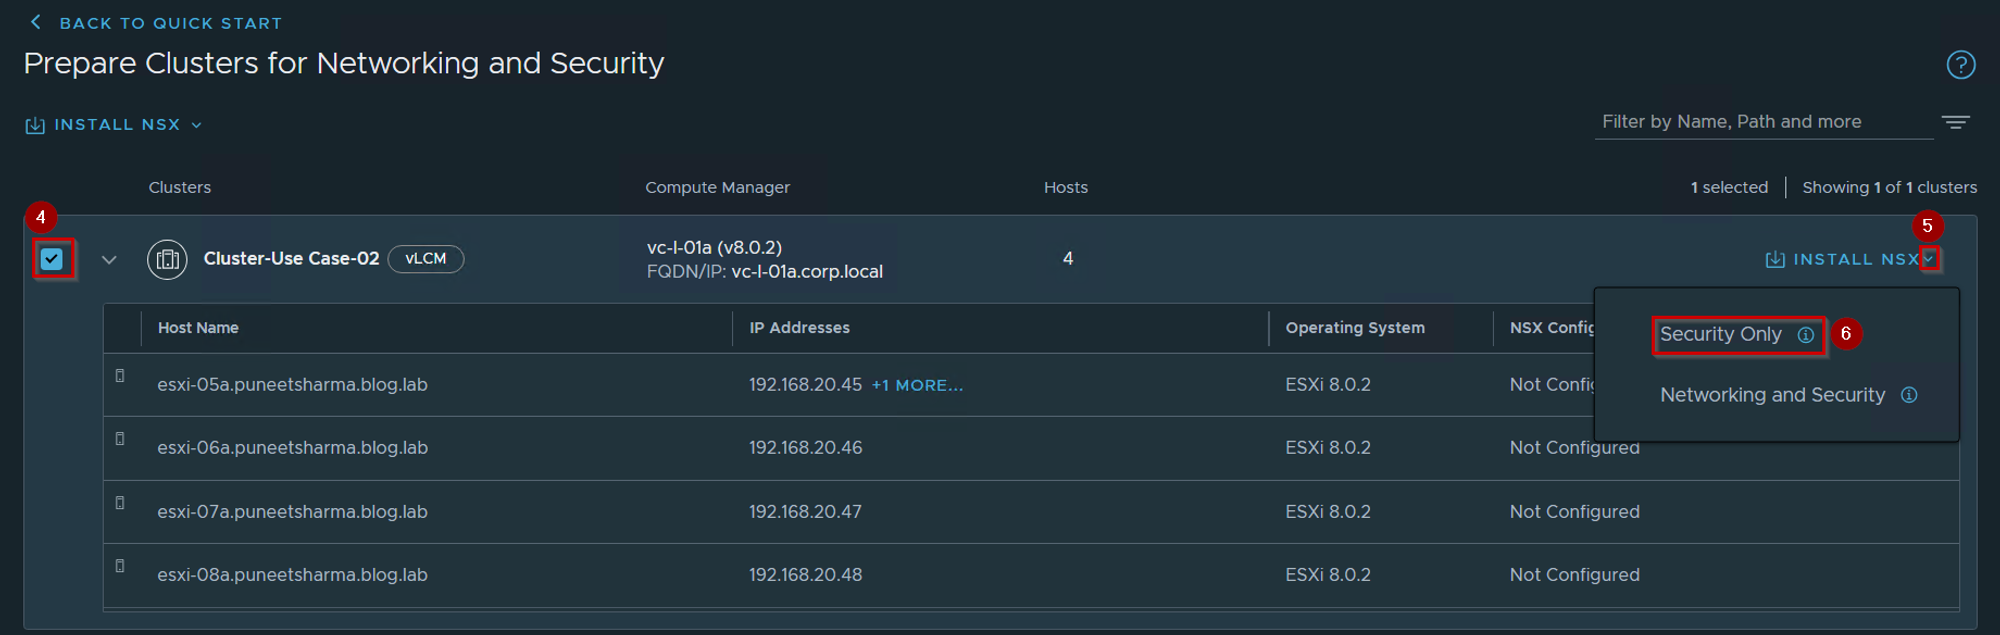
Step 4. Click on radio Button in front of cluster name.
Step 5. Click on Arrow slider after the Install NSX.
Step 6. Click on Security only.
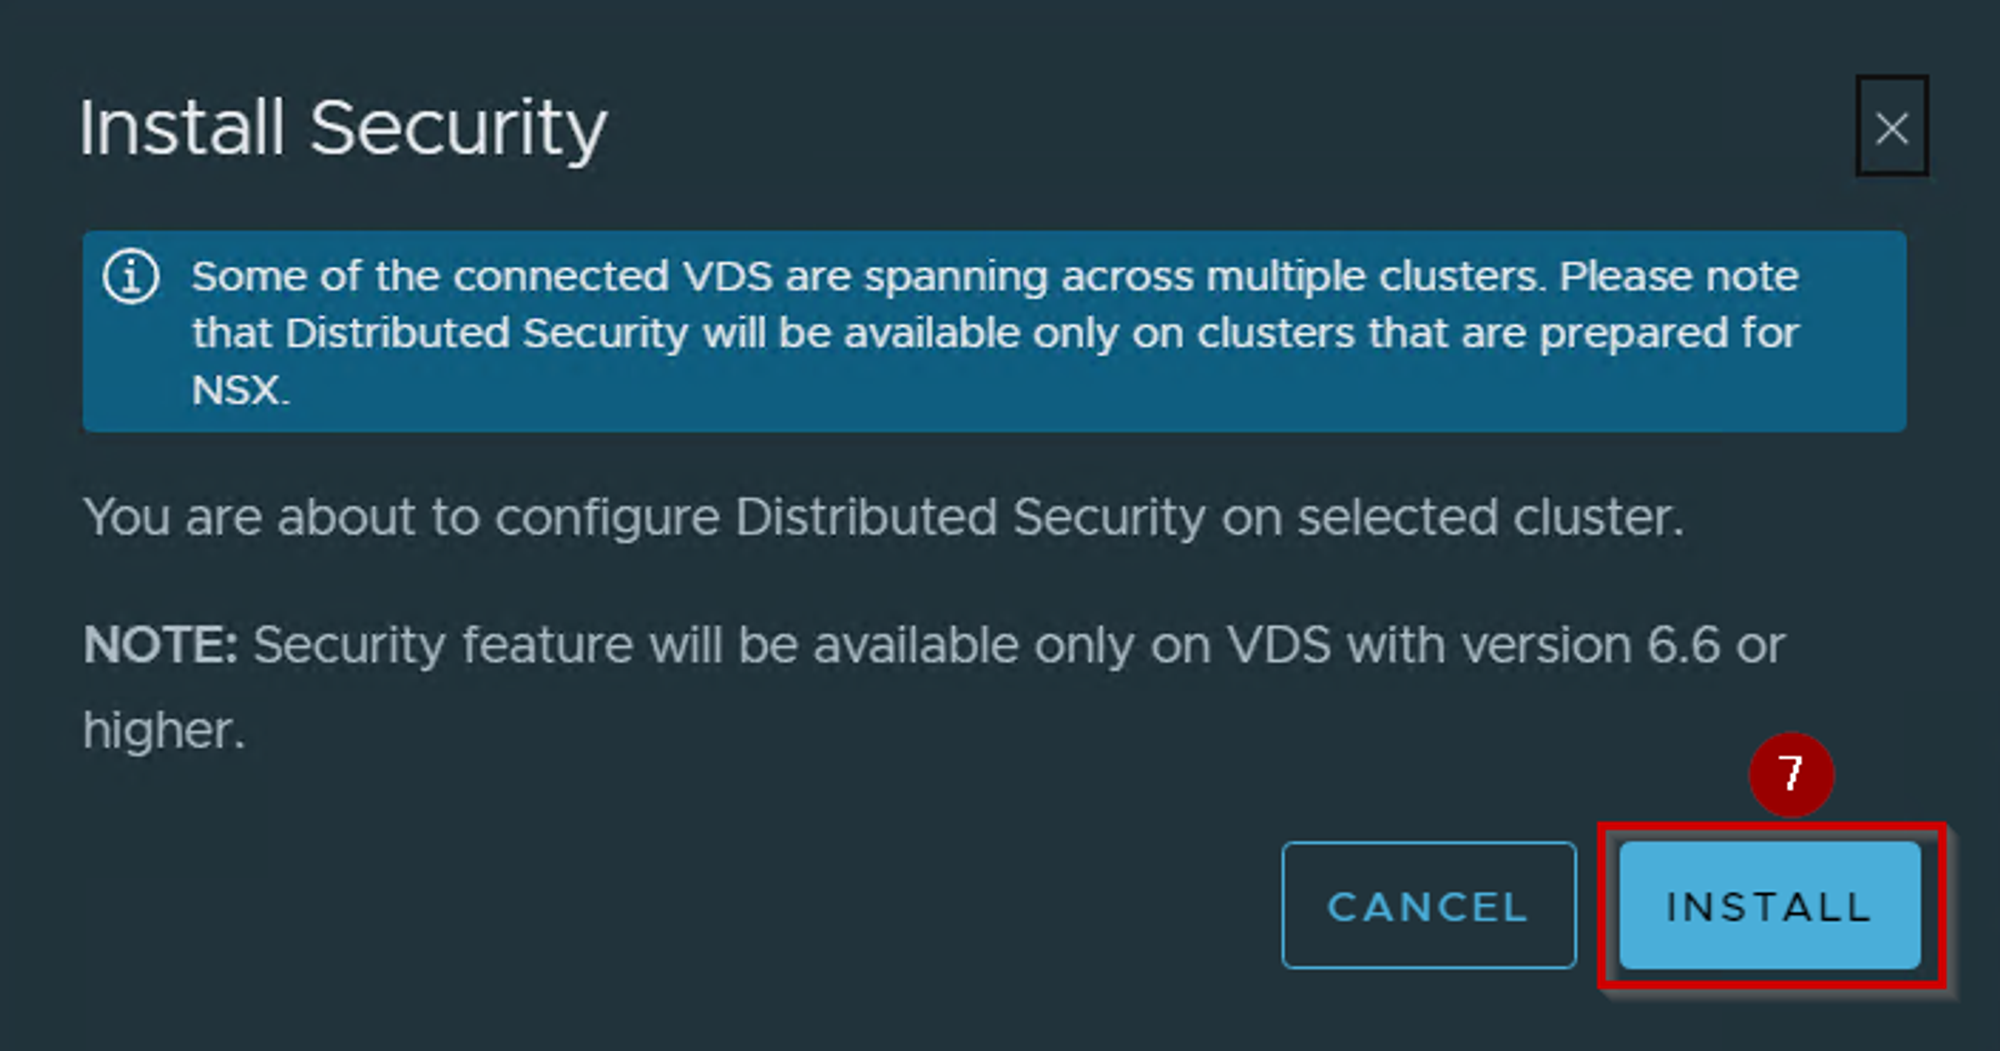
Step 7. Click on Install.

Step 8. We can see the TNP will be auto associated.
The following is a comprehensive guide to the 9 stages of NSX installation on a vLCM-enabled cluster. This guide provides a detailed account of the installation process, enabling you to implement NSX with confidence.
Step 9. We can see the 4 no’s of hosts are successfully prepared for security only solution.
Solution Component-NSX LCP Bundle: –
Capture 5: –
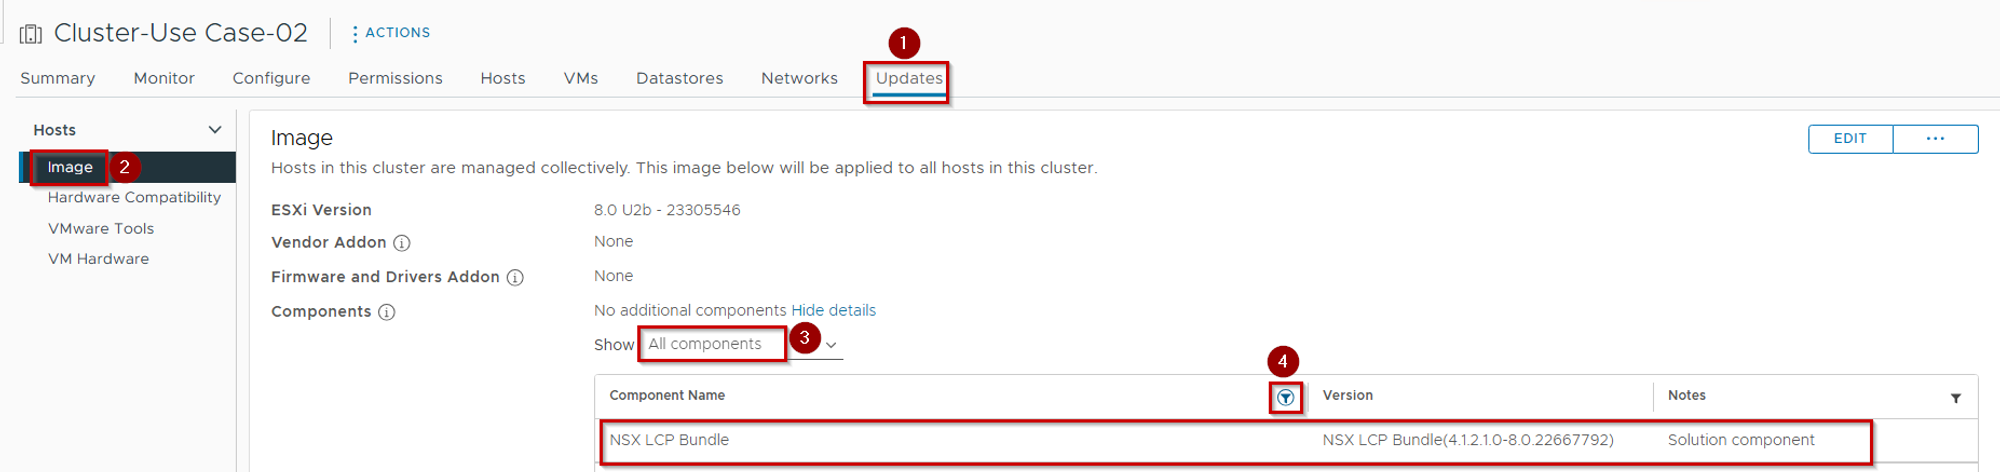
As shown in capture 5, we can see the below details:
Step 1. Click on Updates.
Step 2. Click on Images.
Step 3. Select the All components under Show
Step 4. Click on Filter and write down the NSX and now we can see the NSX LCP Bundle as a solution component.
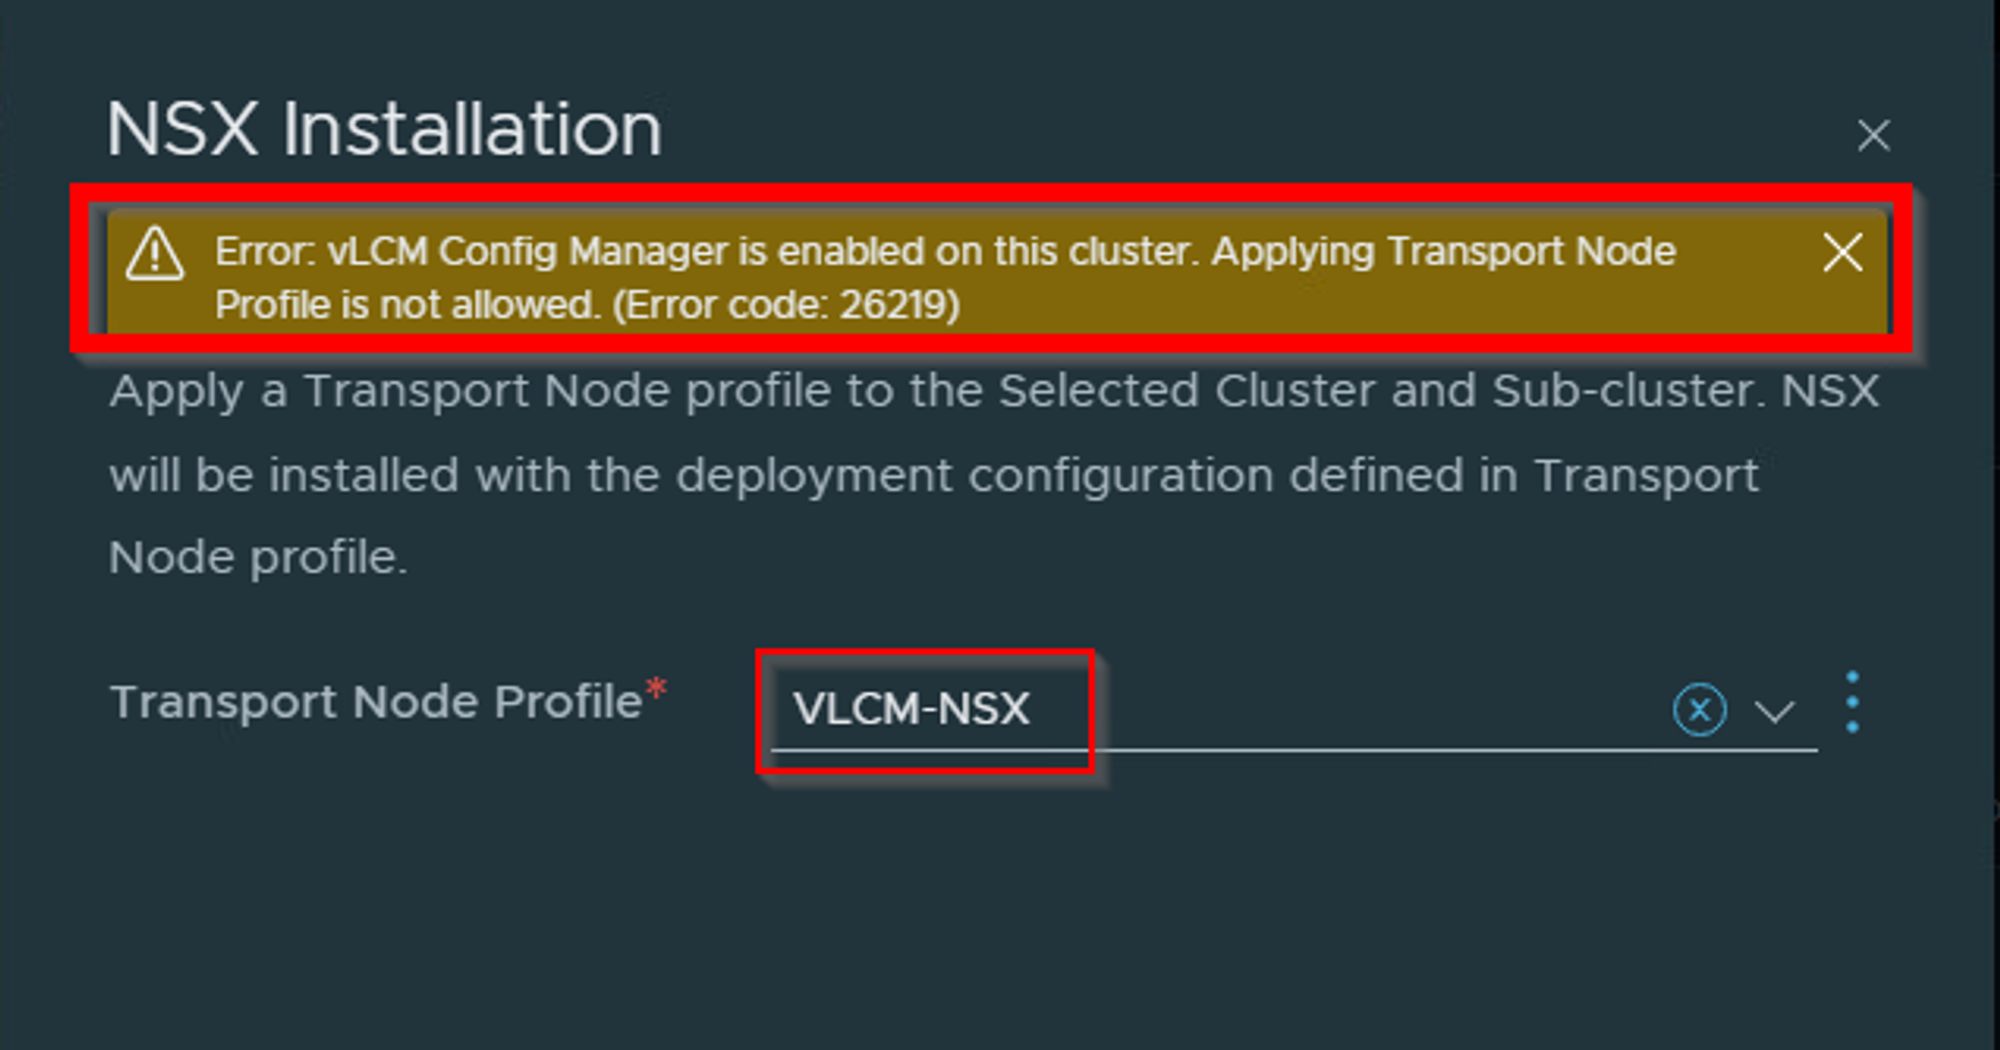
Unsupported Use Case:
- If vSphere Lifecycle Manager is enabled on an ESXi cluster, then you cannot apply an NSX transport node profile to prepare the cluster hosts as transport nodes.
In the event that vSphere Lifecycle Manager is enabled on an ESXi cluster, it is imperative to note that the application of an NSX transport node profile to prepare the cluster hosts as a Network & security transport nodes is unfeasible. An error will ensue in the event that this process is attempted. It is therefore necessary to disable vSphere Lifecycle Manager to proceed with the configuration of the ESXi cluster as an NSX transport node.
“Error: vLCM config manager is enabled on this Cluster. Applying transport node profile is not allowed (Error code: 26219)”
Click here to get more insight about this unsupported use case.
Conclusion
The vSphere Lifecycle Manager (VLCM) feature relies on a desired state, which is stored in vCenter (VC). This desired state takes inputs from various product components, such as Virtual SAN (VSAN) and NSX, to maintain the “source of truth” of a cluster in a consistent manner. Within VC, VLCM acts as the source of truth for the image on a cluster. In contrast, in NSX, a Transport Node Profile (TNP) is applied to a cluster. When a TNP is applied to a vLCM-enabled cluster, the VLCM desired state reads and stores the TNP as a source of truth for all NSX image information, ensuring consistency throughout the cluster. Additional scenarios exist for NSX with vLCM, and warrant exploration click here.

Leave a reply to NSX-T deployment on vLCM enabled cluster – El cancanucho Cancel reply